Are you tired of staring at the same old walls, feeling uninspired by your living space? 🏠 Imagine walking into a room that instantly lifts your mood, reflects your personality, and makes you feel truly at home. It’s not just a dream – it’s entirely possible with the right interior design know-how!
Whether you’re a design novice or a seasoned decorator, there are secrets that can transform any space from drab to fab. These aren’t just quick fixes; they’re time-tested techniques used by professional designers to create stunning interiors. From the subtle power of color psychology to the transformative effect of strategic lighting, we’re about to unveil seven game-changing interior design secrets that will revolutionize your space.
Ready to embark on a journey of design discovery? Let’s dive into the world of color mastery, lighting magic, furniture feng shui, and more. These seven secrets will not only change how you see your space but also how you live in it. Get ready to unlock the potential of your home and create an environment that truly speaks to you! 🗝️✨
Harness the Power of Color
Choose a cohesive color palette
When it comes to transforming your space, choosing a cohesive color palette is the foundation of successful interior design. A well-thought-out color scheme can tie your entire room together, creating a harmonious and visually appealing environment. To achieve this, consider the following tips:
-
Start with inspiration: Look for inspiration in nature, art, or even your favorite piece of clothing. This can help you identify colors that resonate with you and set the tone for your space.
-
Consider the room’s purpose: Different colors evoke different emotions and can affect behavior. For example, calming blues and greens are ideal for bedrooms, while energizing yellows and oranges work well in living areas or home offices.
-
Use a color wheel: Understanding color theory can help you create balanced and harmonious color schemes. Here are some popular color combinations:
- Monochromatic: Various shades and tints of a single color
- Analogous: Colors that are adjacent on the color wheel
- Complementary: Colors that are opposite each other on the color wheel
- Triadic: Three colors that are evenly spaced on the color wheel
-
Take into account existing elements: Consider the colors of your flooring, furniture, and architectural features when selecting your palette.
-
Test before committing: Use paint swatches or samples to see how colors look in your space under different lighting conditions.
Here’s a table showcasing some popular color palette ideas:
| Style | Primary Color | Secondary Color | Accent Color |
|---|---|---|---|
| Coastal | Soft Blue | Sandy Beige | Coral |
| Modern | White | Gray | Black |
| Bohemian | Terracotta | Mustard Yellow | Teal |
| Scandinavian | White | Light Gray | Pale Pink |
| Industrial | Charcoal | Rust | Copper |
By carefully selecting a cohesive color palette, you’ll create a strong foundation for your interior design project, ensuring that all elements work together harmoniously.
Use the 60-30-10 rule
The 60-30-10 rule is a timeless interior design principle that helps create balanced and visually appealing spaces. This rule provides a simple formula for distributing colors throughout a room, resulting in a cohesive and professional look. Here’s how to apply this rule effectively:
-
60% – Dominant Color:
- This is your main color, typically used for walls, large pieces of furniture, or flooring.
- Choose a neutral or softer hue to create a calming backdrop.
- Examples: light gray, beige, or a muted blue.
-
30% – Secondary Color:
- This color complements the dominant color and adds visual interest.
- Use it for smaller furniture pieces, curtains, or an accent wall.
- Choose a color that contrasts with the dominant color but still harmonizes.
-
10% – Accent Color:
- This is your bold, eye-catching color used sparingly for maximum impact.
- Incorporate it through accessories, artwork, or small decor items.
- This color can be vibrant and daring, adding personality to the space.
Implementing the 60-30-10 rule:
- Start by selecting your three colors based on your chosen palette.
- Apply the dominant color to the largest surfaces in the room.
- Introduce the secondary color through medium-sized elements.
- Add pops of the accent color strategically throughout the space.
Benefits of using the 60-30-10 rule:
- Creates visual balance and harmony
- Simplifies the color selection process
- Ensures a professional and polished look
- Allows for easy updates by changing accent pieces
- Provides a framework for cohesive design across multiple rooms
Here’s an example of how to apply the 60-30-10 rule in different room styles:
| Room Style | 60% (Dominant) | 30% (Secondary) | 10% (Accent) |
|---|---|---|---|
| Modern | White walls | Gray furniture | Black accessories |
| Rustic | Warm beige walls | Brown wood tones | Deep red accents |
| Coastal | Soft blue walls | Sandy beige furniture | Coral decorative items |
| Eclectic | Light gray walls | Navy blue furniture | Gold metallic accents |
Remember, while the 60-30-10 rule is an excellent guideline, it’s not set in stone. Feel free to adjust the percentages slightly to suit your personal style and the specific needs of your space. The key is to maintain a sense of balance and hierarchy among your chosen colors.
Create mood with color psychology
Color psychology plays a crucial role in interior design, as different colors can evoke specific emotions and influence behavior. By understanding the psychological effects of colors, you can create spaces that not only look beautiful but also support the desired mood and functionality of each room. Let’s explore how to harness the power of color psychology in your interior design:
-
Warm Colors:
- Red: Stimulates energy, appetite, and passion. Ideal for dining rooms or as an accent in social spaces.
- Orange: Promotes enthusiasm and creativity. Great for home offices or playrooms.
- Yellow: Evokes happiness and optimism. Perfect for kitchens or entryways.
-
Cool Colors:
- Blue: Induces calm and relaxation. Excellent for bedrooms or bathrooms.
- Green: Represents nature and promotes balance. Suitable for any room, especially those with a connection to the outdoors.
- Purple: Associated with luxury and creativity. Works well in meditation spaces or as an accent color.
-
Neutral Colors:
- White: Symbolizes cleanliness and purity. Creates a sense of spaciousness and works well in any room.
- Gray: Conveys sophistication and calmness. Versatile for modern or traditional spaces.
- Brown: Represents stability and warmth. Ideal for creating a cozy atmosphere in living rooms or studies.
-
Black: Adds drama and sophistication. Use sparingly as an accent color or in small doses for contrast.
Applying color psychology to different rooms:
-
Living Room:
- Goal: Create a welcoming and relaxing atmosphere
- Recommended colors: Warm neutrals, soft greens, or light blues
- Accent with: Earthy tones or muted jewel colors
-
Bedroom:
- Goal: Promote restfulness and tranquility
- Recommended colors: Soft blues, lavenders, or warm neutrals
- Accent with: Gentle pastels or deep, rich hues for a touch of luxury
-
Home Office:
- Goal: Enhance focus and productivity
- Recommended colors: Soft greens, light blues, or warm neutrals
- Accent with: Energizing yellows or oranges in small doses
-
Kitchen:
- Goal: Stimulate appetite and encourage social interaction
- Recommended colors: Warm whites, soft yellows, or light greens
- Accent with: Bold reds or oranges for energy
-
Bathroom:
- Goal: Create a clean, refreshing environment
- Recommended colors: Whites, light blues, or soft greens
- Accent with: Spa-like neutrals or pops of vibrant colors for energy
Tips for using color psychology effectively:
- Consider the room’s purpose and desired atmosphere before selecting colors.
- Use bold colors sparingly to avoid overwhelming the space.
- Experiment with different shades and tints of a color to create depth and interest.
- Balance warm and cool colors to create a harmonious environment.
- Use neutral colors as a base and add pops of color through accessories for easy updates.
Here’s a quick reference table for color psychology in interior design:
| Color | Psychological Effect | Best Used In |
|---|---|---|
| Red | Energy, passion | Dining rooms, accents |
| Blue | Calm, relaxation | Bedrooms, bathrooms |
| Yellow | Happiness, optimism | Kitchens, entryways |
| Green | Balance, nature | Any room, especially with outdoor views |
| Purple | Creativity, luxury | Meditation spaces, accents |
| Orange | Enthusiasm, creativity | Home offices, playrooms |
| White | Cleanliness, spaciousness | Any room as a base color |
| Gray | Sophistication, calmness | Modern or traditional spaces |
| Brown | Stability, warmth | Living rooms, studies |
By understanding and applying color psychology in your interior design, you can create spaces that not only look visually appealing but also support the emotional and functional needs of each room. Remember that personal preferences and cultural associations can also influence how colors are perceived, so always consider the individual tastes of those who will be using the space.
Now that we’ve explored how to harness the power of color in interior design, let’s move on to another crucial aspect of transforming your space: mastering the art of lighting. Proper lighting can enhance your chosen color palette and create the perfect ambiance in any room.
Master the Art of Lighting
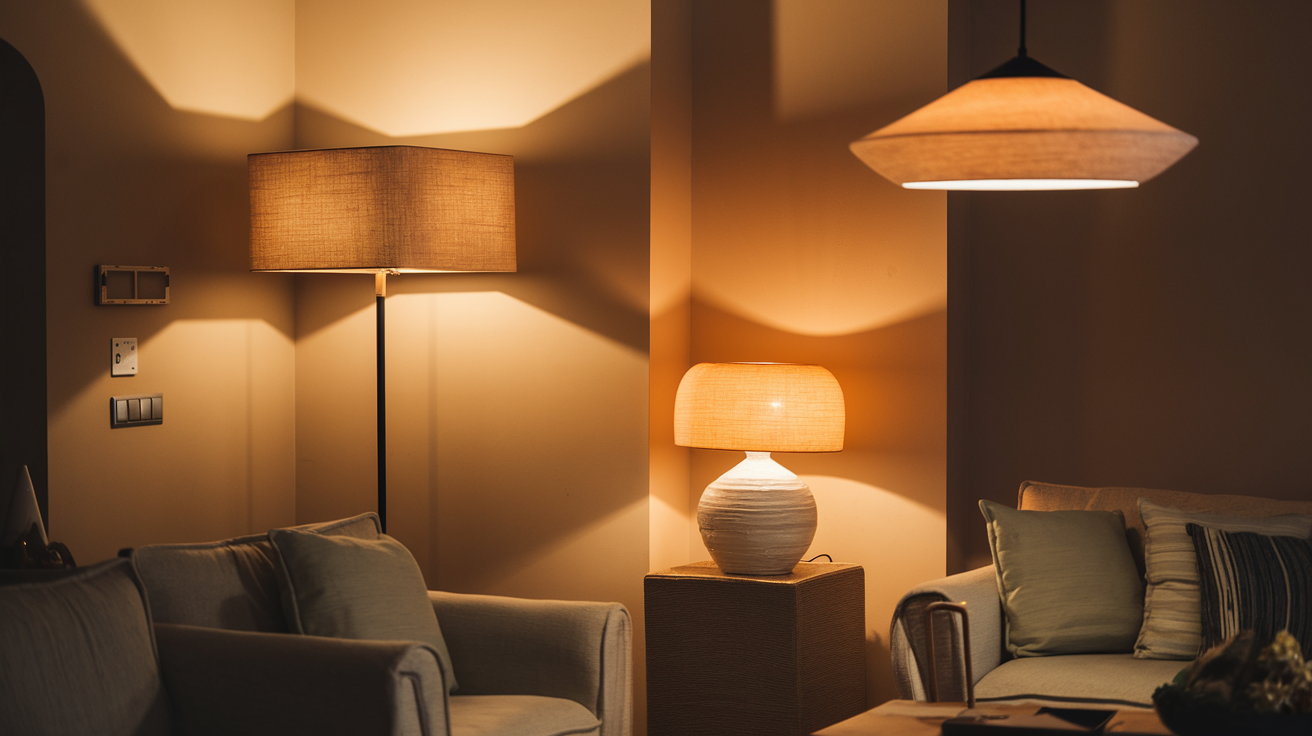
Layer different types of lighting
When it comes to transforming your space, mastering the art of lighting is crucial. One of the most effective ways to do this is by layering different types of lighting. This technique not only enhances the functionality of your space but also creates depth and ambiance.
There are three main types of lighting to consider:
- Ambient lighting: This is your general, overall illumination.
- Task lighting: Focused light for specific activities.
- Accent lighting: Used to highlight particular features or create atmosphere.
Let’s explore how to effectively layer these lighting types:
Ambient Lighting
Ambient lighting serves as the foundation of your lighting scheme. It provides overall illumination and sets the tone for the entire room. Common sources of ambient lighting include:
- Ceiling-mounted fixtures
- Recessed lights
- Wall sconces
- Floor lamps with upward-facing shades
To create a well-balanced ambient lighting scheme, consider the size and purpose of your room. For larger spaces, you may need multiple sources of ambient light to ensure even coverage.
Task Lighting
Task lighting is essential for areas where specific activities take place. It helps reduce eye strain and improves functionality. Examples of task lighting include:
- Desk lamps
- Under-cabinet lights in kitchens
- Reading lamps beside armchairs or beds
- Vanity lights in bathrooms
When incorporating task lighting, think about the activities that typically occur in each area of your room. Place task lights strategically to support these activities without creating harsh shadows or glare.
Accent Lighting
Accent lighting adds drama and visual interest to your space. It’s used to highlight architectural features, artwork, or decorative objects. Some popular accent lighting options are:
- Picture lights
- Wall-mounted directional spots
- LED strip lights
- Candlelight or flameless candles
When using accent lighting, aim for about three times the level of illumination on the focal point compared to the surrounding ambient light. This creates a striking contrast that draws the eye and adds depth to your room.
By skillfully combining these three types of lighting, you can create a dynamic and versatile lighting scheme that adapts to different moods and activities throughout the day.
Choose the right bulbs and fixtures
Selecting the appropriate bulbs and fixtures is crucial for achieving the desired lighting effect in your space. Here’s a guide to help you make informed choices:
Bulb Types
| Bulb Type | Pros | Cons | Best Uses |
|---|---|---|---|
| LED | Energy-efficient, long-lasting, available in various colors | Higher upfront cost | All-purpose lighting |
| CFL | Energy-efficient, affordable | Contains mercury, takes time to reach full brightness | General ambient lighting |
| Incandescent | Warm, familiar light | Energy inefficient, short lifespan | Accent lighting, where dimming is desired |
| Halogen | Bright, white light | Gets hot, less energy-efficient than LED | Task lighting, accent lighting |
When choosing bulbs, consider the color temperature:
- Warm white (2700-3000K): Creates a cozy, inviting atmosphere
- Cool white (3500-4100K): Ideal for workspaces and kitchens
- Daylight (5000-6500K): Best for reading and detailed tasks
Fixture Styles
The style of your light fixtures should complement your overall interior design. Here are some popular fixture styles:
- Modern: Clean lines, minimalist designs
- Traditional: Ornate details, classic shapes
- Industrial: Exposed bulbs, metal finishes
- Bohemian: Colorful, eclectic designs
- Farmhouse: Rustic materials, simple forms
Consider the scale of your fixtures in relation to your room size. A large chandelier can make a statement in a spacious living room, while pendant lights work well over kitchen islands or dining tables.
Incorporate natural light
Natural light is a powerful tool in interior design, offering numerous benefits:
- Enhances mood and productivity
- Makes spaces appear larger and more open
- Reduces energy consumption
- Improves color rendering of objects and surfaces
To maximize natural light in your space:
- Keep windows clean and unobstructed
- Use light-colored or reflective surfaces to bounce light around the room
- Install skylights or sun tubes in darker areas
- Choose window treatments that allow for light control without completely blocking sunlight
For rooms with limited natural light, consider these solutions:
- Use mirrors strategically to reflect available light
- Opt for glass or translucent room dividers to allow light to pass through
- Choose light-colored furniture and decor to brighten the space
- Install “daylight” LED bulbs to mimic natural light
Remember that while natural light is desirable, it’s also important to have options for controlling it. Glare and heat can be issues in rooms with abundant sunlight, so consider installing adjustable blinds or shades.
Use dimmer switches for versatility
Dimmer switches are a game-changer in lighting design, offering unparalleled versatility and control over your lighting scheme. Here’s why you should consider incorporating dimmers into your space:
- Mood setting: Adjust light levels to create the perfect ambiance for any occasion
- Energy savings: Dimming lights reduces energy consumption and extends bulb life
- Customization: Tailor lighting to individual preferences or activities
- Eye comfort: Reduce eye strain by adjusting light intensity as needed
When installing dimmer switches, keep these tips in mind:
- Ensure your bulbs are compatible with dimmer switches (most LEDs and incandescents work well)
- Consider smart dimmers that can be controlled via smartphone or voice commands
- Install dimmers for both ambient and task lighting for maximum flexibility
- Use dimmers in conjunction with layered lighting for a truly customizable lighting scheme
Now that we’ve covered the essentials of lighting design, you’re well-equipped to transform your space with expertly crafted illumination. Remember, good lighting is not just about visibility; it’s about creating atmosphere, enhancing functionality, and showcasing the best features of your home. With these techniques in your arsenal, you’ll be able to create a space that’s not only well-lit but also inviting, comfortable, and uniquely tailored to your needs and style preferences.
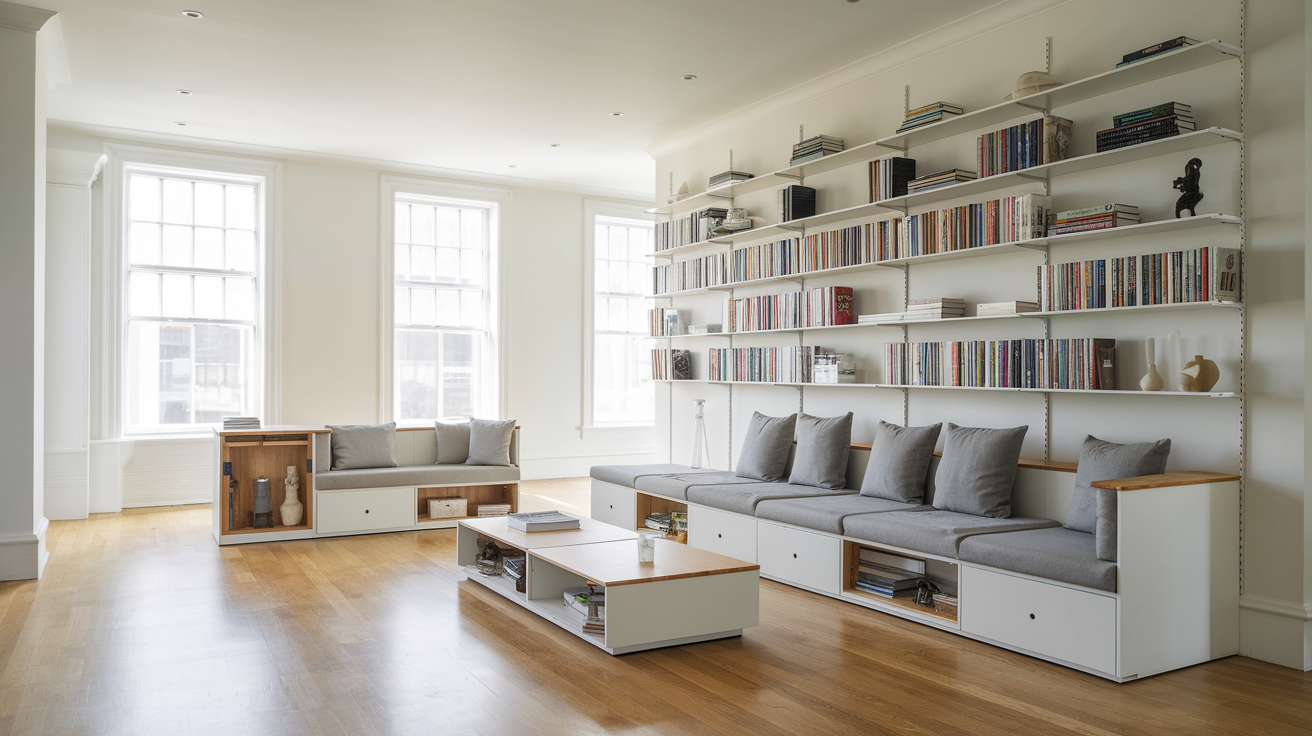
Optimize Furniture Placement
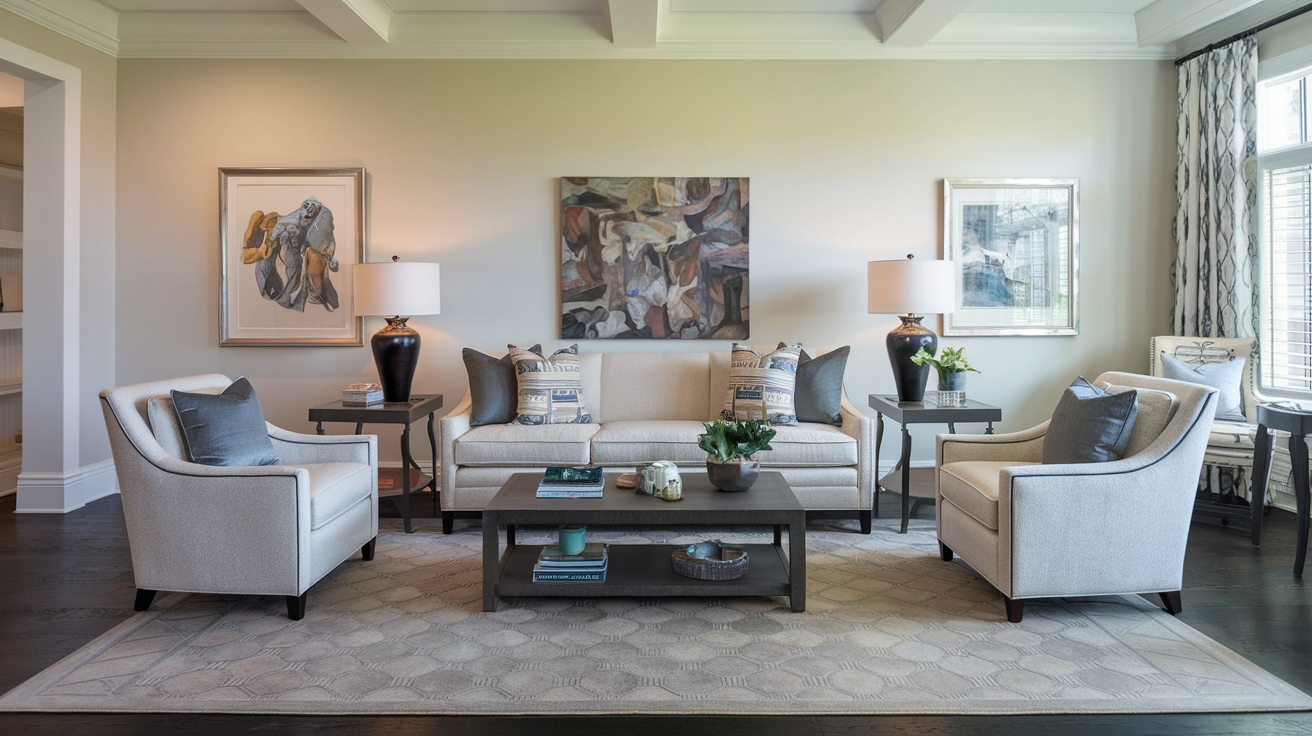
Create a focal point
When it comes to optimizing furniture placement, creating a focal point is an essential first step. A focal point serves as the centerpiece of your room, drawing the eye and anchoring the entire space. This could be a stunning piece of artwork, a grand fireplace, or even a large window with a breathtaking view.
To effectively create a focal point:
- Identify the natural focal point in your room
- Arrange furniture to highlight and complement this feature
- Use lighting to emphasize the focal point
- Keep the area around the focal point clutter-free
For example, if you have a beautiful fireplace, arrange your seating to face it, creating a cozy conversation area. If your focal point is a large window, position a comfortable reading chair nearby to take advantage of the natural light and view.
Follow the rule of thirds
The rule of thirds is a principle borrowed from photography and art that can be applied to interior design for balanced and visually appealing furniture placement. This rule suggests dividing your room into a 3×3 grid and placing key furniture pieces along these lines or at their intersections.
To apply the rule of thirds in your space:
- Mentally divide your room into a 3×3 grid
- Place larger furniture pieces along the grid lines
- Position smaller items at the intersections of these lines
- Avoid centering everything in the middle of the room
This approach creates a more dynamic and interesting layout compared to simply centering everything. For instance, in a living room, you might place your sofa along one of the vertical lines and a coffee table at the intersection of two lines.
Ensure proper traffic flow
Proper traffic flow is crucial for both functionality and comfort in any room. When arranging furniture, it’s important to create clear pathways that allow for easy movement throughout the space.
Consider the following tips for ensuring good traffic flow:
- Leave at least 30-36 inches of space for major walkways
- Create multiple paths through the room when possible
- Avoid placing furniture in a way that obstructs doors or windows
- Consider the natural flow of movement in the room
For example, in a bedroom, ensure there’s enough space to walk around the bed and access closets or en-suite bathrooms comfortably. In a living room, create clear paths between seating areas and to entrances and exits.
Consider scale and proportion
Scale and proportion are key elements in furniture placement that can make or break the overall look and feel of a room. Properly scaled furniture fits well within the space and complements other pieces, while maintaining a sense of balance.
Here are some guidelines for considering scale and proportion:
- Choose furniture that fits the size of your room
- Mix different sizes and heights for visual interest
- Use the 2/3 rule for furniture groupings (e.g., a coffee table should be about 2/3 the length of the sofa)
- Balance large pieces with smaller ones
To illustrate the importance of scale and proportion, consider this comparison table:
| Poor Scale/Proportion | Good Scale/Proportion |
|---|---|
| Oversized sofa dwarfing a small living room | Appropriately sized sofa with complementary armchairs |
| Tiny area rug lost under large furniture | Area rug that extends beyond the seating area |
| Towering bookshelf next to low furniture | Mix of tall and short pieces for visual balance |
| Cluttered space with too many small items | A few larger statement pieces with smaller accents |
By paying attention to scale and proportion, you can create a harmonious and well-balanced space that feels both comfortable and visually appealing.
Now that we’ve covered the principles of optimizing furniture placement, let’s explore how incorporating texture and pattern can add depth and interest to your newly arranged space. These elements work hand in hand with furniture placement to create a cohesive and inviting interior design.
Incorporate Texture and Pattern
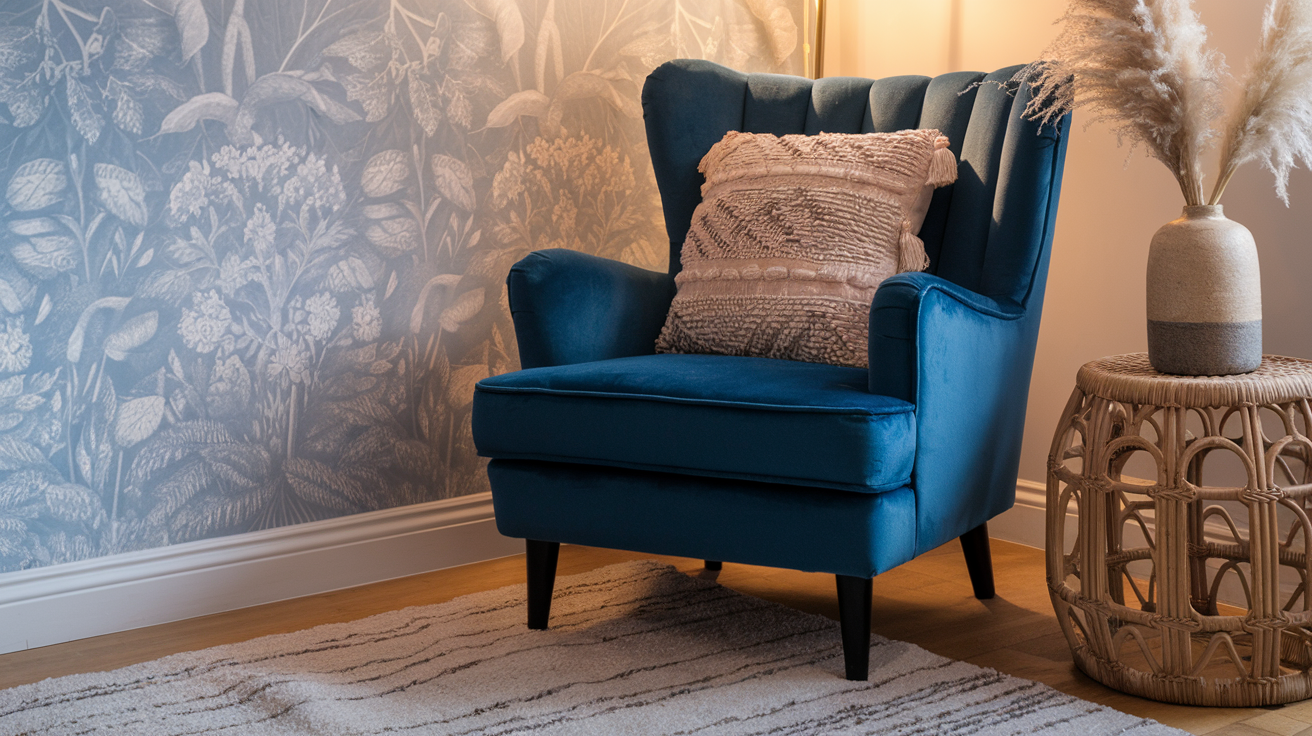
Mix different textures for visual interest
When it comes to interior design, incorporating texture is like adding seasoning to a dish – it elevates the entire experience. Mixing different textures in your space creates visual interest, depth, and a tactile experience that engages the senses. Let’s explore some effective ways to blend textures for a more dynamic and inviting interior.
-
Layering Fabrics: Start by combining various fabric textures in your upholstery, curtains, and throw pillows. For instance, pair a smooth leather sofa with plush velvet cushions, or drape a chunky knit throw over a sleek linen armchair. This contrast creates a rich, multi-dimensional look that invites touch and exploration.
-
Natural Elements: Introduce natural textures through materials like wood, stone, and woven fibers. A rough-hewn wooden coffee table can beautifully complement a polished marble fireplace surround. Similarly, a jute rug under a glass dining table adds warmth and textural contrast.
-
Wall Treatments: Don’t forget your walls when considering texture. Textured wallpaper, grasscloth, or even a feature wall with reclaimed wood can add significant depth to a room. These elements create visual interest and can make a space feel more intimate and cozy.
-
Metallics and Reflective Surfaces: Incorporate metallic or reflective surfaces to add a touch of glamour and create interesting light play. A hammered copper vase, a mirror with an ornate frame, or brushed brass light fixtures can introduce subtle texture while also brightening the space.
-
Tactile Accessories: Small decorative items can pack a big textural punch. Consider adding a fuzzy sheepskin throw, a rough-textured ceramic vase, or a smooth polished stone bowl to your decor. These elements invite touch and create points of interest throughout the room.
Here’s a quick reference table for mixing textures effectively:
| Smooth Textures | Rough Textures | Soft Textures |
|---|---|---|
| Glass | Brick | Velvet |
| Polished metal | Distressed wood | Fur |
| Satin | Jute | Chenille |
| Leather | Burlap | Fleece |
| Lacquer | Stone | Cashmere |
Remember, the key is to create a balance. Too many competing textures can make a space feel chaotic, while too few can make it feel flat and uninteresting. Aim for a harmonious blend that engages the eye and invites touch.
Use patterns to add depth
Patterns are a powerful tool in interior design, capable of transforming a plain space into a vibrant, multi-dimensional environment. When used thoughtfully, patterns can add depth, create focal points, and express your personal style. Here’s how to effectively incorporate patterns into your interior design:
-
Start with a Dominant Pattern: Choose one main pattern that will serve as the focal point of your room. This could be a bold wallpaper, a patterned area rug, or a set of curtains with a striking design. This dominant pattern will set the tone for the rest of the space.
-
Layer with Complementary Patterns: Once you have your main pattern, introduce secondary patterns that complement it. These should share a common color palette or theme with the dominant pattern but vary in scale. For example, if your main pattern is a large floral print, you might add throw pillows with a smaller geometric design in coordinating colors.
-
Mix Pattern Scales: Combining patterns of different scales creates visual interest and prevents the design from feeling too busy. A good rule of thumb is to use a mix of large, medium, and small-scale patterns. For instance, pair a large chevron rug with medium-sized striped curtains and small polka dot throw pillows.
-
Use Geometric Patterns for Modern Spaces: In contemporary interiors, geometric patterns can add depth without overwhelming the clean lines of the space. Consider incorporating hexagons, triangles, or abstract shapes through tiles, wallpaper, or fabric designs.
-
Embrace Organic Patterns for Natural Feel: For a more relaxed, organic look, opt for patterns inspired by nature. Florals, botanicals, and animal prints can add a sense of life and movement to your space.
-
Consider Pattern Placement: Strategic placement of patterns can draw the eye to specific areas of the room. Use patterned elements to highlight architectural features or to create a focal point in an otherwise neutral space.
-
Balance with Solids: To prevent pattern overload, balance patterned elements with solid colors. This gives the eye a place to rest and prevents the space from feeling too chaotic.
Here’s a table showcasing popular pattern types and their effects on interior spaces:
| Pattern Type | Effect on Space | Best Used For |
|---|---|---|
| Stripes | Elongates walls | Making rooms appear taller or wider |
| Florals | Adds softness | Creating a romantic or traditional feel |
| Geometric | Adds structure | Modern or contemporary spaces |
| Chevron | Creates movement | Adding energy to a room |
| Polka Dots | Playful touch | Kids’ rooms or casual spaces |
| Damask | Adds elegance | Formal or traditional interiors |
Remember, when using patterns, it’s crucial to maintain a cohesive color scheme throughout the space. This helps tie different patterns together and creates a harmonious overall look.
Balance bold and subtle elements
Achieving the perfect balance between bold and subtle elements is crucial in creating a visually appealing and harmonious interior. This balance prevents a space from feeling either too overwhelming or too bland. Here’s how to strike the right chord:
-
The 60-30-10 Rule: This classic interior design principle suggests using 60% of a dominant color (usually a neutral), 30% of a secondary color, and 10% of an accent color. Apply this concept to patterns and textures as well. Use bold elements for your 10% accents, and keep the larger portions more subtle.
-
Create a Neutral Base: Start with a neutral foundation in your space. This could be through wall colors, large furniture pieces, or flooring. A neutral base allows you to introduce bolder elements without overwhelming the room.
-
Use Bold Accents Strategically: Introduce bold patterns or textures through easily changeable elements like throw pillows, area rugs, or artwork. This allows you to make a statement without committing to permanent bold features.
-
Balance Scale and Proportion: If you’re using a large-scale bold pattern, balance it with smaller, more subtle patterns or solid colors. For example, if you have a dramatic wallpapered accent wall, keep the rest of the room’s elements more subdued.
-
Play with Contrast: Create visual interest by contrasting bold and subtle elements. A richly textured throw pillow can pop against a smooth leather sofa, or a brightly patterned chair can stand out in a room with neutral walls.
-
Consider the Room’s Function: The balance of bold and subtle elements should align with the room’s purpose. For instance, a bedroom might lean more towards subtle elements for a calming atmosphere, while a living room could handle more bold statements.
-
Use Color to Balance: If you’re using bold patterns, consider keeping the color palette more subdued. Conversely, if you’re using bold colors, you might want to stick to simpler patterns or textures.
-
Gradual Introduction: If you’re hesitant about incorporating bold elements, start small. Begin with one or two bold pieces and gradually add more as you become comfortable with the look.
Here’s a table illustrating how to balance bold and subtle elements in different room types:
| Room Type | Bold Elements | Subtle Elements |
|---|---|---|
| Living Room | Patterned accent chair, Colorful artwork | Neutral sofa, Solid color curtains |
| Bedroom | Textured headboard, Bold area rug | Solid color bedding, Neutral walls |
| Kitchen | Colorful backsplash, Statement light fixture | Neutral cabinets, Simple countertops |
| Bathroom | Patterned floor tiles, Bold mirror frame | Neutral walls, Simple fixtures |
| Home Office | Vibrant desk accessories, Colorful chair | Neutral desk, Simple shelving |
Remember, the key to successfully balancing bold and subtle elements lies in creating a cohesive look. Ensure that your bold choices relate to each other in some way, whether through color, style, or theme. This creates a thread of continuity throughout your space, tying everything together for a polished, intentional look.
By mastering the art of incorporating texture and pattern, and skillfully balancing bold and subtle elements, you can create a space that’s visually interesting, personally expressive, and beautifully harmonious. These techniques add depth and character to your interiors, transforming them from ordinary to extraordinary. As we move forward, we’ll explore how to maximize your space with smart storage solutions, further enhancing the functionality and appeal of your home.
Maximize Space with Smart Storage
Invest in multi-functional furniture
In the quest to maximize space, multi-functional furniture emerges as a game-changer. These versatile pieces not only serve multiple purposes but also add a touch of ingenuity to your interior design. Let’s explore some innovative multi-functional furniture options that can transform your space:
- Sofa beds: Perfect for guest rooms or studio apartments, these pieces offer comfortable seating by day and a cozy bed by night.
- Ottoman with storage: Provides extra seating, a footrest, and hidden storage all in one stylish package.
- Expandable dining tables: Ideal for small dining areas, these tables can be extended when hosting guests and compacted for daily use.
- Murphy beds: These wall-mounted beds can be folded up when not in use, freeing up valuable floor space during the day.
- Nesting tables: A set of tables that can be tucked away when not needed, perfect for entertaining or as side tables.
Here’s a comparison of popular multi-functional furniture pieces:
| Furniture Type | Space-Saving Potential | Versatility | Aesthetic Appeal |
|---|---|---|---|
| Sofa beds | High | High | Medium |
| Ottoman storage | Medium | High | High |
| Expandable tables | High | Medium | High |
| Murphy beds | Very High | Medium | Medium |
| Nesting tables | High | High | High |
Investing in multi-functional furniture not only helps in maximizing space but also adds a layer of sophistication to your interior design. These pieces often become conversation starters, showcasing your commitment to both style and practicality.
Utilize vertical space
When floor space is at a premium, the key is to think vertically. Utilizing the often-overlooked vertical space can dramatically increase your storage capacity without cluttering your living area. Here are some effective ways to make the most of your vertical space:
- Floor-to-ceiling bookshelves: These not only provide ample storage but also create a striking visual impact.
- Hanging organizers: Perfect for closets, bathrooms, or behind doors, these can store a variety of items without taking up floor space.
- Wall-mounted desks: Ideal for home offices in small spaces, these can be folded up when not in use.
- Floating shelves: Versatile and stylish, these can be arranged in countless configurations to suit your needs and aesthetic preferences.
- Pegboards: A customizable solution for organizing tools, craft supplies, or kitchen utensils.
Remember, when utilizing vertical space, it’s crucial to maintain a balance between functionality and aesthetics. Avoid overcrowding your walls, as this can make a space feel claustrophobic. Instead, aim for a curated look that combines storage with decorative elements.
Declutter and organize systematically
A clutter-free space not only looks more appealing but also feels more spacious. Systematic decluttering and organization are essential steps in maximizing your space. Here’s a step-by-step approach to decluttering:
- Start with one room or area at a time to avoid feeling overwhelmed.
- Sort items into categories: keep, donate, sell, and discard.
- Be ruthless with items you haven’t used in the past year.
- Digitize documents and photos to reduce physical storage needs.
- Implement the “one in, one out” rule to maintain clutter-free spaces.
Once you’ve decluttered, it’s time to organize. Consider these organizational strategies:
- Use clear storage containers to easily identify contents.
- Label everything to maintain order and save time searching for items.
- Group similar items together for efficient storage and retrieval.
- Utilize drawer dividers and small containers to keep smaller items organized.
- Implement a color-coding system for visual organization.
By decluttering and organizing systematically, you’re not just creating more space; you’re also crafting a more serene and harmonious living environment. This process often leads to a clearer mind and reduced stress levels, as the physical act of organizing your space can have a profound impact on your mental well-being.
Choose stylish storage solutions
Storage doesn’t have to be purely functional; it can also be a key element in your interior design. Stylish storage solutions serve the dual purpose of organizing your belongings while enhancing the aesthetic appeal of your space. Here are some chic storage ideas to consider:
- Decorative baskets: Perfect for storing blankets, magazines, or toys while adding texture and warmth to a room.
- Vintage trunks: These can serve as coffee tables while providing hidden storage.
- Ladder shelves: A trendy way to display books, plants, and decorative items while maximizing vertical space.
- Floating cabinets: These create a sleek, modern look while offering closed storage to hide clutter.
- Under-bed storage boxes: Utilize often-wasted space with stylish, rolling storage containers.
When selecting storage solutions, consider the following factors:
| Factor | Importance | Considerations |
|---|---|---|
| Material | High | Choose materials that complement your existing decor |
| Size | High | Ensure the storage solution fits the available space |
| Functionality | Very High | Select pieces that meet your specific storage needs |
| Style | High | Opt for designs that enhance your overall aesthetic |
| Durability | Medium | Invest in quality pieces that will stand the test of time |
Remember, the key to stylish storage is integration. Your storage solutions should blend seamlessly with your overall design scheme, becoming part of the decor rather than standing out as purely functional elements.
By investing in multi-functional furniture, utilizing vertical space, decluttering systematically, and choosing stylish storage solutions, you can significantly maximize the space in your home. These smart storage strategies not only create a more organized environment but also contribute to a more aesthetically pleasing and functional living space. As we’ve seen, maximizing space is about more than just finding places to put things away; it’s about creating a harmonious balance between functionality and style.
Now that we’ve explored how to maximize space with smart storage, let’s move on to the next crucial aspect of interior design: adding personality to your space through carefully chosen accessories.
Add Personality with Accessories
Curate a collection of meaningful items
Adding personality to your space is all about infusing it with items that tell your story. By curating a collection of meaningful accessories, you can transform a generic room into a uniquely personal sanctuary. Here’s how to approach this process:
-
Reflect on your experiences:
- Travel souvenirs
- Family heirlooms
- Gifts from loved ones
- Personal achievements (awards, certificates)
-
Showcase your interests:
- Books that inspire you
- Artwork that resonates with your taste
- Hobby-related items (e.g., musical instruments, art supplies)
-
Incorporate sentimental photographs:
- Frame family portraits
- Display candid moments
- Create a gallery wall of memories
Remember, the key is to select items that spark joy and evoke positive emotions. These personal touches will make your space feel more like home and serve as great conversation starters when entertaining guests.
Use the rule of odd numbers
Interior designers often rely on the rule of odd numbers to create visually appealing arrangements. This principle suggests that grouping items in odd numbers (3, 5, 7) is more aesthetically pleasing and memorable than even-numbered groupings. Here’s how to apply this rule effectively:
- Start with triads: Group three items of varying heights, shapes, or colors.
- Create visual triangles: Arrange items so that they form a triangular shape when viewed as a whole.
- Mix and match: Combine different textures, materials, and sizes within your odd-numbered groupings.
| Group Size | Ideal for |
|---|---|
| 3 items | Small surfaces (side tables, shelves) |
| 5 items | Medium surfaces (coffee tables, mantels) |
| 7 items | Large surfaces (dining tables, bookcases) |
By adhering to this rule, you’ll create more dynamic and engaging displays throughout your space. However, don’t be afraid to break this rule occasionally for added interest – sometimes, a perfectly symmetrical pair can be just as impactful.
Create vignettes
Vignettes are small, curated arrangements that tell a story or create a focal point within a room. These mini-scenes add depth and interest to your space while showcasing your personality. Here’s how to create captivating vignettes:
-
Choose a theme or color scheme:
- Nautical
- Vintage
- Minimalist
- Bohemian
-
Vary heights and shapes:
- Use books or small pedestals to elevate objects
- Mix round, square, and irregular shapes
-
Incorporate different textures:
- Smooth ceramics
- Rough natural elements (wood, stone)
- Soft textiles
-
Add a living element:
- Small potted plant
- Fresh flowers
-
Consider the backdrop:
- Use a decorative tray as a base
- Hang a small piece of art behind the arrangement
When creating vignettes, remember that less is often more. Start with a few key pieces and build from there, editing as needed to achieve the perfect balance.
Rotate accessories seasonally
Keeping your space fresh and exciting throughout the year can be as simple as rotating your accessories with the changing seasons. This practice not only reflects the outside world but also prevents your decor from becoming stagnant. Here’s a guide to seasonal accessorizing:
Spring:
- Light, airy fabrics for throw pillows and curtains
- Fresh flowers or floral-themed accessories
- Pastel or bright color accents
Summer:
- Natural elements like seashells or driftwood
- Light-colored or white accessories for a cool feel
- Tropical or beach-inspired decor items
Fall:
- Warm, rich colors (oranges, reds, browns)
- Cozy textures like wool and knits
- Nature-inspired elements (pinecones, leaves, pumpkins)
Winter:
- Metallic accents (silver, gold, copper)
- Plush textures for added warmth
- Holiday-themed decor (if celebrating)
| Season | Color Palette | Textures | Signature Elements |
|---|---|---|---|
| Spring | Pastels, Brights | Light, Airy | Florals, Butterflies |
| Summer | Blues, Greens, Whites | Smooth, Cool | Nautical, Tropical |
| Fall | Oranges, Reds, Browns | Cozy, Warm | Leaves, Pumpkins |
| Winter | Whites, Metallics | Plush, Soft | Snowflakes, Pinecones |
By rotating your accessories, you’ll keep your space feeling fresh and aligned with the current season. This practice also allows you to rediscover and appreciate items that may have been stored away, giving them new life in different contexts.
Now that we’ve explored how to add personality with accessories, let’s delve into the final secret of transforming your space: embracing the power of greenery. Indoor plants not only enhance the aesthetic appeal of your home but also contribute to a healthier living environment.
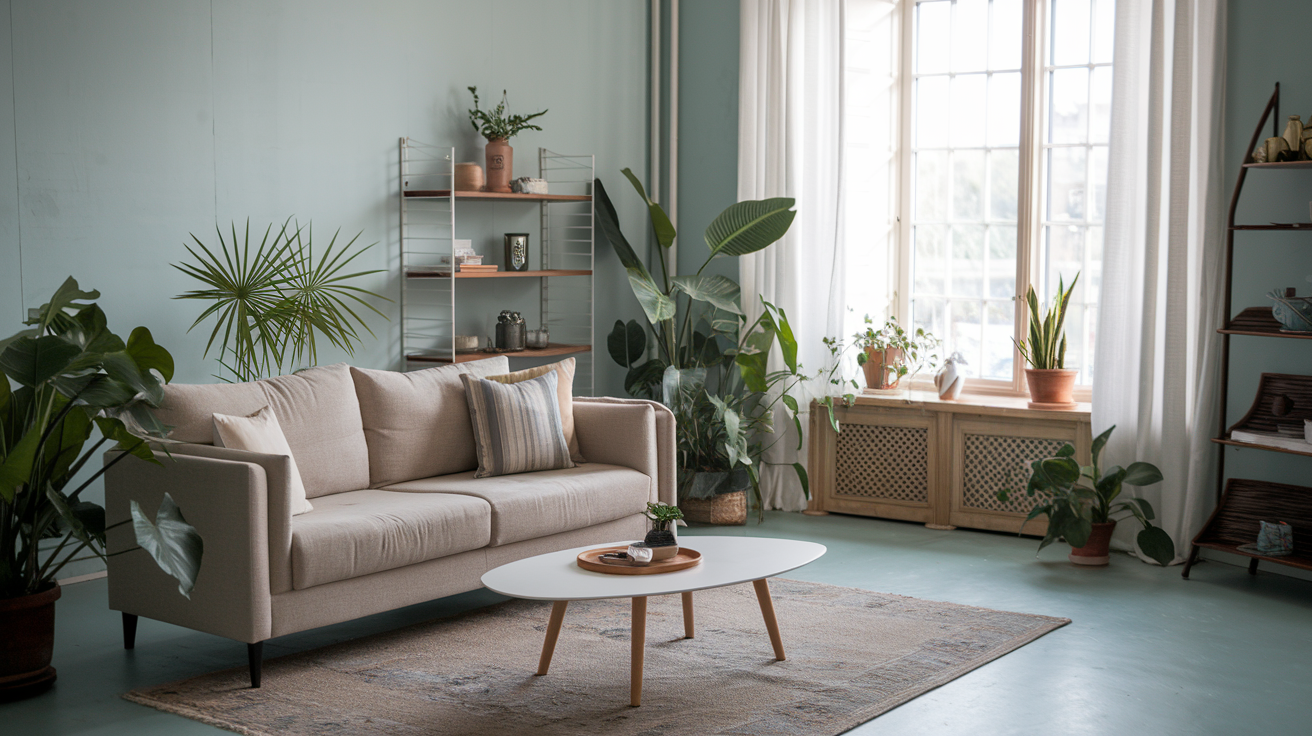
Embrace the Power of Greenery
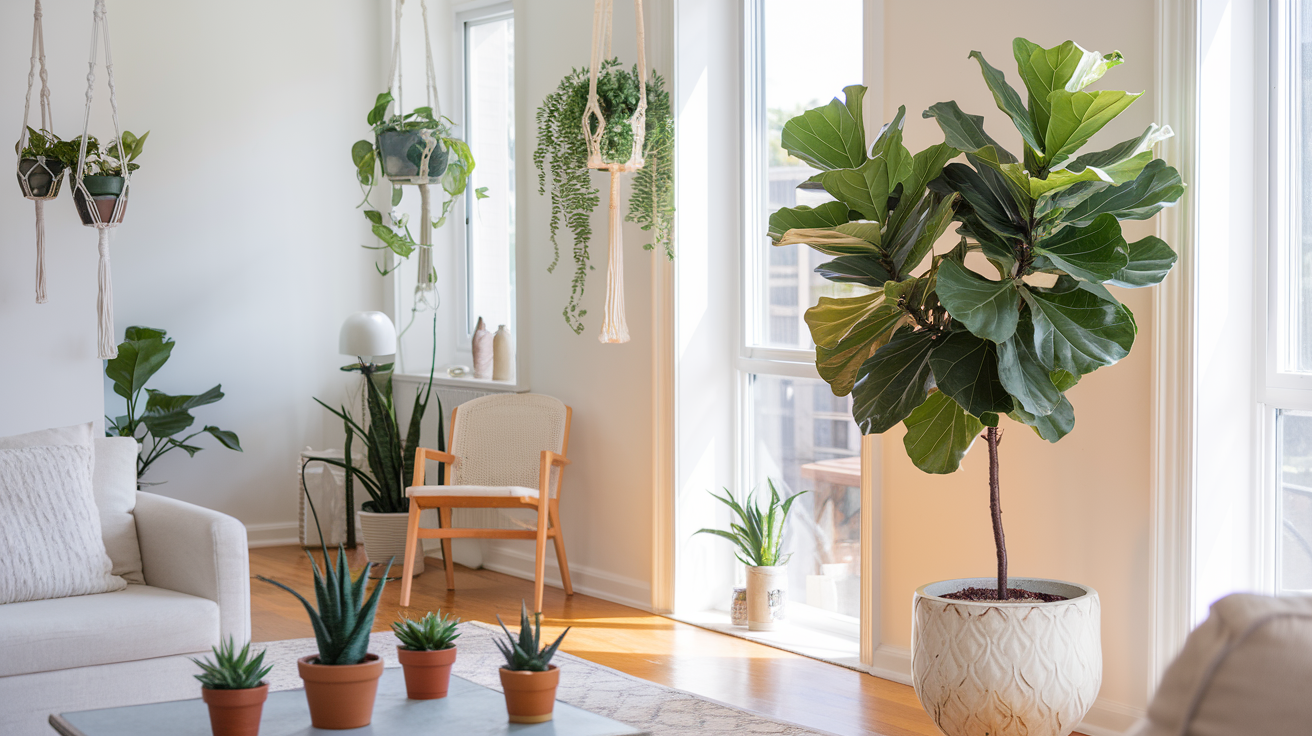
Choose low-maintenance indoor plants
When embracing the power of greenery in your interior design, it’s crucial to select plants that not only enhance your space but are also easy to care for. Low-maintenance indoor plants are perfect for busy homeowners or those new to plant care. These resilient green companions can thrive with minimal attention while still providing all the benefits of indoor greenery.
Here’s a list of some popular low-maintenance indoor plants:
- Snake Plant (Sansevieria)
- ZZ Plant (Zamioculcas zamiifolia)
- Pothos (Epipremnum aureum)
- Spider Plant (Chlorophytum comosum)
- Chinese Evergreen (Aglaonema)
- Rubber Plant (Ficus elastica)
- Peace Lily (Spathiphyllum)
- Dracaena
- Philodendron
- Aloe Vera
These plants are known for their ability to thrive in various light conditions and can tolerate occasional neglect. When selecting plants, consider the light levels in your space and choose accordingly. For example, snake plants and ZZ plants can tolerate low light conditions, while rubber plants prefer brighter, indirect light.
| Plant Name | Light Requirement | Watering Frequency | Air Purifying |
|---|---|---|---|
| Snake Plant | Low to Bright Indirect | Every 2-3 weeks | Yes |
| ZZ Plant | Low to Moderate | Every 2-3 weeks | Yes |
| Pothos | Low to Bright Indirect | Weekly | Yes |
| Spider Plant | Moderate to Bright Indirect | Weekly | Yes |
| Chinese Evergreen | Low to Moderate | Every 1-2 weeks | Yes |
Use plants to improve air quality
Beyond their aesthetic appeal, indoor plants play a crucial role in improving air quality within your living spaces. NASA’s Clean Air Study has shown that certain plants can effectively remove harmful toxins from the air, creating a healthier environment for you and your family.
Some of the best air-purifying plants include:
- Peace Lily: Removes benzene, formaldehyde, trichloroethylene, xylene, and ammonia
- Spider Plant: Eliminates formaldehyde and xylene
- Snake Plant: Filters out benzene, formaldehyde, trichloroethylene, and xylene
- Aloe Vera: Removes formaldehyde and benzene
- Bamboo Palm: Filters out benzene and trichloroethylene
To maximize the air-purifying benefits of your plants, consider placing them strategically throughout your home. Focus on areas where you spend the most time, such as the living room, bedroom, and home office. It’s also beneficial to place plants near potential sources of indoor air pollution, such as near electronic devices or in rooms with new furniture or carpeting.
Remember that the effectiveness of plants in purifying air depends on various factors, including the size of the plant, the size of the room, and the number of plants present. As a general rule, aim for one medium to large-sized plant per 100 square feet of space for optimal air-purifying benefits.
Create a focal point with larger plants
Large indoor plants can serve as stunning focal points in your interior design, adding drama and visual interest to any room. These statement pieces can draw the eye, anchor a space, and create a sense of balance in your overall design scheme.
Some popular large indoor plants that make excellent focal points include:
- Fiddle Leaf Fig (Ficus lyrata)
- Monstera deliciosa
- Bird of Paradise (Strelitzia nicolai)
- Rubber Plant (Ficus elastica)
- Dracaena marginata
- Kentia Palm (Howea forsteriana)
- Banana Plant (Musa)
When using large plants as focal points, consider the following tips:
-
Choose the right location: Place your statement plant in an area where it can be easily seen and appreciated, such as near a window, in a corner, or as a room divider.
-
Consider scale: Ensure the plant is proportionate to the room size. A large plant in a small room can overwhelm the space, while a small plant in a large room may get lost.
-
Use decorative pots: Enhance the visual impact of your focal plant by selecting a stylish, oversized planter that complements your interior design.
-
Create contrast: Choose a plant with a color or texture that stands out against your wall color or furniture to create a striking visual effect.
-
Layer with smaller plants: Surround your focal plant with smaller plants at varying heights to create depth and interest.
Incorporate botanical prints and patterns
To further embrace the power of greenery in your interior design, consider incorporating botanical prints and patterns throughout your space. This approach allows you to bring the essence of nature indoors, even in areas where live plants may not be practical.
Here are some creative ways to incorporate botanical elements into your decor:
-
Wallpaper: Choose a bold botanical print wallpaper for an accent wall or to cover an entire room. This can create a dramatic, immersive effect that brings the outdoors in.
-
Textiles: Incorporate botanical patterns through curtains, throw pillows, area rugs, or bedding. This allows you to change the look seasonally or as your tastes evolve.
-
Artwork: Hang botanical prints, photographs, or paintings to add a touch of nature to your walls. Consider creating a gallery wall with a mix of different botanical-themed artworks.
-
Dinnerware and serving pieces: Use plates, cups, and serving dishes with leaf or flower motifs to bring a subtle botanical touch to your dining area.
-
Upholstery: Choose furniture with botanical-print upholstery for a bold statement, or use slipcovers for a temporary change.
-
Shower curtains and bath accessories: Bring the botanical theme into your bathroom with nature-inspired shower curtains, bath mats, and towels.
-
Window treatments: Use sheer curtains with delicate leaf patterns to filter light and create a soft, natural ambiance.
When incorporating botanical prints and patterns, keep these design principles in mind:
-
Balance: If using a bold botanical print, balance it with solid colors or more subtle patterns in the rest of the room.
-
Scale: Mix large-scale prints with smaller, more delicate patterns for visual interest.
-
Color coordination: Choose botanical prints that complement your existing color scheme or use them as inspiration for a new palette.
-
Texture: Combine different textures, such as smooth cotton prints with more textured materials like linen or velvet, to add depth to your design.
By thoughtfully incorporating live plants, air-purifying varieties, statement pieces, and botanical prints, you can truly embrace the power of greenery in your interior design. This approach not only enhances the aesthetic appeal of your space but also contributes to a healthier, more vibrant living environment. As we move forward, we’ll explore how to tie all these elements together to create a cohesive and personalized interior design that reflects your unique style and preferences.
Transforming your living space doesn’t have to be a daunting task. By implementing these seven interior design secrets, you can create a home that’s both beautiful and functional. From harnessing the power of color to embracing the soothing effects of greenery, each technique offers a unique way to elevate your space.
Remember, the key to successful interior design lies in balancing aesthetics with practicality. Whether you’re optimizing furniture placement, incorporating textures, or maximizing storage, always keep your personal style and needs in mind. With these tips in hand, you’re well-equipped to embark on your interior design journey and create a space that truly reflects your personality and enhances your daily life.