Planning a small attic bathroom with sloped ceiling constraints is where most renovations either find their footing or fall apart completely. The IRC building code requires 6 feet 8 inches of ceiling height over at least half your bathroom floor — a measurement that eliminates more than half of the average attic before a single tile is laid. Most homeowners discover this after they’ve already fallen in love with the idea. After that, the project either gets abandoned, gets done wrong, or gets handed to someone who actually understands what sloped geometry demands.
Quick Answer
The IRC building code requires 6 feet 8 inches of ceiling height over at least half your bathroom floor — a measurement that eliminates more than half of the average attic before a single tile is laid.
Eleven years doing residential interiors across Chicago and New York taught me that attic bathrooms are the most misunderstood renovation in residential design. Not because they’re impossible — they’re not — but because everyone approaches them with flat-ceiling logic. You can’t do that. The slope isn’t a flaw to work around. It’s the architecture. The moment you stop fighting it and start designing with it, these rooms stop being problems and start being the most interesting spaces in the house.
What follows isn’t a mood board or a list of pretty tile ideas. These are the nine actual fixes — structural, spatial, material, and atmospheric — that determine whether an attic bathroom lives or dies.
Why Sloped Ceilings Make Attic Bathrooms Uniquely Difficult (And Uniquely Rewarding)
In This Article
- Why Sloped Ceilings Make Attic Bathrooms Uniquely Difficult (And Uniquely Rewarding)
- Can You Actually Put a Bathroom in an Attic Space? What the Codes Say
- 1. Zone Your Floor Plan Around the Slope, Not Against It
- 2. Choose the Right Shower Configuration for a Raked Ceiling
- 3. Handle Ventilation Before the Walls Close
- 4. Use Lighting to Correct the Ceiling’s Spatial Distortion
- 5. Select Materials That Work With Low Clearance, Not Against It
- 6. Build Storage Into the Knee Walls
- 7. Address the Thermal Envelope Before Any Finish Work
- 8. Get the Vanity Height and Mirror Placement Right for a Raked Wall
- 9. Control the Visual Scale With Deliberate Color and Pattern Strategy
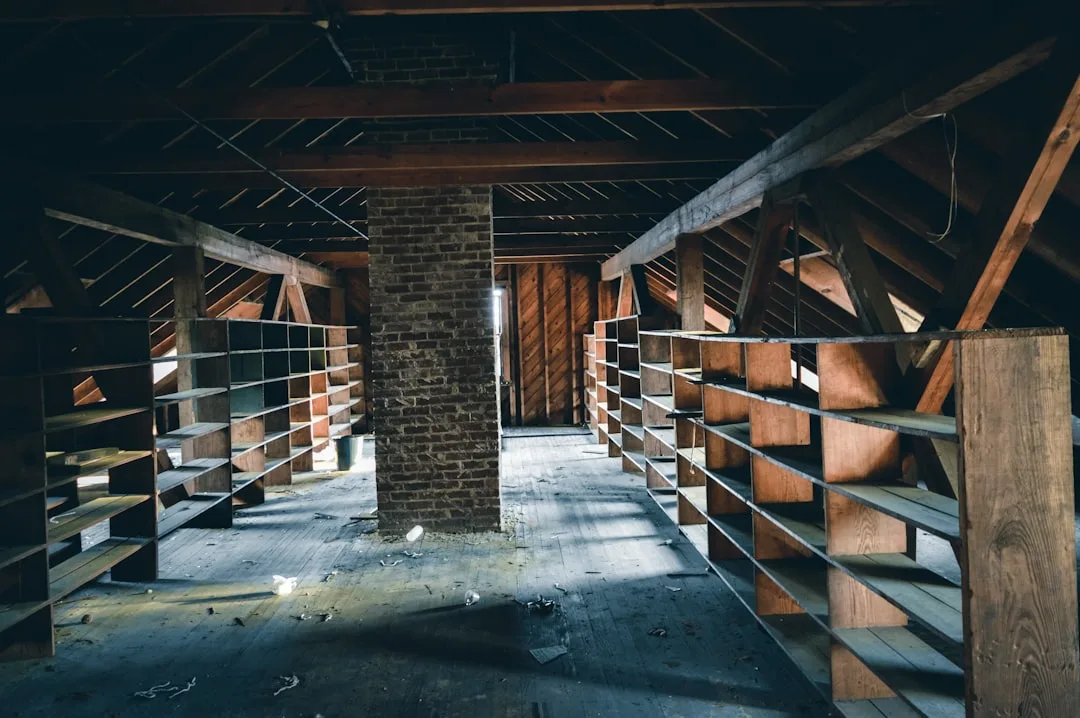
Spend an afternoon in an unfinished attic and you’ll understand the problem immediately. The ridge sits somewhere between 7 and 9 feet at its peak — enough to feel generous — but the floor plan collapses toward the knee walls, which typically drop to 4 feet or less at the perimeter. That transition isn’t gradual. It’s aggressive. And every standard bathroom planning rule was written for a box, not a wedge.
The 6 ft 8 in IRC minimum is the number that recalibrates everything. It applies to at least 50% of the bathroom’s usable floor area, which sounds lenient until you start taping out your fixture zones and realize the shower, toilet, and vanity all need to land within that compliant footprint. Knee-wall zones — the low, slanted regions near the eaves — fall out of the running for any standing-use fixture immediately. That typically leaves you with a workable spine of maybe 40 to 60 square feet, depending on the ridge line.
Ventilation compounds the challenge. Warm, humid air from a bathroom rises. In a standard room, it hits a flat ceiling and gets pulled out by an exhaust fan. In an attic bathroom, that same air travels up the rake and hits cold roof decking — and if the assembly isn’t right, you get condensation inside the wall and ceiling structure before anyone’s noticed a problem.
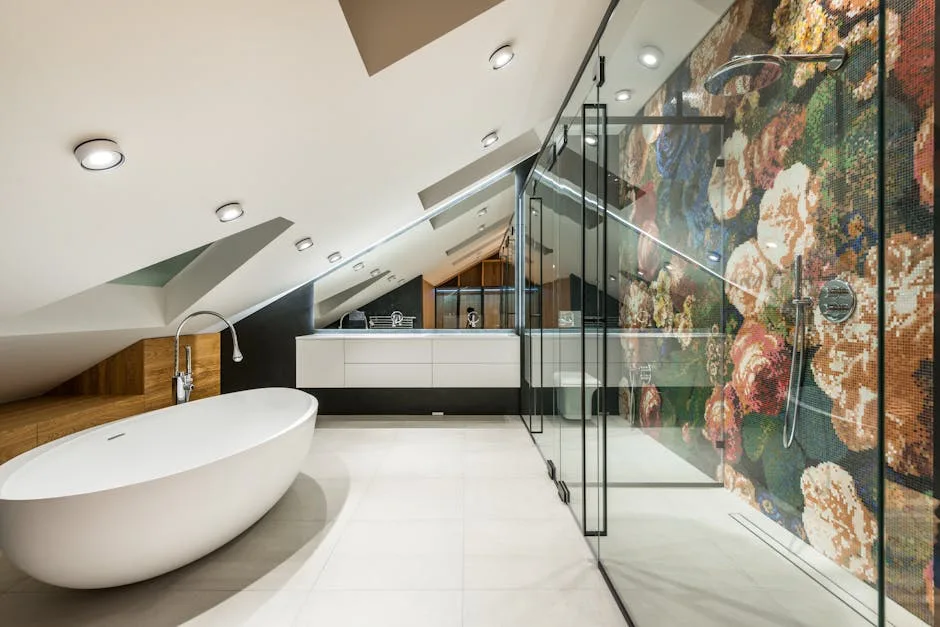
Here’s what the design industry tends not to say loudly enough: those same constraints are what make attic bathrooms extraordinary when they work. The enclosed angle of a raked ceiling creates intimacy that no flat-ceiling bathroom can manufacture. You feel held by the space rather than merely contained in it. The proportions force a kind of deliberateness — every fixture, every material, every light source has to earn its place — and the result is almost always more interesting than a standard bathroom renovation.
The homeowners I’ve worked with who pushed through the structural and code complexity almost universally called their attic bathroom the best room in the house afterward. That’s not marketing. That’s just what happens when a constrained space gets solved properly.
Takeaway: Map your ceiling heights before touching anything else. Tape the floor into zones — compliant height, knee-wall low, and transitional — and treat each zone as a different functional category. Your floor plan will follow from that map.
Can You Actually Put a Bathroom in an Attic Space? What the Codes Say

Yes. With permits, an engineer, and a plumber who understands what “gravity drainage from an attic” actually means.
I’ve watched homeowners skip the permit step to save a few thousand dollars. Two years later, they’re selling the house and a home inspector flags an unpermitted wet room — and suddenly they’re either disclosing a liability or ripping out finished tile to bring the work into compliance. The permit isn’t bureaucratic friction. It’s the documentation that protects your investment.
The structural question comes first. Adding a wet bathroom to an attic means adding water weight (full tub: 700+ lbs), tile weight (large-format porcelain at 4–6 lbs per square foot), and fixture weight to floor joists that were originally designed to carry storage loads, not live occupancy. Most attic joists are undersized for this. A structural engineer’s report — typically $500–$1,500 depending on your market — tells you whether you need sister joists, a new beam, or a complete floor assembly before you’ve spent a dollar on finishes.
Plumbing routing is where the budget surprises most people. Gravity drainage works by falling. In an attic, your drain lines have to travel down through walls on every floor below before reaching the main stack. That often means opening finished ceilings on the floor below — sometimes two floors below — and it’s rarely cheap. Some contractors push a macerating toilet system to avoid the stack routing problem; that’s a valid workaround for the toilet, but showers and tubs still need gravity drainage.
On the value side: adding a bathroom is one of the few renovations with broadly documented resale return. The National Association of Realtors has tracked bathroom additions as increasing home resale value by an average of 5.7% — which on a $450,000 home is over $25,000. The permit investment starts looking rational very quickly.
Ventilation carries its own code requirements. IRC mandates either an operable window of at least 1.5 square feet or a mechanical exhaust fan venting to the exterior — not into the attic cavity, which is both a code violation and a moisture catastrophe waiting to happen. These are non-negotiable.
Takeaway: Hire a structural engineer before you hire a contractor. That sequence matters — you need load confirmation before anyone quotes you a job, or you’ll get a price that doesn’t account for the real scope.
1. Zone Your Floor Plan Around the Slope, Not Against It
Every failed attic bathroom I’ve ever seen — and I’ve seen enough to fill a depressing portfolio — made the same foundational mistake: the floor plan was drawn as if the ceiling were flat, then the slope was treated as an inconvenience to accommodate afterward. That’s backwards. The slope is the organizing principle. Start there.
The approach I keep returning to is what I call the spine-and-shelf principle. The high zone along the ridge — wherever you have compliant ceiling height — is your spine. That’s where the toilet, shower, and primary standing space live. The knee-wall zones on either side become shelves. Not metaphorical shelves. Actual storage, built-in seating, bathtub surrounds, and vanity bases that use the low ceiling as a canopy instead of fighting it.
A practical zoning checklist for a small attic bathroom with sloped ceiling:
- Mark the ridge line on your floor plan first — this is your centerline of usable height
- Measure and tape out the 6’8″ height boundary on the physical floor before any design decisions
- Assign fixtures to zones: toilet and shower in the compliant spine, vanity along the transitional zone if your ceiling allows it at sink height (typically 6’2″–6’4″ above floor)
- Reserve knee-wall zones for built-in storage, towel cubbies, or a freestanding soaking tub if the tub doesn’t require full standing height alongside it
- Plan your traffic path through the compliant zone only — don’t route the primary movement path through a low-ceiling area
Any fixture that requires a person to stand gets placed in the compliant spine. Any fixture or feature that works at seated height or lower gets placed in the knee-wall zone. That single rule eliminates about 80% of the planning mistakes I see.
Takeaway: Draw your ceiling-height zones before you draw your floor plan. The floor plan is a consequence of the geometry, not the other way around.
2. Choose the Right Shower Configuration for a Raked Ceiling
The shower is where sloped ceiling bathrooms most frequently go wrong, and where they can most visibly go right. Standard shower planning assumes a vertical wall on all four sides and a flat ceiling above. In a small attic bathroom with sloped ceiling geometry, you’re unlikely to have either — and forcing a standard configuration into a raked space produces a cramped, awkward enclosure that makes every shower feel slightly claustrophobic.
The three configurations that actually work under a slope:
Walk-in with an open entry at the low end. The shower runs parallel to the ridge, with the showerhead and standing position at the high end. The entry is at the low end, where the ceiling drops. Since you’re not standing at the entry — you’re moving through it — the low clearance is acceptable. IRC requires a minimum 80-inch clear height at the showerhead, which is the critical measurement, not the entry clearance.
Corner wet room. If the ridge runs along one wall, a wet-room configuration — where the shower zone is defined by drainage and a half-wall rather than a full enclosure — can occupy the high corner without a ceiling-height conflict. The open top eliminates the raked-ceiling clearance problem entirely.
Niche shower against the knee wall. Counterintuitive but effective for small footprints: a compact shower (36 × 36 or 36 × 48) built directly into the knee-wall zone with a sloped ceiling as the shower ceiling. The slope becomes the design feature. You need a shower pan that accommodates the raked ceiling without trapping moisture in dead corners, and the light source has to be a recessed waterproof fixture rather than a side-mounted sconce.
What doesn’t work: a standard prefabricated shower unit. The 80-inch height requirement on those units will conflict with your ceiling geometry at every perimeter point that isn’t directly under the ridge. Custom tile or a site-built unit with a shower pan is the only path that gives you full dimensional control.
Takeaway: Decide on shower configuration before you finalize the floor plan — the configuration affects how much of the spine you need and where the plumbing stub-outs go.
3. Handle Ventilation Before the Walls Close

This is the fix that nobody wants to spend money on and everyone eventually wishes they had. Moisture is the mechanism that destroys attic bathrooms. Not immediately — over two or three years, as condensation cycles accumulate in the roof assembly and you start seeing staining, soft spots, and eventually structural damage that costs ten times the ventilation investment to repair.
The specific problem in a small attic bathroom with sloped ceiling construction is that the standard “vent to exterior” instruction doesn’t tell you how — and the how matters enormously. Most attic roofs have some form of insulation in the rafter bays. When you route a bathroom exhaust duct through those bays, you’re threading warm humid air through cold insulation before it reaches the exterior. If the duct isn’t perfectly sealed and insulated along its entire length, you get condensation inside the duct — and that moisture either drains back into the bathroom or saturates the insulation around it.
The correct approach:
- Insulate the exhaust duct for its full run, not just the sections you can easily reach
- Use rigid duct over flex duct wherever the run is longer than 6 feet — flex duct sags and collects condensate
- Terminate at a dedicated roof cap, not through a soffit vent (humid bathroom air venting into the soffit recirculates into attic ventilation)
- Size the fan correctly: CFM rating should match or exceed the bathroom’s cubic footage, and attic bathrooms typically run larger because of the additional ceiling volume above the flat-ceiling height
- Install a timer switch or humidity-sensing switch rather than a manual fan switch — the fan needs to run longer than most people remember to leave it on
A 110 CFM exhaust fan costs $80–$150. Repairing moisture damage to roof sheathing and rafters costs $3,000–$12,000. The math is not complicated.
Takeaway: Spec and install the ventilation system before the ceiling goes up. Once the rafters are enclosed, fixing the ductwork requires destructive access.
4. Use Lighting to Correct the Ceiling’s Spatial Distortion
A sloped ceiling does something psychologically strange to a bathroom: it makes the room feel smaller than it measures. The dropping angle creates a visual compression that reads as “cramped” even when the square footage is objectively adequate. Lighting is the primary tool for correcting that perception — and most attic bathrooms I’ve seen use it exactly wrong, with a single overhead fixture at the ridge that creates a spotlight effect and leaves the perimeter in shadow.
The approach that works:
Layer from low to high. Place the brightest functional light at counter height — either sconces flanking the mirror or an illuminated mirror — rather than overhead. This puts light at face level for tasks and reduces the visual emphasis on how much ceiling is above you. When the ceiling isn’t the brightest thing in the room, it recedes.
Graze the slope. A recessed fixture or LED strip positioned to wash light up the raked ceiling plane makes the angle feel intentional and architectural rather than constraining. This works especially well with a light wood or pale plaster ceiling finish — the texture catches the light and the slope reads as a feature.
Use warm color temperatures throughout. Cooler light (above 3500K) emphasizes the geometry of a small space. Warmer temperatures (2700K–3000K) soften edges and create the sensation of enclosure as comfort rather than confinement. Every fixture in the bathroom should be within 200K of the same color temperature to avoid the jarring mismatched quality that makes compact spaces feel worse than they are.
Takeaway: Design your lighting plan at the same time as your floor plan, not after. Fixture placement in a raked ceiling requires framing decisions — you can’t add recessed cans after the ceiling is closed without major rework.
5. Select Materials That Work With Low Clearance, Not Against It
Material selection in a small attic bathroom with sloped ceiling isn’t primarily aesthetic — it’s functional. The wrong materials make a tight space feel tighter, require maintenance access you don’t have, or create cleaning challenges in corners where the slope meets the floor.
What to avoid:
- Large-format floor tile (anything over 12 × 12) in bathrooms under 50 square feet — the grout lines don’t math out cleanly and the cuts along the knee wall run create significant waste and awkward visual interruptions
- Dark grout in tight corners where the ceiling meets the wall — those V-shaped intersections collect soap residue and are nearly impossible to clean at low ceiling heights where you can’t get leverage
- Frameless glass shower doors with top rail hardware — the hardware requires flat ceiling clearance for installation and alignment; use frameless panels or a curtain instead
- Wallpaper or wall coverings that can’t handle humidity — the moisture dynamics in an attic bathroom are more aggressive than a standard bathroom, and any material that isn’t rated for wet-area use will fail faster here
What performs well:
- Large-format tile on walls (not floors) — a 12 × 24 or 24 × 48 tile run vertically on the sloped ceiling plane creates a continuous, low-maintenance surface and visually elevates the room
- Waterproof wall panels (solid surface or large-format porcelain slabs) in the shower — eliminates grout lines entirely, which is a significant maintenance advantage in a space where access for regrouting is limited
- Penny tile or mosaic tile on floors — the small format handles the irregular geometry at knee-wall junctions without waste cuts, and the grout grid provides slip resistance
- Matte finishes on fixtures — reflective chrome in a small space amplifies every visual element; matte black or brushed brass reads quieter and reduces the sense of clutter
Takeaway: Bring material samples into the actual space and look at them in the actual light before committing. Attic bathroom light — often a skylight plus artificial sources — renders color and texture differently than a showroom.
6. Build Storage Into the Knee Walls
Storage is the silent failure point of most attic bathrooms. The room gets designed around the code-compliant spine, the fixtures land where they need to land, and then someone looks around and asks where the towels go. In a standard bathroom, this is solved with a linen closet or a freestanding cabinet. In an attic bathroom, there’s typically no wall square footage left for either.
The knee walls are the answer. Those low, angled zones that can’t hold standing fixtures are ideal cavities for built-in storage — if you plan for it before the walls close.
Built-in knee-wall storage options that work:
- Recessed shelving alcoves framed between the rafters in the knee-wall section — typically 14–16 inches deep (rafter bay width) and whatever height the knee-wall stud allows, usually 18–36 inches. This produces a recessed cabinet without any projection into the usable floor area.
- Built-in bench with lift-top storage along one knee wall — the bench sits under the slope, the seat height stays at standard (17–19 inches), and the cavity below the seat stores towels, cleaning supplies, or a step stool for children’s bathrooms.
- Toe-kick drawers under the vanity — if the vanity runs into a transitional ceiling zone, the toe-kick space (typically 4 inches high × the full vanity width) can be converted to shallow drawers for flat storage items.
- Floating shelves cascading down the slope — a series of shelves installed to follow the ceiling angle, each one shorter as the ceiling drops, creates a visually interesting storage wall that uses the full height available at each point.
The planning requirement: all of these need to be framed before drywall. Retrofit knee-wall storage is possible but involves opening finished walls. Build it in once and build it right.
Takeaway: Calculate your storage needs in linear feet of shelf space before finalizing the framing plan. The knee-wall cavities are your best opportunity for generous storage in a small footprint.
7. Address the Thermal Envelope Before Any Finish Work
Attic bathrooms are exposed to more extreme temperature swings than any other room in the house. In summer, the roof absorbs heat and the attic space above the room acts as a thermal battery. In winter, the reverse — the roof sheds heat and the space above the room pulls warmth out through the ceiling. A bathroom with inadequate insulation in a sloped roof assembly is a bathroom that will be uncomfortable six months of the year and will run a disproportionate share of the household HVAC load year-round.
The insulation challenge is specific to sloped ceilings: you need a continuous thermal boundary at the roof plane while maintaining a ventilation channel between the insulation and the roof decking (required by code in most assemblies to prevent moisture accumulation in the sheathing). That channel is typically 2 inches minimum, which means your rafter depth has to accommodate both the ventilation gap and sufficient insulation depth to hit your climate zone’s required R-value.
In Climate Zone 5 (northern US), the IRC requires R-49 ceiling insulation. A standard 2×10 rafter gives you roughly 9 inches of depth. Subtract 2 inches for the ventilation channel and you have 7 inches — which gets you to about R-21 with standard batt insulation. The gap between R-21 and R-49 has to come from somewhere: either a rigid insulation layer on the interior face of the rafters (reducing ceiling height), spray foam that eliminates the ventilation channel (acceptable only with a fully conditioned unvented assembly, which requires specific membrane details), or a combination approach.
This is not a decision to leave to the drywaller. It requires the structural engineer and a building enclosure consultant to spec the assembly correctly for your climate and your roof geometry before anyone picks up a nail gun.
Takeaway: Spec the thermal envelope at the same time as the structural assessment. Both affect how much ceiling depth you have to work with, and ceiling depth affects every finish decision that follows.
8. Get the Vanity Height and Mirror Placement Right for a Raked Wall
Standard vanity height is 32–36 inches. Standard mirror mounting puts the center of the mirror at roughly eye level for a 5’8″ adult, which means the top of the mirror sits somewhere around 6’2″–6’6″ above the floor. In a small attic bathroom with sloped ceiling, the wall behind the vanity is often a knee wall or a transitional-height wall — and a standard mirror centered on that wall either hits the slope awkwardly or can’t be mounted at functional height at all.
The fixes that work:
Position the vanity under the high end of the transitional zone, where the wall behind it has the most clearance before the slope intersects. Even 6 inches of additional wall height behind the vanity makes a significant difference in how the mirror sits.
Use a horizontal mirror rather than a vertical one. A wide, low mirror — 48 inches wide and 24 inches tall, for example — can be mounted lower on the wall and still provide full-face coverage. The horizontal format also visually widens a narrow attic bathroom, which is almost always a spatial improvement.
Consider a tilted mirror. A mirror mounted on a slight forward tilt (5–10 degrees) can be placed lower on the wall while still reflecting at a comfortable viewing angle. This is a practical solution when the wall height genuinely won’t accommodate a standard mounting position.
Build the vanity lower than standard. A 30-inch vanity height (lower than the current trend toward 36-inch comfort height) leaves more wall above it for mirror clearance. If the primary users are average adult height, 30 inches is functional — and the lower vanity visually increases the apparent ceiling height by creating more vertical wall above it.
Takeaway: Measure the wall height directly behind your planned vanity position before selecting the vanity or mirror. That number governs both decisions.
9. Control the Visual Scale With Deliberate Color and Pattern Strategy
A small attic bathroom with sloped ceiling is a room where every surface decision has amplified consequences. The same tile that looks elegant in a 200-square-foot master bath can feel overwhelming in a 55-square-foot attic bathroom. The same goes for pattern, contrast, and color temperature. The attic bathroom that feels expansive and considered is almost always the one where someone made deliberate, restrained choices — not the one where every surface got its own treatment.
The principles that consistently produce good results:
Limit the material palette to three surfaces maximum. Floor tile, wall tile or paint, and ceiling treatment. Any more than three and the room starts competing with itself. The slope means every surface is highly visible from any standing position — you see the floor, two or three walls, and the ceiling simultaneously, which means complexity multiplies faster than it does in a standard room.
Run the floor material up the knee wall. Continuing the floor tile 12–18 inches up the knee-wall face eliminates the visual break at floor level and makes the perimeter feel less chopped. It’s a small detail with a disproportionate spatial effect.
Use the ceiling as the accent surface. In most rooms, the ceiling is the neutral. In a sloped attic bathroom, the ceiling is too prominent to be neutral — it’s constantly in your peripheral vision. Leaning into it with a paint color, a wood treatment, or a tile that’s different from the walls turns the slope from an awkward feature into the room’s focal point.
Keep grout color close to tile color. High-contrast grout in a small space emphasizes the geometry of every tile — including every awkward cut along the slope. Tone-on-tone grout reads as continuous surface rather than a grid pattern, which makes small rooms read larger.
Takeaway: Finalize your material palette as a complete set before purchasing anything. Hold all samples in the actual space at the same time and look at them together, not individually.
These nine fixes address the real failure points in attic bathroom design — structural, code, spatial, material, atmospheric, and thermal. Not every project will hit every challenge, but in a small attic bathroom with sloped ceiling geometry, most projects will hit most of them. The ones that get built well are the ones where the design decisions followed the geometry instead of fighting it.
Frequently Asked Questions
What is the minimum ceiling height required for an attic bathroom?
The IRC requires a minimum of 6 feet 8 inches of ceiling height over at least 50% of the bathroom’s floor area. This applies to the finished ceiling height — after framing, insulation, and drywall — not the raw rafter height. Showers have a separate requirement: IRC specifies a minimum 80-inch (6’8″) clear height at the showerhead. In practice, these two requirements often land in the same zone, which is the high spine along the ridge.
Can I put a full tub in a small attic bathroom with a sloped ceiling?
Yes, but placement is specific. A freestanding soaking tub doesn’t require standing height above it — you lower yourself into it and recline — which means it can sit in a transitional ceiling zone where the height drops to 5–6 feet. The approach path to the tub needs compliant clearance, but the tub itself can tuck under the slope. This is one case where the slope becomes a genuine design advantage: a tub nestled under a low raked ceiling feels intentionally cozy rather than constrained.
How much does an attic bathroom typically cost compared to a standard bathroom renovation?
Expect a 40–70% premium over a comparable standard bathroom renovation, primarily driven by structural reinforcement (sistered joists, new floor assembly), plumbing routing through multiple floors, and custom work that replaces prefabricated components. A mid-range standard bathroom renovation might run $15,000–$25,000; the equivalent attic bathroom typically runs $22,000–$40,000 or more depending on the structural conditions. The structural engineer assessment ($500–$1,500) is the most important early spend — it tells you whether you’re looking at the lower or upper end of that range before you’ve committed to anything.
What’s the best exhaust fan setup for an attic bathroom?
A humidity-sensing fan rated for at least 110 CFM, vented through insulated rigid duct to a dedicated roof cap. Avoid soffit terminations and flex duct runs longer than 6 feet. The humidity sensor removes the human variable — the fan runs as long as moisture is present regardless of whether anyone remembers to leave it on. In a sloped ceiling assembly, the duct routing requires more planning than in a standard bathroom because you’re threading through an insulated rafter bay, so the duct insulation and sealing need to be done before the ceiling is enclosed.
How do I make a small attic bathroom feel larger than it is?
The most effective tactics, in rough order of impact: run floor material up the knee wall 12–18 inches to eliminate the visual break at the perimeter; use a horizontal mirror instead of a vertical one; keep the material palette to three surfaces and use tone-on-tone grout; place the primary light source at counter height rather than overhead so the ceiling recedes; and treat the sloped ceiling as an accent surface rather than a neutral. None of these add square footage. All of them change how the existing square footage registers.