The average home office is smaller than a parking space — yet most desk advice assumes you have room to pull a chair back three feet, run cables along a baseboard, and still walk past without turning sideways. If you’ve been searching for built in desk ideas small spaces actually accommodate without gutting the room or sacrificing every inch of floor space, the answer almost never comes from freestanding furniture. Most of it also assumes you’ll buy a freestanding desk, push it against a wall, and call it a built-in. That’s not a built-in. That’s a desk near a wall, and the difference matters enormously once you’re actually trying to work in the space every day.
Quick Answer
The average home office is smaller than a parking space — yet most desk advice assumes you have room to pull a chair back three feet, run cables along a baseboard, and still walk past without turning sideways.
What follows isn’t an inspiration gallery. Every fix here comes with the specific numbers, structural notes, and trade-offs that the Pinterest-board articles skip entirely — because those articles are written by people who have never had to explain to a client why the beautiful corner desk they saw online left them unable to open their closet door.
Why Most Compact Workspace Setups Fail Before You Buy a Single Thing
In This Article
- Why Most Compact Workspace Setups Fail Before You Buy a Single Thing
- 1. The Floating Ledge Desk — Minimum Footprint, Maximum Rigidity
- 2. Recessed Alcove Workstation — Borrowing Depth From the Wall Itself
- 3. Corner Built-In — The Most Underused Geometry in Small Rooms
- 4. Closet Conversion Desk — Turning Dead Storage Into a Full Workstation
- 5. Under-Stair Built-In — Using the Triangle Nobody Thinks About
- 6. Murphy Bed Desk Combination — When the Workspace Has to Disappear Completely
- 7. Window Bay Built-In — Capturing the Most Valuable Light in the Room
- 8. Bedroom Built-In — Integrating a Workspace Without Wrecking Sleep
- 9. Hallway Built-In — The Linear Space Almost Everyone Ignores
- The Honest Summary: Which of These Built In Desk Ideas for Small Spaces Actually Makes Sense for Your Home
Most people treat a small-space desk problem as a shopping problem. They measure the wall, find a desk that fits the measurement, order it, and then spend the next six months frustrated — not because the desk is wrong, but because the planning sequence was wrong from the start.
The three planning mistakes that waste square footage before a single bracket goes into the wall:
- Planning around furniture dimensions instead of body dimensions. A standard desk is 30 inches deep. OSHA ergonomic guidelines note that for monitor-only setups, as little as 20 inches of desk depth is functionally sufficient — meaning you might be sacrificing 10 inches of floor space for a surface you’ll never use.
- Ignoring the chair clearance zone. The desk footprint is only half the space it consumes. A standard office chair needs 18–24 inches of pull-back clearance. That’s often more floor space than the desk itself.
- Conflating a built-in with a built-to-look-built-in. A true built-in is anchored to the structure of the room — it has no gap at the back wall, no exposed sides unless they terminate into a wall or cabinet, and it doesn’t move. A piece of furniture pushed against a wall looks different, reads differently in photos, and matters on resale. Buyers and appraisers distinguish between the two.
On the resale question: a thoughtfully executed built-in — one that’s properly finished, doesn’t block egress, and doesn’t require demolition to remove — reads as a home improvement. A particleboard shelf with a power strip zip-tied to the back reads as a liability.
The room size reality is worth naming plainly: NAHB data puts the average dedicated home office at roughly 10×10 feet or smaller. That’s 100 square feet, and in that space, a 30-inch-deep desk running 5 feet wide consumes 12.5 square feet of floor space — plus the chair zone. Trim the desk depth to 20 inches and you recover nearly 4 square feet. In a 10×10 room, that’s not nothing.
Actionable takeaway: Before you plan any built-in, measure your actual body dimensions in use — seated elbow height, monitor distance preference, and the clearance your specific chair requires — then plan the surface around those numbers, not around standard furniture specs.
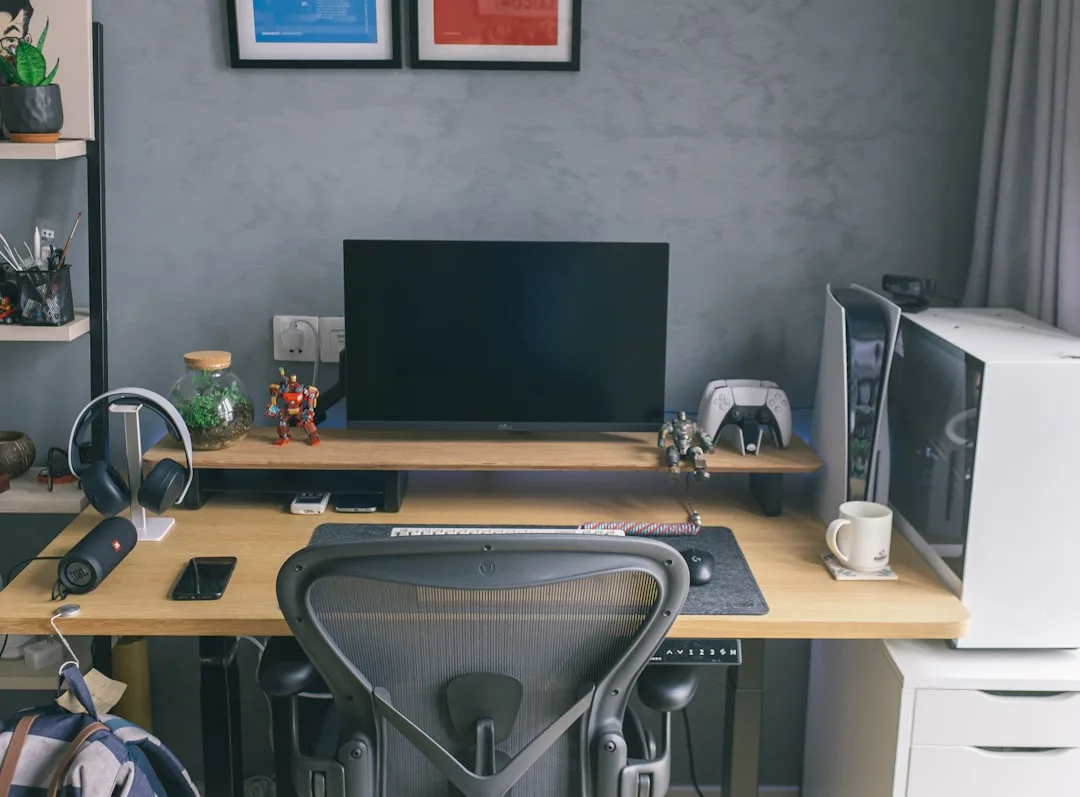
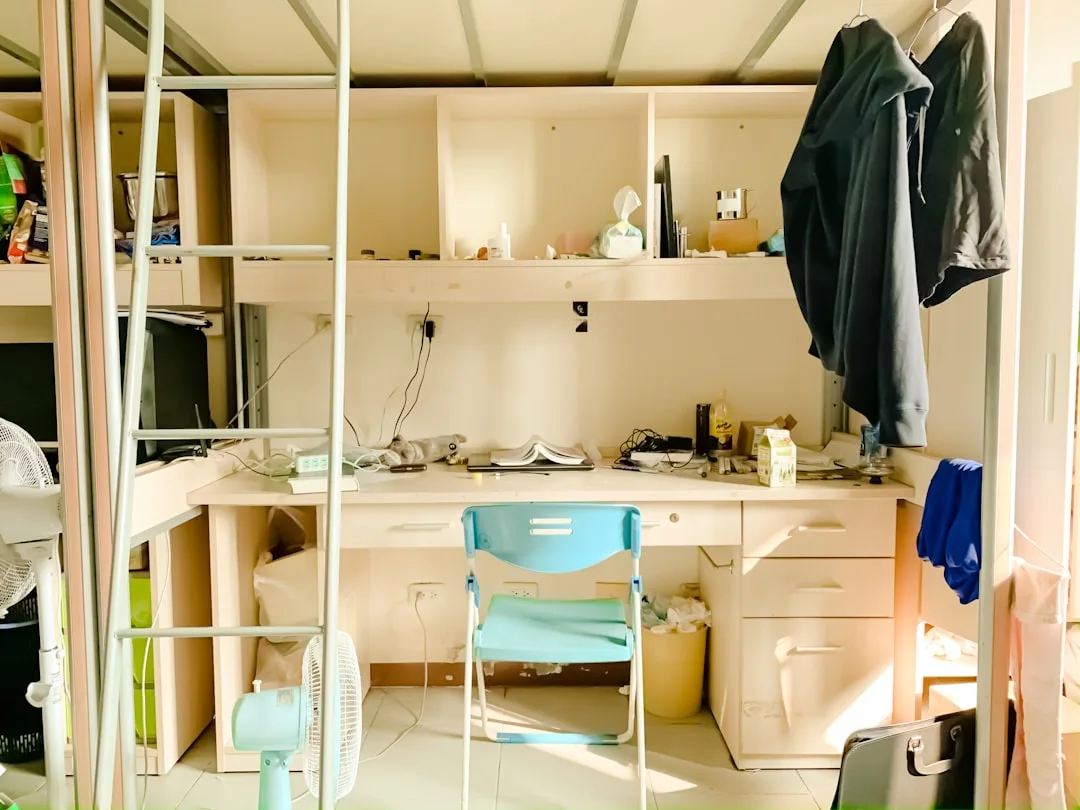
1. The Floating Ledge Desk — Minimum Footprint, Maximum Rigidity
Wall-mounted floating desks are everywhere in small-space content, and almost all of that content skips the one thing that determines whether the surface is actually usable: bracket placement. Get it wrong and the desk wobbles under typing pressure, which is maddening in a way that’s hard to describe until you’ve experienced it at 9am on a Monday.
The depth question first. Eighteen to twenty inches is the realistic minimum for laptop-only use — you need enough surface to rest your wrists and keep the screen at a comfortable distance. Bump to 24 inches if you’re running a single external monitor. Dual monitors in a straight-line arrangement want at least 30 inches, at which point you’re back to standard desk depth and should probably consider a corner configuration instead.
Bracket placement is where most floating desk installations fail. The instinct is to place brackets at the ends of the surface — it looks symmetrical, and symmetry feels stable. It isn’t. A properly loaded floating surface distributes weight more safely when brackets are positioned at the quarter-points of the span. On a 6-foot surface, that means brackets at 18 inches and 54 inches from the left end, not at 0 and 72. This reduces the lever-arm moment that causes end-bracket wobble under load. A properly anchored bracket into wall studs — not just drywall — can support 50–100 lbs per bracket, but that rating assumes the fastener is actually in a stud, not floating in drywall.
Material selection matters more in certain rooms than others. Butcher block is beautiful and handles humidity better than MDF — relevant if the desk is near a kitchen or in a basement. MDF will swell and delaminate at the edges if moisture is a consistent factor. For painted finishes in dry rooms, MDF is fine and cheaper to work with. Solid wood and plywood both outperform MDF for anything spanning more than 48 inches unsupported.
Cable routing is the detail that separates a clean installation from one that looks improvised. Route power through the wall or along a surface-mounted cable raceway before the desk surface goes up — retrofitting a cable trough into an already-mounted surface is technically possible but genuinely irritating. A 2-inch hole with a grommet insert positioned at the back corner of the surface handles most cable needs without visible mess.
Actionable takeaway: Before drilling, locate every stud in the installation zone with a reliable stud finder (scan twice), mark the quarter-points of your intended surface length, and confirm those points align with studs — adjust the surface length slightly if they don’t.
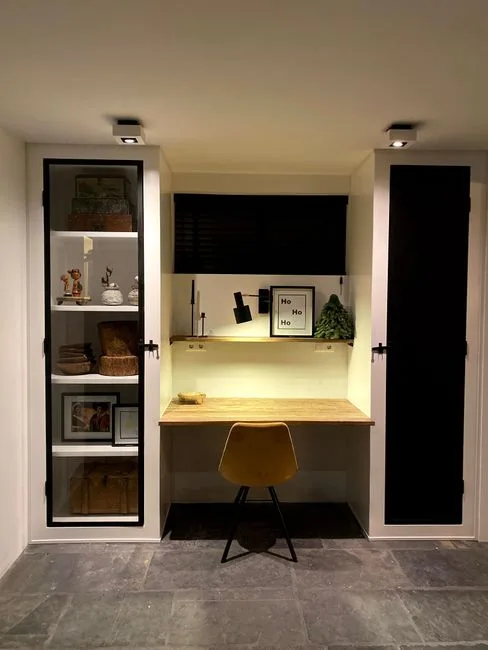
2. Recessed Alcove Workstation — Borrowing Depth From the Wall Itself
Here’s something most guides won’t tell you directly: the wall itself has depth you’re not using. A standard 2×4 stud wall has a 3.5-inch cavity between the drywall faces. A 2×6 wall gives you 5.5 inches. Neither of those sounds like much until you realize that recessing a desk surface by even 3–4 inches means the working surface sits flush with — or behind — the face of the wall plane. The desk stops feeling like a thing sticking into the room and starts feeling like part of the architecture.
Identifying viable walls. The critical qualification is non-load-bearing. Load-bearing walls are not candidates for niche work unless you’re involving a structural engineer and a permit, full stop. Non-load-bearing partition walls — typically interior walls running parallel to the roof ridge, or walls that don’t support a beam or floor system above — are the target. If you’re not certain, a contractor can assess this in under 30 minutes. The cost of that conversation is far lower than the cost of cutting into the wrong wall.
Going deeper than the stud cavity. If the wall backs up to a closet, pantry, or another low-priority space, you can steal 6–18 inches of genuine depth by framing a niche that extends into that adjacent space. This is how you get a full 20–24 inch working depth without the desk surface projecting into the room at all. The structural work is straightforward — you’re essentially framing a new opening and finishing the interior — but it does require a permit in most jurisdictions if it involves modifying framing.
Finishing the niche interior. Paint the recessed surfaces two shades darker than the surrounding wall, or use a contrasting material like painted wood paneling or tile. This reads as intentional rather than unfinished, and it visually separates the workspace from the rest of the room without a physical partition. Add a single recessed light or a small LED strip at the top of the niche to keep the working surface adequately lit — a recessed workspace that’s dim defeats the purpose.
Electrical planning inside a niche. A recessed workstation almost always needs power inside the niche, and the time to run that circuit is before the drywall goes back up. A single duplex outlet at desk height on the back wall of the niche, combined with a USB-A/USB-C outlet, handles most setups cleanly. If you’re running this as a dedicated workspace, a separate 20-amp circuit is worth the additional cost — it prevents the desk from sharing a circuit with kitchen appliances or other high-draw devices.
Actionable takeaway: Before committing to a recessed alcove, map what’s on the other side of the wall. A utility chase, HVAC duct, or plumbing stack can rule out an otherwise ideal location — and finding that out before you cut is significantly less painful than finding it after.
3. Corner Built-In — The Most Underused Geometry in Small Rooms
Corners are the most consistently wasted real estate in small rooms. The floor area within 24 inches of a 90-degree corner is functionally inaccessible to most furniture configurations — you can’t push a sofa into a corner without losing the corner space, and you can’t place a freestanding desk there without creating an awkward gap. A built-in corner desk solves this by filling the geometry completely.
The L-shaped configuration math. A corner desk with two 48-inch runs gives you 8 linear feet of working surface while occupying a footprint that would otherwise be dead space. That’s substantially more surface area than a 60-inch freestanding desk, in a zone of the room that couldn’t productively hold much else. The actual floor space consumed by the desk itself is concentrated in the corner — the chair occupies the center of the room, where circulation happens anyway.
Depth asymmetry as a feature. Most corner built-ins are designed with equal depth on both runs, which wastes the opportunity to optimize. If your primary work surface is on one run — say, the run facing the window — give that side 24 inches of depth and reduce the secondary run to 16 inches. The secondary run handles reference materials, a secondary monitor, or a printer without consuming the floor space that a full-depth surface would require.
The corner joint problem. The inside corner of an L-shaped desk is the most structurally vulnerable point and the least ergonomically useful — you can’t sit directly in the corner and reach both surfaces comfortably. Options: a standard 90-degree joint with a fixed corner filler panel, a diagonal cut that creates a usable triangular surface in the corner, or a radius corner (curved front edge) that looks refined but requires more careful material fabrication. The diagonal cut is the most practical for DIY execution.
Anchoring both runs independently. Each arm of the L should anchor to its own wall with independent bracket or ledger systems. Don’t rely on the corner joint to transfer structural load between the two runs — the joint will eventually work loose under the cyclic loading of daily use. Two independent, properly anchored runs that meet at a corner are more stable than a single fabricated L-shape that’s anchored at only two points.
Actionable takeaway: Measure the corner diagonal before committing to a corner configuration — confirm that your chair, when positioned at the center of the L, doesn’t conflict with a door swing, drawer pull, or other fixed element. This is almost always the clearance issue that surprises people after installation.
4. Closet Conversion Desk — Turning Dead Storage Into a Full Workstation
Converting a reach-in closet into a built-in desk is one of the highest-ROI space moves available in a small home, and it’s substantially more achievable than it looks. The closet already has three finished walls, an existing ceiling, and — in most cases — a light fixture. You’re not building a workspace from scratch; you’re reclassifying an existing room volume.
Closet size minimums. A standard reach-in closet is 24 inches deep and 36–60 inches wide. That’s enough depth for a monitor setup and enough width for a functional single-person workspace. A 60-inch-wide closet with 24 inches of depth gives you more usable working area than many dedicated home offices. If the closet is 36 inches wide, it’s still functional — you’re working in a more focused, less cluttered configuration.
The bifold door decision. Bifold doors can stay or go. If you want to close the workspace off from the room — for video calls, visual separation, or simply tidying — keeping the doors is valuable. Bifold doors, however, require clearance to operate, and that clearance zone eats into your chair pullback. Replace bifolds with barn doors on a wall-mounted track to eliminate that clearance conflict, or remove the doors entirely and replace the opening with a roman shade or curtain panel for a softer visual close.
Electrical access is usually straightforward. Most closets share a wall with a room that has outlets on that same wall — the outlet is on the room side of the shared wall, and running a new outlet into the closet by tapping into that circuit is a relatively simple electrical task. Confirm that the circuit has available capacity before adding devices. If the closet lacks a ceiling light, a battery-operated LED puck light at the top center of the closet interior handles basic task lighting for under $30 without any electrical work.
Ventilation for equipment. A closed closet with a running computer generates heat, and heat damages equipment over time. If you’re closing the doors during work, cut 2–4 louvered vent holes at the bottom of the door panels — this allows passive airflow without a visible opening. If the closet has a shared wall with an exterior, a small duct fan can actively exhaust warm air during heavy-use periods.
Actionable takeaway: Before removing the closet rod and shelving, photograph the existing configuration from every angle. If the conversion doesn’t work as planned, having a record of the original layout simplifies restoration — which matters for renters and for anyone planning to sell within a few years.
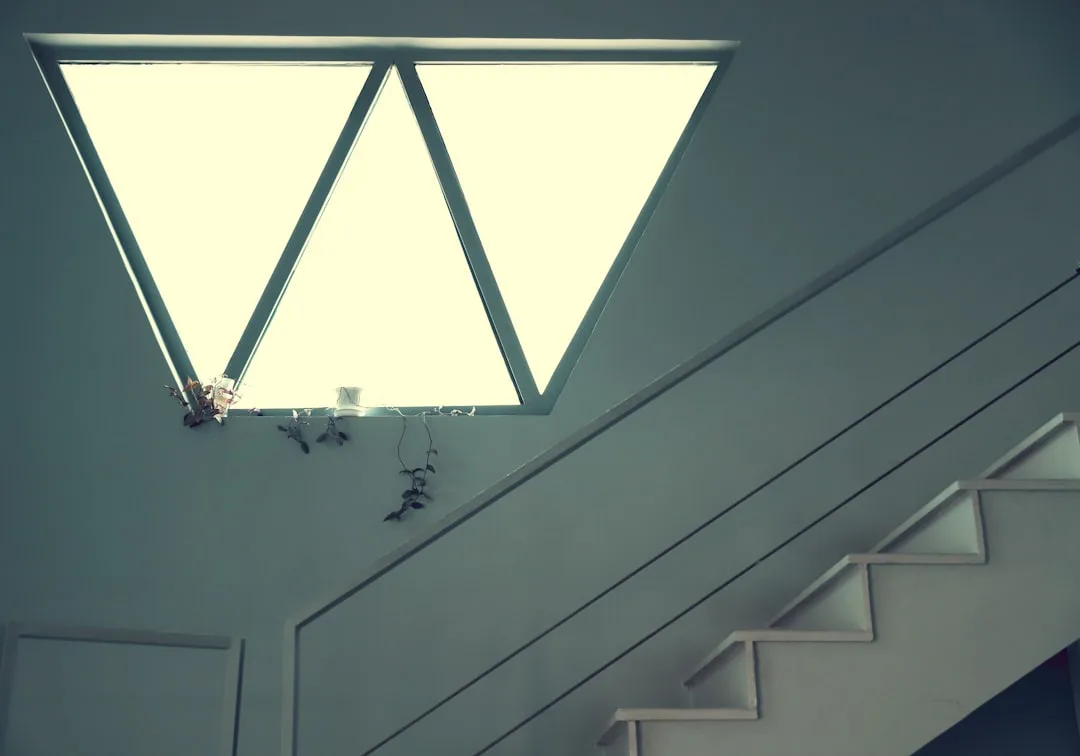
5. Under-Stair Built-In — Using the Triangle Nobody Thinks About
The space under a staircase is one of the most distinctive built-in desk locations available in a two-story home, and it’s genuinely well-suited to desk use in ways that other awkward spaces aren’t. The low-clearance end naturally houses storage, the mid-height zone fits monitor setups comfortably, and the full-height end can accommodate standing work or a tall shelving unit.
Clearance mapping before anything else. Stand under the stair and measure the clearance height at 12-inch horizontal intervals from the low end to the high end. You’re looking for the point where clearance reaches 48 inches — that’s the minimum practical seated desk height (chair seat plus seated torso height). The desk surface itself doesn’t need to span the entire under-stair volume; it only needs to occupy the zone where clearance is adequate.
The structural consideration specific to stairs. Stair stringers — the diagonal structural members that support the treads — run along the wall side of the staircase and are load-bearing. Don’t notch, cut, or fasten anything into the stringer without understanding what you’re attaching to. Fastening a desk bracket to the wall beside the stringer is fine; fastening through the stringer itself requires a structural assessment. When in doubt, a ledger board fastened to the studs of the adjacent wall carries the desk load cleanly without touching stair framing.
The angled ceiling challenge. The underside of the stair creates an angled ceiling plane that’s visually interesting but practically tricky — a monitor positioned too close to the low-clearance end puts the screen uncomfortably close to the ceiling. Position the primary monitor zone at the point where vertical clearance is at least 18 inches above the desk surface, which keeps the screen in a comfortable viewing angle range and prevents the ceiling from intruding on sightlines.
Built-in storage in the low-clearance zone. The triangular low end — where clearance drops below 36 inches — is useless for seated work but excellent for shallow drawers, printer storage, or a rolling cabinet. Frame this zone with a door and it reads as intentional cabinetry rather than an awkward leftover. Custom drawer fronts that follow the angled ceiling line look deliberate and finish the installation cleanly.
Actionable takeaway: Check local building codes before modifying under-stair space — some jurisdictions require fire-rated materials on the underside of stairs, particularly in multi-family housing. A coat of intumescent paint on any exposed wood surfaces satisfies most of those requirements without a full drywall installation.
6. Murphy Bed Desk Combination — When the Workspace Has to Disappear Completely
For rooms that need to function as both bedroom and workspace — guest rooms, studio apartments, multipurpose rooms — a Murphy bed and desk combination system is the only configuration that genuinely solves the problem rather than compromising on both uses simultaneously.
How the mechanism works. A Murphy bed desk combination uses a counterweighted wall-mounted cabinet system. The bed platform folds down from the wall; the desk surface either folds up out of the way when the bed deploys, or remains fixed at a height that clears the lowered bed. The better systems use a gas-piston or spring counterbalance that makes the bed easy to raise and lower without assistance. Cheap pivot hardware makes the bed heavy and awkward — this is not the place to economize on mechanism quality.
Desk surface options within the system. The most functional Murphy desk combinations keep the desk surface in use even when the bed is deployed — the desk doesn’t fold away; it stays fixed at a position that clears the lowered bed platform. This requires precise measurement: the desk surface height plus the mattress-plus-platform stack height must total less than the wall cabinet height, with clearance to spare. A typical twin mattress plus platform runs 10–14 inches; add the desk surface at standard height (28–30 inches) and confirm those numbers work within your wall cabinet dimensions before ordering.
Wall structure requirements. A Murphy bed system imposes significant point loads on the wall — the full weight of the bed, mattress, and any integrated storage is cantilevered off the wall cabinet’s anchoring points. These anchors must hit studs, and the studs must be in good condition. A wall with damaged, cut, or sistered studs may require reinforcement before installation. If you’re in an older home, have the stud condition assessed before committing.
The visual close. When the Murphy bed is raised, the wall should look like a wall with built-in cabinetry — not like a bed-shaped rectangle outlined in trim. This requires the cabinet doors to fully cover the bed platform and mattress edge, with consistent reveal gaps and hardware that matches other room finishes. Budget an additional 10–15% of the system cost for this finishing work if you’re buying a base system and finishing it yourself.
Actionable takeaway: Before purchasing any Murphy system, measure your ceiling height against the system’s total deployed height — some Murphy beds require 9-foot ceilings, and installing a system with insufficient clearance is a non-starter that’s expensive to discover after delivery.
7. Window Bay Built-In — Capturing the Most Valuable Light in the Room
A bay window creates a projecting volume that most furniture can’t fill cleanly. The angled side windows, the offset floor plane if the bay has a raised platform, and the irregular footprint all work against freestanding furniture. A built-in desk that fills the bay turns that awkward geometry into the best seat in the house — natural light from three directions, a view, and a workspace that feels separate from the rest of the room without a partition.
Platform vs. flush configuration. If the bay has a raised platform (common in older homes), you have two options: build the desk surface at platform height and treat the platform as the base, or frame the platform down to match room floor level and build a standard-height desk. The platform-height option is simpler and preserves the existing structure; the flush option is more work but gives you more clearance height under the desk surface for leg room and storage.
Dealing with the angled side walls. The angled returns of a bay window create wall surfaces that aren’t perpendicular to the desk surface — standard rectangular desk returns don’t fit cleanly against them. The solution is a scribed return panel: a side panel cut to follow the angle of the wall exactly, creating a tight fit without gaps. This is a detail that reads as custom regardless of the actual material cost, because it demonstrates that the desk was made for this specific space.
Thermal and moisture management. Bay windows are among the highest heat-loss zones in a house, and a desk surface directly against the glass will experience temperature swings that can affect wood movement and comfort. Keep solid wood surfaces at least 3–4 inches from the glass, seal any gaps between the desk structure and the window surround, and consider a thin insulation layer in the desk base if it’s a platform configuration. In cold climates, a desk in a poorly insulated bay is uncomfortable to use in winter regardless of how well it fits the space.
Seating configuration in a bay. The natural seating position in a bay desk faces the room rather than the window — putting the window light behind you eliminates screen glare and provides the best natural light for video calls. This is counterintuitive to most people who imagine themselves facing the view, but the functional reality is that a window behind you is a better working condition than a window in front of you.
Actionable takeaway: Before building a bay desk, assess the window condition — a bay desk built against failing windows will need to be partially dismantled when the windows eventually require replacement. New windows before the desk is a better sequence than new windows after.
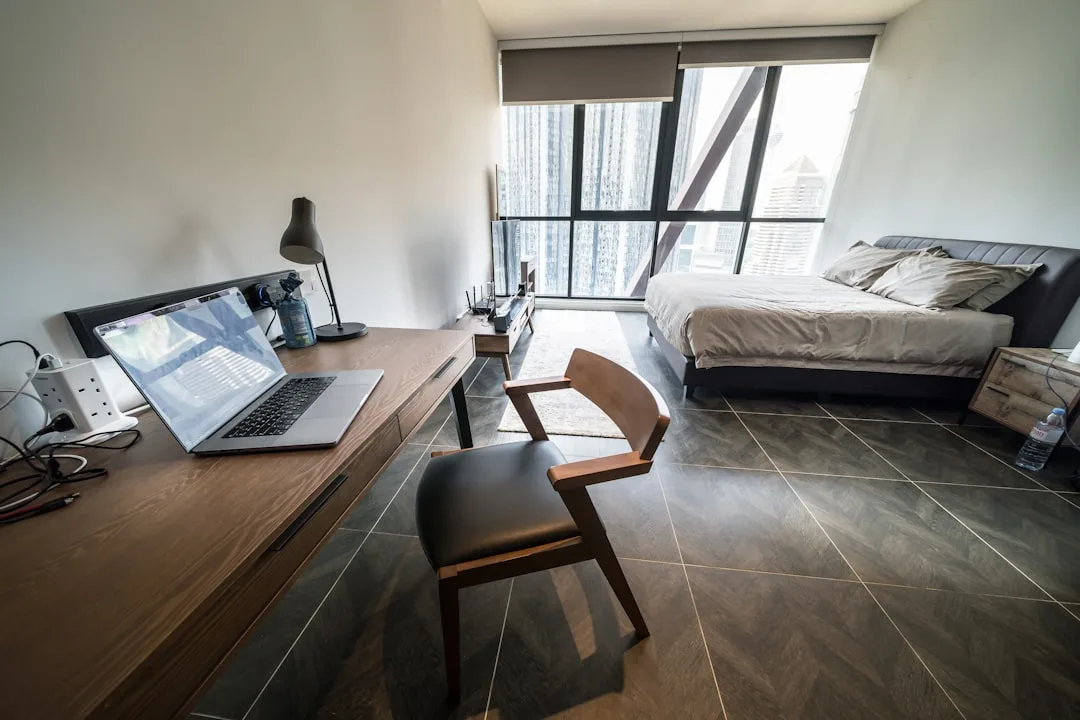
8. Bedroom Built-In — Integrating a Workspace Without Wrecking Sleep
The bedroom desk is a design problem that has a genuinely good solution and several genuinely bad ones. The bad solutions involve putting a desk in the sightline of the bed and calling it done. The good solution involves positioning, visual separation, and the built-in as a containment strategy rather than just a furniture choice.
The sleep science position. The American Academy of Sleep Medicine recommends against working in the bedroom — the association between the space and work activity can interfere with sleep onset. That said, for many people in small homes, the bedroom is the only private space available. The built-in solution addresses this by making the workspace concealable — a desk that can be visually closed off with a panel, curtain, or cabinet door preserves the bedroom’s primary identity even if work happens there during the day.
Position relative to the bed. The desk should not be in the direct sightline from the pillow position. If you can see the desk — particularly if you can see a screen, pending work, or an active indicator light — while lying in bed, the workspace is too visible. Built-ins in an adjacent alcove, behind a partial wall, or in a window bay can all achieve sightline separation without a structural partition.
The built-in as a headboard alternative. A desk built into a wall adjacent to the bed head can share structural elements with a headboard-height unit — open shelving above the desk, a narrow working surface, and low-profile storage below. This concentrates all the bedroom’s non-sleeping functions into one wall, keeping the rest of the room as neutral as possible. It also allows the desk surface to be narrower than standard — 18 inches is workable for a laptop-only setup — because the desk isn’t the room’s primary function.
Lighting for dual function. A bedroom built-in desk needs task lighting that doesn’t bleed into the sleeping zone. A directional LED arm lamp positioned to light the surface without washing the room handles this cleanly. Avoid overhead fixtures mounted above the desk — they illuminate the ceiling and walls in a way that makes the workspace feel present even when it’s not in use.
Actionable takeaway: Install a physical on/off switch for the desk lighting that’s separate from the room’s main lighting circuit. Being able to kill the task light completely from a single switch — without affecting bedside lamps — makes the transition from work to sleep mode faster and less disruptive.
9. Hallway Built-In — The Linear Space Almost Everyone Ignores
Hallways have a bad reputation as wasted space, and the reputation is mostly deserved — until you start looking at the wall surface available in a standard corridor. A hallway that’s 36 inches wide (the minimum ADA-compliant corridor width) has enough clearance for a 12–16 inch deep built-in desk surface that leaves 20–24 inches of pass-through width — technically sufficient for pedestrian circulation in a residential setting, though tight.
Where the hallway desk actually works. The configuration requires a hallway that terminates at a wall or has a dead end — a through-corridor with traffic from both directions is not a good desk location for obvious reasons. A hallway leading to a bedroom, ending at a window, or terminating at a utility room is the target. The terminating wall is your desk wall; the length of the approach is your overhead storage zone.
Depth constraints and workarounds. A 12-inch desk surface is marginal for any setup beyond a tablet or small laptop. The workaround is a fold-down or pull-out extension: a 12-inch fixed surface with a 10-inch fold-down extension on a piano hinge gives you 22 inches of depth when you need it and 12 inches when you don’t. The extension folds flat against the desk front when not in use, maintaining corridor clearance during pass-through traffic.
Overhead storage as the primary function. In a hallway built-in, the desk surface is secondary to the storage opportunity above it. Floor-to-ceiling built-in shelving flanking a narrow desk surface creates an alcove effect — the visual weight of the storage unit makes the desk feel embedded in the architecture rather than perched on the wall. This also gives you the vertical storage that a small home needs, in a zone that would otherwise hold nothing but paint.
Lighting in a typically dark zone. Hallways are often the darkest spaces in a home, and a dark workspace is both unpleasant and hard on the eyes. A single under-cabinet LED strip on the lowest shelf above the desk handles task lighting without requiring a new ceiling fixture. If the hallway has no natural light, a daylight-spectrum LED strip (5000K–6500K) makes a material difference in how the workspace feels during extended use.
Actionable takeaway: Before committing to a hallway desk, walk the corridor at peak traffic times for your household — morning routines, school bag drop zones, late-night kitchen runs. A desk that interrupts any of those circulation patterns will be abandoned within weeks regardless of how well it’s built.
The Honest Summary: Which of These Built In Desk Ideas for Small Spaces Actually Makes Sense for Your Home
Every configuration above works — in the right room, for the right use, with the right execution. The matching problem is simpler than it looks:
- Floating ledge desk: Renters, minimalists, laptop-primary users, anyone who wants reversibility.
- Recessed alcove: Homeowners with non-load-bearing partition walls and an adjacent low-priority space to borrow depth from.
- Corner built-in: Anyone with an underused corner and enough room width to pull a chair back without hitting the opposite wall.
- Closet conversion: Households with more closet space than storage needs, and anyone who wants a workspace that can close completely.
- Under-stair: Two-story homes only, works best when the stair run is long enough to provide 48+ inches of clearance at the desk zone.
- Murphy bed desk: Studio apartments, guest rooms, any space that has to perform two primary functions and can’t compromise on either.
- Bay window: Older homes with bay geometry that furniture has never fit well; best in rooms with good window condition and thermal performance.
- Bedroom built-in: Last resort for private space, best executed with visual containment built into the design from the start.
- Hallway built-in: Dead-end corridors only, works best when paired with significant overhead storage to justify the installation effort.
The common thread across all nine is that the built-in works because it responds to the specific geometry of the room — not because it’s a clever product, but because it was designed for that wall, that corner, that closet. That’s what separates built in desk ideas small spaces genuinely benefit from versus the generic advice that looks good in a render and disappoints in practice.
Have a specific room configuration that doesn’t match any of the above? The structural and planning principles here apply to hybrid configurations — a floating ledge inside a recessed alcove, a corner built-in in a hallway termination, a Murphy system inside a converted closet. The geometry changes; the planning sequence doesn’t.