
The cabinet in your home office is probably full — and that’s exactly the problem: fullness and organization are not the same thing, and every professional organizer knows the difference starts before you buy a single bin. I’ve walked into hundreds of home offices over eleven years of practice, and the ones with the worst storage problems almost never lacked cabinets. They lacked intention. The cabinet becomes a drawer — a place where things disappear rather than a system that supports how you actually work — and then people go buy another cabinet and repeat the process at twice the cost.
Quick Answer
The cabinet in your home office is probably full — and that’s exactly the problem: fullness and organization are not the same thing, and every professional organizer knows the difference starts before you buy a single bin.
This is the fix. Not a product list. A framework.
Why Most Home Office Storage Fails Before You Even Open a Drawer
In This Article
- Why Most Home Office Storage Fails Before You Even Open a Drawer
- Audit First: Mapping What Actually Lives in Your Cabinets
- Shelf Placement Strategy: The Ergonomic Logic Most People Ignore
- The Interior Insert Hierarchy: What Goes Inside Your Cabinets vs. On Them
- Labeling Systems That Age Well (And Ones That Fall Apart Fast)
- Cord and Tech Management Inside Cabinet Spaces
- Styling the Open Sections: Making Organized Cabinets Look Intentional
- When to Reconfigure vs. When to Replace Your Cabinet Entirely
Storage fails at the purchasing stage — almost always. The pattern I kept seeing in client homes was identical: someone feels disorganized, they go to IKEA or Target, they buy a cabinet or a set of matching bins, they fill it up, and six weeks later they’re more frustrated than before. The purchase felt like action, but it wasn’t. It was avoidance dressed up as productivity.
The fundamental mistake is treating storage and organization as synonyms. Storage is physical capacity. Organization is a system that assigns purpose to that capacity based on how you work. One is a container. The other is a decision.
Most home office clutter falls into three categories that people habitually mix together inside the same cabinet — and this is where the breakdown happens. Active work is anything you touch within the current week: client files, notebooks, the project you’re mid-stream on. Archive material is documentation you need to keep but rarely reference — past contracts, tax records, completed project folders. Dead weight is everything else: old cables for devices you no longer own, promotional materials from three jobs ago, blank notebooks you bought but never used. When these three categories share the same shelf without separation, every time you open the cabinet you’re forcing your brain to sort through all three categories to find one thing.
Research from Princeton Neuroscience Institute has demonstrated that physical clutter actively competes for your attention and measurably reduces focus — which means a disorganized cabinet isn’t just an aesthetic problem. It’s costing you cognitive bandwidth every single time you look at it.
Buying more furniture accelerates the chaos if you haven’t audited the workflow first. I once watched a client spend $800 on a custom sectional — wait, wrong project. But I made an equivalent mistake recommending a full modular cabinet wall for a client before we’d established what she actually needed daily access to. We filled it beautifully. It was completely wrong for how she worked.
Takeaway: Before purchasing a single bin or insert, identify which of your three clutter categories is dominating your cabinet. That diagnosis changes every decision that follows.
Audit First: Mapping What Actually Lives in Your Cabinets
Pull everything out. Completely. This sounds obvious but most people resist it because it feels like making things worse before making them better — and they’re right, temporarily. But sorting on a flat surface, whether it’s your desk, your floor, or a folding table, reveals patterns you absolutely cannot see when you’re pulling items out one at a time and making micro-decisions about whether each thing “belongs.”
When everything is out, sort into four buckets:
- Daily access — items you touch every working day
- Weekly access — items you reach for one to three times per week
- Archival — items you need to keep but rarely use (taxes, completed contracts, reference binders)
- Discard — items that have no legitimate reason to occupy real estate in your workspace
The discard pile will be larger than you expect. It always is. In most offices I audited, roughly a quarter of cabinet contents qualified as dead weight — and removing that quarter immediately changed what was possible with the remaining space.
Frequency of use — not size, not category — should determine shelf placement. This is the zone-based workflow model borrowed directly from professional kitchen design, where mise en place logic reigns: things you reach for constantly live within arm’s reach, things you access once or twice a week live at eye level, and archival items go high or low where retrieval requires a moment of deliberate effort. That mild friction is actually useful — it prevents archival material from bleeding back into your active workflow zone.
The audit reveals something else that’s genuinely useful: item clustering. You start to see that three different “categories” of items — your tax documents, your business license copies, and your insurance records — are all the same behavioral category. You reach for them under the same circumstances. They belong together. Category labels don’t capture this. Frequency patterns do.
Most people skip this step entirely and go straight to buying containers. Don’t. The containers should serve the system the audit reveals, not invent one for you.
Takeaway: Do the full pull-out audit before touching a label maker or ordering a single insert. Photograph your four piles when you’re done — you’ll reference that photo when you’re deciding what gets prime shelf real estate.
Shelf Placement Strategy: The Ergonomic Logic Most People Ignore
Here’s something that took me longer to internalize than it should have: inside a cabinet, shelf placement is ergonomics, not aesthetics. The prime real estate inside any cabinet runs from roughly eye level down to mid-torso — that zone is where your visual field naturally lands when you open a door, and where your hands can move without strain. Most people put things wherever they fit. That is not a strategy.
Adjustable shelving changes this from a one-time decision into a living system. Fixed shelves are a liability — not immediately, but eventually. Workflows change. The deep binder collection you maintained in 2022 might be entirely digital by 2025, and if your shelves can’t adjust to accommodate new storage formats, you’re fighting the cabinet instead of using it. Standard adjustable shelf pins allow for roughly one-inch incremental height changes, which sounds minor but means the difference between wasting three inches above a short stack of files and eliminating that dead zone entirely by dropping the shelf to meet the content.
Shelf depth is the silent killer of cabinet efficiency. Most standard office cabinets run 12 to 16 inches deep. If you’re storing items that are 4 to 6 inches deep on those shelves — think binders, small bins, paper reams — you have 6 to 10 inches of invisible dead zone behind every item. Solutions:
- Front-load shallow items and use the back zone for archival boxes that extend deeper
- Add a second row of shorter items behind taller front items on the same shelf
- Install a shelf riser to create a split-level surface that addresses the depth problem without adding a new shelf
The mistake I made repeatedly early in my career was speccing cabinet inserts before measuring the actual items clients owned. We’d install a beautiful grid of clear bins — and then find out that the client’s specific binder style was half an inch too tall. Now I measure everything before I recommend anything.
Takeaway: Before reconfiguring your shelves, measure the tallest item in each of your four access-frequency groups and arrange shelf heights around those measurements, not around what the cabinet manufacturer suggested.
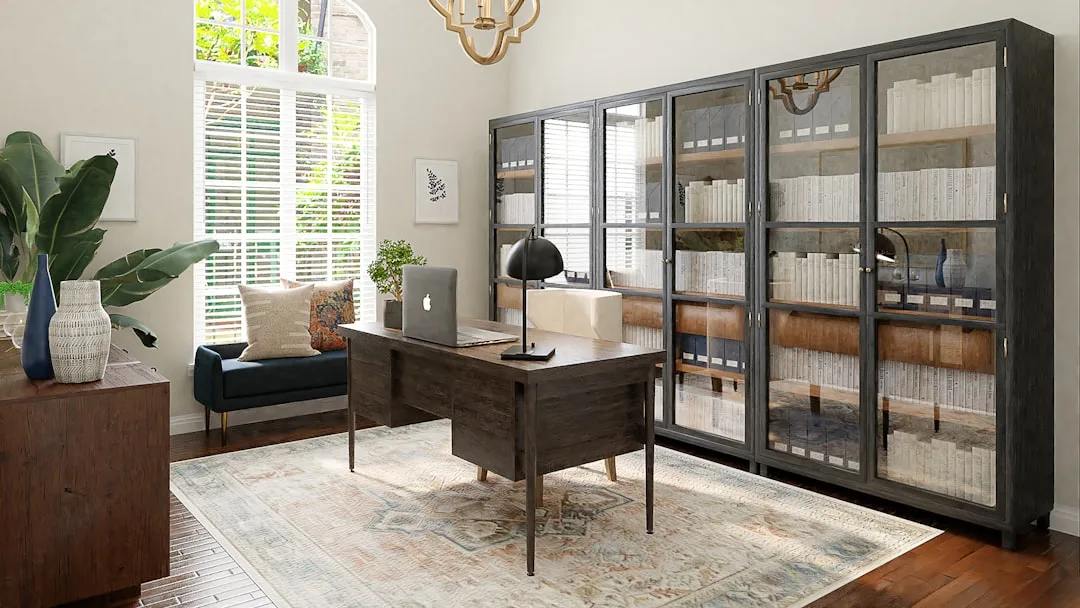
The Interior Insert Hierarchy: What Goes Inside Your Cabinets vs. On Them

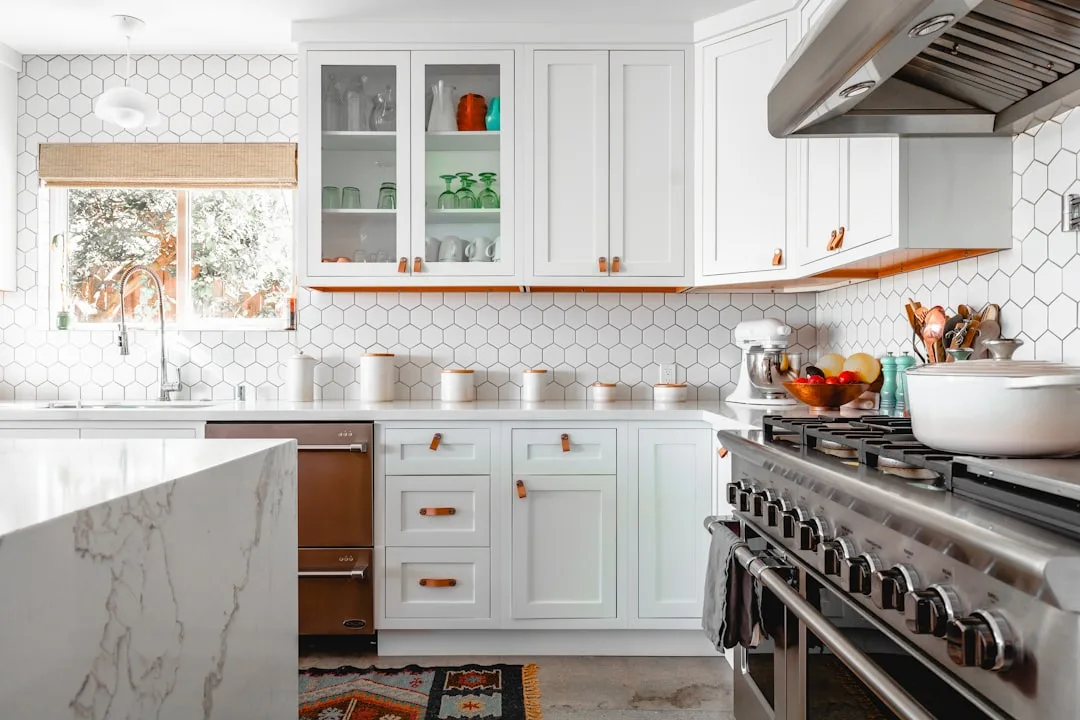
Open shelves and closed cabinets are not the same organizational challenge, and treating them identically is one of the most common mistakes I see in otherwise well-intentioned office redesigns. Open shelves — the kind mounted to a wall, or the exposed back section of a bookcase — are performing two jobs simultaneously: function and aesthetics. Every item you place there is visible, so the visual logic has to hold up. Closed cabinets are different. Nothing inside them is visible with the door shut, which means you can optimize entirely for function.
Inside closed cabinets, visibility beats aesthetics every time. Clear bins, labeled bins, transparent file boxes — these exist not because they look good (they don’t, particularly) but because when you open that cabinet door, you need to locate the right item in under five seconds. Opaque boxes are appropriate only when an entire box represents a single category you’ve clearly labeled, and when you don’t need to see the contents to confirm you have the right box.
Three inserts that dramatically change what a standard cabinet can do — without any renovation:
- Drawer inserts (even shallow ones laid flat on a shelf) turn a generic shelf into a shallow-item station for pens, scissors, tape, and miscellaneous small tools
- Shelf risers create two tiers within a single shelf space, doubling the usable surface in zones where items are consistently shorter than the shelf opening
- Tension rods, mounted horizontally inside a cabinet, act as vertical file dividers — the same technique borrowed from kitchen pantry organization, where they hold cutting boards upright. Repurposed for an office cabinet, they create vertical file sections that cost under $5 and require zero hardware installation
That last one I stumbled on years ago from a client who’d done it herself before I arrived. I’ve recommended it probably two hundred times since.
Takeaway: Walk through your closed cabinet with a “clear vs. opaque” rule: use opaque boxes only where the box is the label (one complete category, clearly marked). Everything else should let you see contents without opening it.
Labeling Systems That Age Well (And Ones That Fall Apart Fast)

Labels fail — not because people forget to label things, but because they build labeling systems that can’t survive the reality of how work actually evolves. I’ve seen beautiful chalkboard-labeled baskets become completely useless nine months later when the project system changed and nobody updated the labels. The basket still said “Client A” but Client A had wrapped three months prior.
The label is not just organizational — it’s a behavioral cue. Behavioral research on habit formation consistently shows that visible, consistent labeling significantly increases the likelihood that people return items to their correct location. The label removes the decision. Without it, every time you put something back, you’re making a micro-choice about where it belongs — and under time pressure, that micro-choice defaults to “wherever it fits.”
Different cabinet zones warrant different label formats:
- Printed labels (via a label maker or printed template) work best for stable, long-term categories that rarely change — archival boxes, tax year folders, reference binders
- Chalkboard or dry-erase labels work best for active project zones where categories rotate — the names of current clients, active project phases, seasonal work
- Handwritten labels on card stock are genuinely fine for personal home offices where you’re the only user; they’re fast, flexible, and can be replaced in thirty seconds
Color-coding by project rather than by item type creates more durable mental shortcuts. Color-coding by item type — “all financial documents are green” — sounds logical until a single project spans financial, legal, and correspondence documents, and the color system breaks down. Color-code by project or client instead. Everything related to one project gets one color. The association holds because it maps to how you actually think about your work.
Build a quarterly reset into your calendar. Fifteen minutes, every three months, to check that labels still match contents. Systems don’t fall apart dramatically — they decay gradually, one mislabeled box at a time.
Takeaway: Schedule your next label audit before you finish setting up the system. Put it in your calendar for 90 days out. The system that gets maintained is the one that has maintenance built in.
Cord and Tech Management Inside Cabinet Spaces
This section is almost entirely missing from competing content, which baffles me — because the home office cabinet of 2024 is rarely just storing paper. It’s housing routers, external hard drives, charging stations, backup drives, spare monitors, and at minimum two to three devices in various states of charging. The average home office worker uses four to six devices simultaneously, a number that’s grown substantially since remote work became normalized — and most cabinets weren’t designed with any of that in mind.
Dedicate one shelf exclusively to your tech hub. Not shared with files, not shared with supplies. A single 12-inch shelf with a power strip routed through a grommet hole drilled through the cabinet back panel is the cleanest long-term solution I’ve seen in practice. The grommet hole — a $3 part available at any hardware store — allows the power cord to exit cleanly without leaving a gap in the cabinet panel. The strip lives inside; the cord disappears through the back.
Ventilation matters more than people realize. Devices that generate heat — routers, external drives, charging hubs — need airflow, and a sealed cabinet shelf can cause them to throttle performance or fail prematurely. Leave the cabinet door cracked, use a mesh cabinet door panel if your unit supports it, or choose an open shelf for this zone specifically.
For cord management inside the cabinet itself:
- Velcro wraps (not zip ties — zip ties make changes painful) for bundling cables that run between devices
- Adhesive cable clips mounted to the underside of the shelf above, so cords run along the shelf ceiling rather than across the floor of the shelf
- Cable labels at both ends of every cord, so you can identify which device a cable belongs to without tracing it
The moment you start housing more than two devices in a cabinet, treat it like a small server room. Plan the layout before you plug anything in.
Takeaway: Measure your planned tech shelf before you assemble it and confirm your power strip fits with room for the cords to flex — a strip crammed into a tight shelf becomes a fire hazard, not a solution.
Styling the Open Sections: Making Organized Cabinets Look Intentional

Function and aesthetics are not opponents — but they do require separate mental frameworks when you’re working on a cabinet that has both open and closed sections. The closed sections serve function. The open sections serve both, and if you conflate the two approaches, you end up with either a beautiful surface that’s useless or a functional system that looks chaotic.
Interior stylists working on editorial shoots follow a practice called “editing to breathe” — before photographing a styled shelf, they pull roughly one-third of the items off and set them aside. What looks sparse in person photographs as intentional and calm. The same principle applies to a home office you actually live in: leaving 20 to 30 percent of a visible shelf deliberately empty isn’t wasteful. It’s what makes the objects you’ve chosen look considered rather than crammed.
For the objects that remain, apply the rule of three within each shelf section: one tall element, one mid-height element, one flat or layered element. Not as a rigid law but as a starting point that almost always works. The tall element anchors the eye. The mid-height element creates movement. The flat element — a stack of books, a woven tray — grounds it.
Texture within a single color palette does more visual work than most people expect. A white shelf holding a white ceramic pot, a natural linen-covered box, and a bleached woven basket reads as rich and considered despite using almost no color. The variation is tactile — matte versus woven versus soft — and that variation is what the eye actually wants.
One thing I learned the hard way: don’t try to style open office shelves with items you use constantly. Daily-use items belong in the closed sections, organized functionally. Open shelves should hold things you need occasionally or things that are genuinely beautiful enough to earn visible real estate. Mixing the two — a nice ceramic next to your tape dispenser and three expired batteries — is how styled shelves fall apart within two weeks.
Takeaway: Before styling any open cabinet section, remove everything, then add items back in groups of three using the tall/mid/flat rule. Stop when the shelf looks one item short of full.
When to Reconfigure vs. When to Replace Your Cabinet Entirely
This is the question nobody wants to ask because the answer might be expensive — but asking it late is always more expensive than asking it early. I’ve watched clients pour $200 in inserts into a cabinet that fundamentally couldn’t support the organization system they needed, and do it twice before finally replacing the unit.
Three signs your current cabinet cannot be organized into usefulness:
- Non-adjustable shelves at fixed heights that don’t match your actual items — this is a structural mismatch that no insert solves
- Depth that’s wrong for your primary storage needs — a 20-inch-deep cabinet storing mostly shallow files is a dead-zone factory
- No interior lighting — if you can’t see into it clearly with the door open, you’ll stop using it correctly within weeks
If none of those apply, reconfiguration — inserts, new shelf positioning, a labeling overhaul — will almost certainly solve the problem for under $150. If one or more applies, you’re throwing good money after bad.
For replacement, the cost calculus matters. Custom built-in cabinetry for a home office runs approximately $1,500 to $6,000 installed depending on linear footage and finish quality — a real number that earns its place in any honest conversation about this decision. Modular systems like IKEA SEKTION or PAX run $300 to $800 for a comparable footprint and can be configured with adjustable shelves, pull-out drawers, and interior lighting. The quality ceiling is lower. The flexibility ceiling is surprisingly high.
The renovation threshold question is simpler than people make it: if you’re working from home full-time and your office directly affects income-generating work, custom cabinetry amortizes quickly against the productivity cost of a broken system. If your home office is part-time or occasional, a modular unit at $400 to $600 solves the same problem for a fraction of the cost. Hire a carpenter when the space itself — irregular walls, odd ceiling heights, structural constraints — makes modular solutions impractical.
Takeaway: Before spending a dollar on organization products, run the three-sign checklist above. If your cabinet fails two out of three, replacement is almost certainly the better investment.
Frequently Asked Questions
How do I organize a home office cabinet with deep shelves that waste space?
Deep shelves create dead zones because most office items — binders, small bins, paper stacks — are far shallower than the shelf itself. The most practical fix is a two-row system: front-load your frequently accessed items in the front half of the shelf, and use the back half for archival or rarely used items that can extend deeper. A shelf riser placed in the front half lets you add a second tier of shorter items, effectively doubling the usable surface without modifying the cabinet. For very deep shelves — 18 inches or more — a lazy Susan insert on the shelf floor gives you rotational access to everything, including items pushed to the back. Measure your shelf depth before buying any insert, and confirm the insert leaves at least two inches of clearance on each side so it can rotate fully.
What is the best way to organize files and paperwork inside a cabinet without a filing system?
A traditional hanging-file system is one solution, but it’s not the only one — and for many home offices, it’s overkill. A more flexible approach is the frequency-based box system: one labeled box for each active project or recurring category, stored upright on a shelf with the label facing out. Inside each box, papers are chronological, newest in front. This requires no special hardware, works with any cabinet shelf, and scales up or down as your workload changes. The critical discipline is a weekly “paper purge” where you spend five minutes deciding what leaves active boxes and moves to archive or discard. Without that habit, even a well-designed file system accumulates dead weight and stops functioning within a month.
Should home office cabinets be open or closed for better organization?
The honest answer is: both, used for different purposes. Closed cabinets are better for functional storage — items you access regularly but that don’t need to be visible at all times. They keep visual noise low, which matters more than most people realize for sustained focus. Open shelves are better for items you reference visually — frequently used reference books, project materials you’re actively working on, or objects that contribute to the room’s design. The mistake is using open shelves as overflow for closed cabinet contents. If it’s in your office primarily for function and you access it more than twice a week, it belongs behind a door, organized by frequency and clearly labeled. If it earns visible real estate through beauty or immediate utility, open shelving works. Mixing the two categories on the same open shelf is how everything starts looking cluttered within two weeks.
How do I keep my home office cabinet organization from falling apart after a few weeks?
Systems fail for two reasons: they were designed for an idealized workflow rather than the actual one, or they were never given a maintenance schedule. Solve the first problem by auditing your system after the first two weeks — not at setup, but after you’ve actually lived with it. Notice what’s already migrated to the wrong spot, what categories you underestimated the volume for, and what you reach for that’s stored too far from your desk. Make those adjustments immediately rather than tolerating friction. Solve the second problem with a quarterly calendar event — 15 minutes, four times a year — to check that labels still match contents and that dead weight hasn’t re-accumulated in active zones. The systems I’ve seen hold up for years all have one thing in common: the person using them treats maintenance as scheduled, non-negotiable, and short. Not a weekend project. Fifteen minutes, on a schedule.
Start here, today: Open your home office cabinet, pull everything out onto a flat surface, and sort into the four buckets — daily, weekly, archival, discard. Don’t buy anything. Don’t label anything. Just do the audit. What you find in the next twenty minutes will tell you more about what your cabinet actually needs than any product guide ever could. Everything after that is just executing on what the audit reveals.
How do I organize a home office cabinet with deep shelves that waste space?
Deep shelves create dead zones because most office items — binders, small bins, paper stacks — are far shallower than the shelf itself. The most practical fix is a two-row system: front-load your frequently accessed items in the front half of the shelf, and use the back half for archival or rarely used items that can extend deeper. A shelf riser placed in the front half lets you add a second tier of shorter items, effectively doubling the usable surface without modifying the cabinet. For very deep shelves — 18 inches or more — a lazy Susan insert on the shelf floor gives you rotational access to everything, including items pushed to the back. Measure your shelf depth before buying any insert, and confirm the insert leaves at least two inches of clearance on each side so it can rotate fully.
What is the best way to organize files and paperwork inside a cabinet without a filing system?
A traditional hanging-file system is one solution, but it’s not the only one — and for many home offices, it’s overkill. A more flexible approach is the frequency-based box system: one labeled box for each active project or recurring category, stored upright on a shelf with the label facing out. Inside each box, papers are chronological, newest in front. This requires no special hardware, works with any cabinet shelf, and scales up or down as your workload changes. The critical discipline is a weekly “paper purge” where you spend five minutes deciding what leaves active boxes and moves to archive or discard. Without that habit, even a well-designed file system accumulates dead weight and stops functioning within a month.
Should home office cabinets be open or closed for better organization?
The honest answer is: both, used for different purposes. Closed cabinets are better for functional storage — items you access regularly but that don’t need to be visible at all times. They keep visual noise low, which matters more than most people realize for sustained focus. Open shelves are better for items you reference visually — frequently used reference books, project materials you’re actively working on, or objects that contribute to the room’s design. The mistake is using open shelves as overflow for closed cabinet contents. If it’s in your office primarily for function and you access it more than twice a week, it belongs behind a door, organized by frequency and clearly labeled. If it earns visible real estate through beauty or immediate utility, open shelving works. Mixing the two categories on the same open shelf is how everything starts looking cluttered within two weeks.
How do I keep my home office cabinet organization from falling apart after a few weeks?
Systems fail for two reasons: they were designed for an idealized workflow rather than the actual one, or they were never given a maintenance schedule. Solve the first problem by auditing your system after the first two weeks — not at setup, but after you’ve actually lived with it. Notice what’s already migrated to the wrong spot, what categories you underestimated the volume for, and what you reach for that’s stored too far from your desk. Make those adjustments immediately rather than tolerating friction. Solve the second problem with a quarterly calendar event — 15 minutes, four times a year — to check that labels still match contents and that dead weight hasn’t re-accumulated in active zones. The systems I’ve seen hold up for years all have one thing in common: the person using them treats maintenance as scheduled, non-negotiable, and short. Not a weekend project. Fifteen minutes, on a schedule.