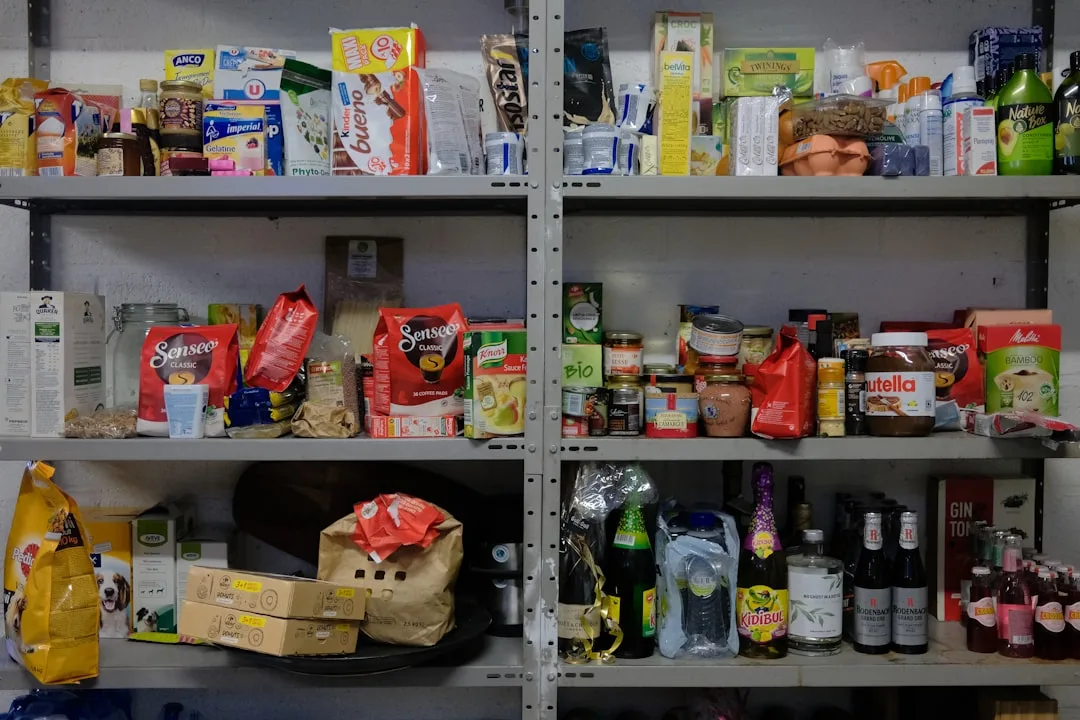
The average deep pantry shelf holds twice the food its owner thinks — the rest is quietly expiring somewhere behind the front row, invisible and forgotten. I’ve watched this happen in hundreds of kitchens across Chicago and New York, in apartments worth a million dollars and in rentals with hardware-store shelving, and the problem is never the food or the person buying it. The problem is that most pantry shelves were designed by builders who were thinking about cubic footage, not retrieval. Nobody stood in front of those shelves at 6:45 on a Tuesday night trying to find the tahini.
Quick Answer
The average deep pantry shelf holds twice the food its owner thinks — the rest is quietly expiring somewhere behind the front row, invisible and forgotten.
This guide isn’t about making your pantry look like an Instagram post. It’s about making the back half of every shelf stop being a graveyard.
Why Deep Pantry Shelves Fail Most Households (And What Designers Do Differently)
In This Article
- Why Deep Pantry Shelves Fail Most Households (And What Designers Do Differently)
- The Depth Zone Method: Divide Every Shelf Into Front, Mid, and Rear Territories
- Pull-Through Systems: The Hardware That Actually Solves Deep Shelf Access
- Vertical Thinking: Using Height to Offset Depth in Narrow Pantry Cabinets
- Container Strategy for Deep Shelves: Why Standard Bins Make the Problem Worse
- Category Clusters: How to Group What You Store So Nothing Gets Buried Again
- Aesthetic Cohesion Without Sacrificing Function: The Design Layer
- Maintenance Systems That Keep Deep Pantry Shelves From Reverting to Chaos
- Start Here, Today

Most pantry shelves run between 18 and 24 inches deep. Standard. Common. And almost completely mismatched to how human beings actually reach for things. The pattern I kept seeing — in project after project — was that clients would load a pantry to capacity, swear they were out of space, and then I’d pull everything forward and find 14 cans of diced tomatoes and a bag of farro they’d forgotten existed.
The fundamental problem is that deep shelves create invisible rear zones, and invisible zones become dead zones.
Research on food waste in home kitchens consistently points to unorganized, deep storage as a primary driver of spoilage — some estimates suggest up to 40% of pantry food expires before it’s ever used, with rear-shelf burial as a major contributing factor. That’s not a discipline failure. That’s a design failure. The pantry wasn’t built with any retrieval logic — it was built to hold as much as possible, which is a completely different goal.
What professional kitchen designers actually do — and this is something most remodel clients don’t realize until they see the specs — is deliberately shorten usable shelf depth. Not by building shallower cabinets, but by breaking depth into managed zones. A designer I trained under early in my career used to say that a 24-inch shelf with no zoning is just a 12-inch shelf with a junk drawer behind it. She was exactly right.
Standard builder-grade pantry shelves prioritize volume. Professional kitchen designers prioritize access frequency — they ask which items get grabbed daily, which get grabbed weekly, and which should honestly live somewhere else entirely. That’s the shift in thinking this guide is built around. Not more storage. Smarter depth management.
Takeaway: Before buying a single bin or basket, decide that your pantry is a retrieval problem, not a capacity problem — because those two problems have completely different solutions.
The Depth Zone Method: Divide Every Shelf Into Front, Mid, and Rear Territories
Here’s the framework I use when I’m redesigning a pantry from scratch, and it costs nothing to implement before you spend a dollar on organizers. Every shelf, regardless of length or material, gets divided into three territories based entirely on how often the items in that zone get touched.
Front zone (0–8 inches from the shelf edge): This is prime real estate. Daily-use items live here — the coffee, the olive oil you cook with every night, the snacks your kids grab after school, whatever open packages are currently in rotation. If you’re reaching for it more than twice a week, it belongs here. Ergonomic research on kitchen reach zones actually supports keeping high-frequency items within a 12-inch forward reach from the shelf edge, which maps almost exactly to this front zone.
Mid zone (8–16 inches): Weekly-use items. Backup cans of staples, dry goods you cycle through over the course of a week or two, the second jar of something when the first is in the front zone. This is the zone most people accidentally treat as front-zone storage, which is why their front zone is always overcrowded.
Rear zone (16+ inches): Bulk overflow, seasonal ingredients, specialty items you use for specific recipes a few times a year. Not dead space — but curated dead space. The rear zone should be audited intentionally, not discovered by accident.
Before buying anything, do this audit:
- Pull everything off one shelf and lay it out on your counter
- Sort items into three piles: touches it multiple times a week, touches it once or twice a week, touches it rarely or seasonally
- Notice how much of your frequently-touched pile is currently living in the back of your shelf
- That gap between where things are and where they should be is your renovation budget, even if your budget is zero
Frequency of use — not food category — drives placement decisions. Alphabetical order looks tidy. Frequency-based zoning is the only thing that actually reduces how many times you say “where is that?” in a given week.
Takeaway: Audit one shelf today using the three-zone framework before purchasing anything — you’ll immediately see which items are in the wrong territory.
Pull-Through Systems: The Hardware That Actually Solves Deep Shelf Access
This is where the real investment happens, and where I’ve seen clients waste the most money by buying the wrong thing first. The difference between a slide-out cabinet organizer and a freestanding pull-out bin matters enormously depending on what type of shelf you’re working with.
Slide-out organizers mounted to the shelf or cabinet frame are the stronger solution for fixed wood shelving — they use a bracket-and-rail system and require knowing your exact shelf width and whether your shelf can support side-mounted hardware. If you have solid wood or MDF shelving that’s at least ¾ inch thick, you can mount these directly. If you have wire shelving, you’re looking at freestanding bins instead. Trying to mount a slide-out bracket onto wire shelving is the kind of Saturday afternoon mistake I made once and only once.
Freestanding pull-out bins sit on the shelf surface without any mounting and work in wire pantries, rental situations, or anywhere you can’t drill into the cabinet. They’re less stable — they can tip if overloaded — but they’re flexible and removable.
For either system, the measurement that competitors almost never mention: full-extension slides (minimum 18-inch travel) allow complete access to the rear zone. Partial-extension slides — which are cheaper and far more common in budget organizers — leave up to 6 inches of dead rear space even when fully extended. You’re essentially buying a solution that solves 70% of your problem and replicates the other 30%.
For mid-zone visibility, tiered step risers work well and don’t require any hardware. Bamboo and coated steel hold up best in pantry environments where humidity fluctuates. Avoid uncoated wood risers — I had a client’s bamboo-lookalike MDF riser warp badly within eight months in a kitchen that ran humid from a gas range.
Other hardware worth knowing:
- Drawer-style pull-out inserts that sit on a shelf and essentially convert it into a functioning deep drawer — these are the most functional option for bulky, awkwardly shaped items
- Wire pull-outs over solid-bottom bins in any pantry with limited airflow — solid-bottom bins trap crumbs and moisture, and in a poorly ventilated pantry that becomes a problem fast
Takeaway: Measure your shelf depth and confirm your shelf material before ordering any pull-out system — the difference between a mounted slide and a freestanding bin is not aesthetic, it’s structural.
Vertical Thinking: Using Height to Offset Depth in Narrow Pantry Cabinets
Most people look at a deep pantry shelf and think about what to put on it. The better question is whether that single shelf should exist in its current form at all. Adding a shelf is often the single highest-return move in a pantry redesign — and it’s something I consistently recommended to clients who told me they needed more storage when what they actually needed was more levels.
Adding one adjustable shelf to a pantry section with 14 inches of vertical clearance between shelves can increase usable storage by 30–35% without touching the walls, the floor, or anything structural. You’re halving the effective depth you need to manage on each individual surface. Two shallow shelves are always easier to organize than one deep one. Always.
For rentals or situations where you can’t drill, tension-mounted shelf pin kits work surprisingly well in enclosed pantry cabinets. I’ve installed them in maybe a dozen rental apartments and never had one fail when sized correctly.
Beyond adding shelves, the vertical strategies that actually work in practice:
- Door-mounted organizers — and I’ll be specific here, because the vague “use your door” advice I read constantly drives me crazy. You need to know the clearance between your pantry door and the front edge of your shelves before mounting anything. Measure that gap. Most door organizers are 3–4 inches deep. If your shelf-to-door clearance is less than 5 inches, you’ll be fighting your own pantry door every time you open it.
- Under-shelf hanging baskets that clip onto the shelf above and create a floating front zone below — these are excellent for produce, for snack bags, for lightweight items that would otherwise clutter the front zone of the shelf below
- Stackable clear bins in the rear zone, used as vertical columns rather than side-by-side rows — this is counterintuitive but it works, because height in the rear zone is often wasted while width is what gets crowded
Ceiling-to-floor pantry planning is a different discipline than cabinet organization. The highest shelves should hold the rarest items — not because that’s conventional wisdom, but because reaching overhead for something you use twice a year is fine, while reaching overhead for your pasta is a small daily inconvenience that accumulates into genuine kitchen frustration.
Takeaway: Before buying any organizer, measure vertical clearance on every pantry shelf — a $12 shelf pin kit and one extra board might solve the access problem entirely.
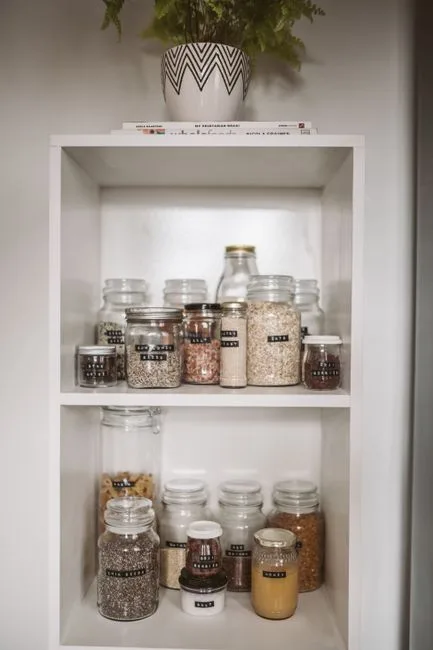
Container Strategy for Deep Shelves: Why Standard Bins Make the Problem Worse

Here’s the thing about clear bins that no pantry organization article will tell you: buying a 16-inch-deep bin for a 20-inch-deep shelf recreates your original problem inside the bin. I’ve walked into reorganized pantries — reorganized with money and effort and a matching aesthetic — where the owner still couldn’t tell me what was in the back of their bins without pulling them out. The bin became the shelf. Same dead zone, better lighting.
The container depth trap is the most common and most expensive mistake in pantry organization.
The rule I give clients: containers should be no deeper than two-thirds of the shelf depth, so you can pull them forward to the front zone to access the contents without having to empty them. On a 20-inch shelf, that means containers maxing out at around 13 inches deep. This leaves space in front of the container to work, and it prevents the bin itself from becoming a new version of the problem.
On sizing for bulk goods specifically — food storage logic (not an influencer’s pantry aesthetic) recommends sizing containers to hold roughly one recipe’s worth of an ingredient, which for most grains and legumes means 1–2 quarts. Full-bag quantities go into rear-zone storage, and you refill the front-zone container as you use it. That’s FIFO (first in, first out) applied at the container level.
On labeling:
- Angled labels on the front face are readable from a standing position without bending
- Top labels work only if containers are always stored below eye level, which in most pantries means just one or two shelves
- Front-face labels in a large, clean typeface beat every other system for household members who didn’t set up the pantry and aren’t going to read the system documentation
On the clear vs. opaque debate — clear wins on visibility, but certain pantry staples (oils, whole grain flours, dried herbs) degrade noticeably faster when exposed to ambient light. If your pantry isn’t fully dark when closed, opaque containers for those specific items are the functional choice, not just the aesthetic one.
Decanting is worth doing when: the original packaging is bulky, oddly shaped, or keeps falling over. It is not worth doing when the primary motivation is visual uniformity. I’ve had clients spend two hours decanting items into matching canisters only to admit six weeks later that they couldn’t tell what anything was anymore because the labels were too small.
Takeaway: Measure your shelf depth and cap your container depth at two-thirds of that number before you buy a single bin.
Category Clusters: How to Group What You Store So Nothing Gets Buried Again

This is the organizational logic layer — the part that determines whether your system is self-maintaining or slowly collapses over the next 90 days. Most people organize by food category: grains together, canned goods together, snacks together. It’s intuitive. It’s also why you end up with a baking zone spread across three different shelves and half the ingredients for pasta night living nowhere near each other.
Meal-based clustering — grouping by recipe type rather than food category — is the organizing principle that actually survives real life. Professional kitchen organizers who’ve tracked the difference report that meal-based clustering reduces average meal prep time by roughly 8–12 minutes per cooking session, because you’re no longer triangulating between three different shelf zones to assemble one dish’s ingredients.
The practical version of this: pick the five or six meals your household makes most often. Build a zone for each one. The pasta zone has the pasta, the canned tomatoes, the olive oil (or a backup), the dried herbs that go into pasta sauce. The baking zone has the flour, sugar, baking soda, vanilla, the things you reach for every time you bake anything. Items that belong to multiple meals get placed in the zone for whichever meal uses them most.
The use-together principle extends to frequency: if two items are always grabbed at the same time, they live in the same depth zone, regardless of food category. Oil and vinegar go together. Oats and chia seeds go together. The food pyramid doesn’t need to be represented spatially in your pantry.
Handling overflow without disrupting the front zone requires one clear rule: bulk purchases go directly to the rear zone, and the front zone never gets restocked from a grocery bag. You move items forward from the rear zone as the front empties. This is FIFO, and it’s the only reason your older cans of chickpeas don’t expire behind your newer ones.
Seasonal rotation is real work that’s worth doing twice a year. Summer means different rear-zone contents than November. Swapping holiday baking supplies into the mid-zone in October and back to the rear zone in January takes twenty minutes and keeps your daily-use zones uncluttered.
Takeaway: Map your five most common meals and build a zone for each one — then move everything into those clusters before assigning any organizers.
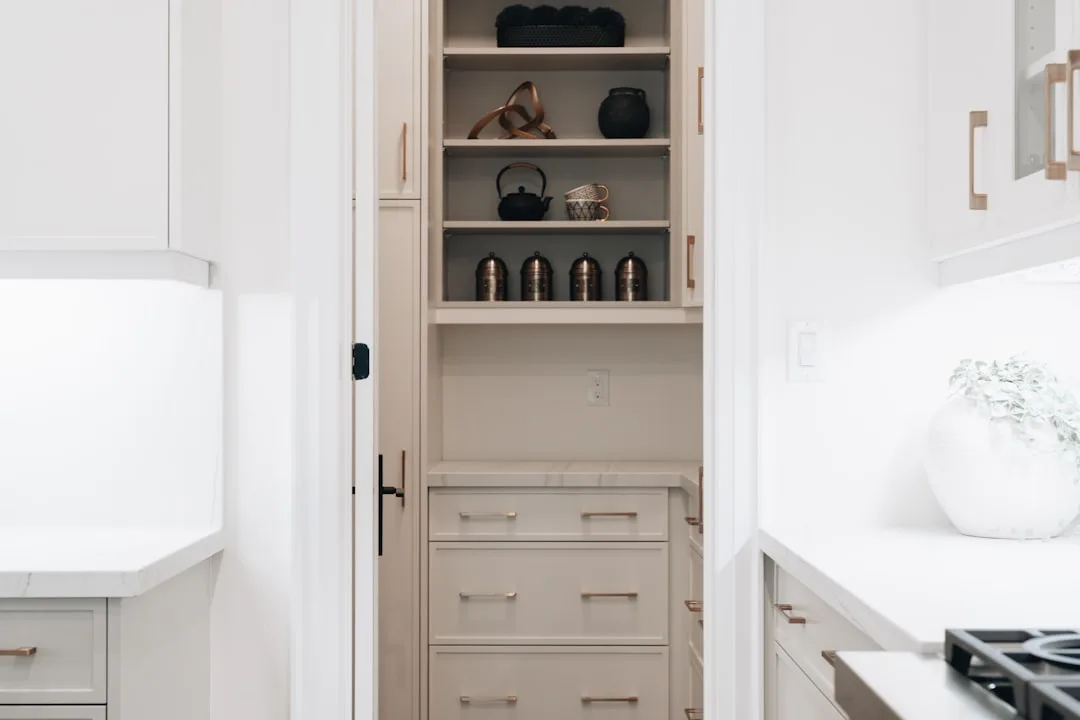
Aesthetic Cohesion Without Sacrificing Function: The Design Layer
Function comes first. It has to. But a pantry that’s been zoned intelligently and equipped with the right hardware can also look considered, intentional, and genuinely good — and that matters, because a space that looks cared-for gets treated that way. Visual coherence in kitchen storage areas has a measurable effect on how clean a kitchen feels even when actual clutter levels haven’t changed. The perception of order changes how people interact with a space. I’ve seen it work.
The design moves that actually hold up over time are simpler than most pantry aesthetic content suggests. Limit yourself to two materials and one color family — not one material, which can look sterile, but two. Woven seagrass baskets and matte white canisters. Clear acrylic and natural wood. Concrete-finish containers and black wire. Pick your combination and buy nothing that doesn’t fit it. I once had a client who’d accumulated four different container styles over three years of pantry reorganization attempts, and the visual noise alone made the pantry feel chaotic even when it was technically sorted.
Shelf liner is underused as a design element. A graphic pattern or a solid color that contrasts slightly with your container palette gives the shelves visual depth, protects the surface, and makes spills dramatically easier to clean. Removable adhesive liner is the right choice for rentals — the non-adhesive stuff slides around and becomes its own frustration within a week.
Lighting inside a pantry cabinet changes the entire experience. Adhesive LED strip lights at 2700K–3000K color temperature (warm white) make food colors read accurately — you can actually tell the difference between similar-looking labels at a glance. Cooler temperatures (4000K and above) make a pantry feel clinical and make yellows and reds wash out. It’s a $15–30 upgrade with disproportionate impact.
The styled front row approach: treat the visible front zone as a display surface and the rear zones as pure storage. The front row should have some visual consistency — not a catalog shoot, but a clear visual intention. Behind that first row, function rules entirely. This is the only way to maintain both aesthetics and genuine usability without making the pantry a museum piece that nobody actually uses.
Takeaway: Choose two materials and one color family before buying a single container — and don’t deviate from it, even when something cheaper or faster is available in a third material.
Maintenance Systems That Keep Deep Pantry Shelves From Reverting to Chaos
Every system degrades. I’ve never designed a pantry organization system — not once, in eleven years — where the setup alone was enough to sustain it. The clients who maintained their pantries beautifully weren’t more organized people. They had shorter, more frequent maintenance habits. That’s the entire difference.
Behavioral research on habit formation suggests that a 5-minute weekly maintenance routine is roughly three times more effective at sustaining organization systems than periodic deep cleanouts performed every few months. Three times. The reason is simple: small, frequent resets prevent accumulation. A deep cleanout is corrective. A weekly reset is preventive.
Here’s what the 5-minute weekly reset actually includes:
- Pull anything that drifted to the wrong zone back to its correct one — this takes 90 seconds if you do it weekly, 20 minutes if you wait two months
- Move any newly emptied containers or packaging to the recycling immediately so the rear zone doesn’t fill with ghost items
- Check that the front zone still reflects what you’re actually using — needs change, and the zone assignments should change with them
- Glance at expiration dates on anything in the front zone
The quarterly deep audit is different in scope and purpose. This is when you rotate rear-zone contents, pull everything out and check expirations, and ask honestly whether your zone assignments still match your household’s current cooking patterns. A family that started meal-prepping grain bowls needs a different front zone than they did when they were eating cereal every morning. Zone assignments go stale. They need re-evaluation.
Getting other household members to use the system is a design problem, not a communication problem. If the system requires explanation, it’s too complicated. Labels should be large enough to read at arm’s length, in plain language, with no ambiguous abbreviations. Zone boundaries should be physically obvious — a different liner color for each zone works surprisingly well in practice.
The one-in, one-out rule adapted for pantries: when you bring in a bulk purchase, the old version of that item moves to the front of its zone before the new stock goes in. You never put new stock in front of old stock. Ever. This is the single habit that eliminates most expiration-date waste in deep pantries.
When a system needs a redesign versus just a reset: if you’re spending more than 10 minutes on a weekly reset, the zone assignments are wrong. If multiple household members consistently put things in the wrong place, the zones aren’t intuitive enough. Those are signals to reassign, not to enforce harder.
Takeaway: Set a recurring 5-minute calendar reminder for the same time every week — the habit slot matters as much as the habit itself.
Frequently Asked Questions
How deep should pantry shelves be for easy access?
The sweet spot for pantry shelves — based on how humans actually reach and retrieve — is 12 to 16 inches of usable depth. Most builder-grade pantries run 18 to 24 inches, which is where the dead zone problem starts. If you’re designing or retrofitting shelves, 14–16 inches of depth with proper lighting and a pull-out system for any section exceeding that is far more functional than a single 22-inch shelf with no retrieval hardware. If your shelves are already deep, the depth zone method (front, mid, rear territory) is the practical fix without reconstruction.
What is the best way to organize a pantry with very deep shelves?
Start with the depth zone framework before buying anything. Divide each shelf mentally into a front zone (0–8 inches), a mid zone (8–16 inches), and a rear zone (16+ inches), then assign items based on how often you use them. After that, add hardware: full-extension pull-out organizers for the shelves you use most, step risers for mid-zone visibility, and door-mounted organizers to take pressure off the primary shelf surface. Container sizing matters more than container style — keep bins at no more than two-thirds of your shelf depth so you can pull them forward to access contents.
How do you keep things from getting lost in a deep pantry cabinet?
Two mechanisms work together: physical and visual. Physically, pull-out systems with full-extension slides give you 100% access to the rear zone without reaching blind. Visually, containers that are labeled on the front face and consistent in height within each zone mean you can scan a shelf from the door without moving anything. The discipline layer — frequency-based placement, so that your most-used items never migrate to the rear zone — is what prevents things from getting lost in the first place. Quarterly audits of the rear zone catch anything that’s been buried.
Are pull-out drawers worth installing in a deep pantry?
Yes. Unambiguously. The caveat is that they need to be full-extension to be worth the investment — partial-extension slides leave up to 6 inches of dead rear space and give you the illusion of access without the reality. Mounted pull-outs are the better option when your shelving can support the hardware. Freestanding pull-out bins are the alternative for wire shelving or rental situations. The cost ranges from about $25 for a basic freestanding bin to $80–150 for mounted full-extension systems, and in both cases the return — measured in food you actually use before it expires — is immediate.
Start Here, Today
Pick one shelf. Not your whole pantry. One shelf, ideally the one that frustrates you most. Pull everything off it, sort it into three piles by frequency of use, and put it back according to the depth zone framework — daily items in the front 8 inches, weekly items in the mid zone, everything else in the rear. Don’t buy anything yet. Just see how the shelf changes when you stop organizing by food category and start organizing by how often your hand reaches for something.
That’s the entire shift. Everything else in this guide — the hardware, the containers, the labeling, the aesthetic layer — is in service of that one reframe. Your pantry doesn’t need more space. It needs the space it already has to be retrievable.