The average homeowner has between 400 and 600 square feet of garage wall surface — and treats nearly all of it as decoration for a cobweb collection. Meanwhile, the floor fills up with bikes leaning against each other, bins stacked so high that the one you need is always at the bottom, and tools that haven’t been organized since the Bush administration. The walls just sit there. Empty. Waiting. The right garage wall storage organization systems turn all of that wasted vertical surface into the most functional square footage in your home — and this guide covers exactly how to get there.
Quick Answer
The average homeowner has between 400 and 600 square feet of garage wall surface — and treats nearly all of it as decoration for a cobweb collection.
This is not a content piece about buying things. It is about understanding your garage walls as a legitimate design surface — one with structural logic, ergonomic principles, and a real return on investment if you approach it the right way. What follows is everything I learned across eleven years of working in actual homes, including a few expensive mistakes I would very much like to help you avoid.
Why Most Homeowners Miss the Most Valuable Square Footage They Own
In This Article
- Why Most Homeowners Miss the Most Valuable Square Footage They Own
- 1. The Wall Panel Systems That Actually Hold Up Over Years of Use
- 2. Pegboard Gets a Bad Reputation — Here Is When It Still Makes Sense
- 3. Bike Storage on Walls — Getting the Weight and Angle Right
- 4. Wall-Mounted Shelving — The Structural Decisions That Matter Before You Buy
- 5. Track Systems — Why the Most Flexible Option Is Also the Most Misunderstood
- 6. Cabinet Systems on Walls — When Enclosed Storage Makes More Sense Than Open
- 7. Overhead Wall-Adjacent Storage — Using the Zone Above Eye Level
- 8. Zones and Layout — The Design Logic That Makes Everything Work Together
- 9. The Installation Sequence That Prevents You From Doing Everything Twice

Garages were not designed with storage in mind. They were designed to shelter vehicles — single-car boxes attached to modest mid-century homes where the idea of storing sports equipment, holiday decorations, and a chest freezer inside one would have seemed absurd. That original design logic calcified into a habit, and the habit is still running the show in most American garages right now: everything goes on the floor, or in a pile, or in a bin that slowly becomes unidentifiable.
Vertical wall space is the most underused square footage in residential real estate — and I do not say that to be dramatic. A standard two-car garage has 400 to 600 square feet of wall surface. Most homeowners use close to zero of it deliberately. The National Association of Home Builders has tracked that over 50% of homeowners identify garage clutter as a top source of household stress — yet fewer than 20% make any intentional use of vertical wall space. Those two numbers, sitting next to each other, are genuinely maddening.
What changed my own thinking about garage walls was a project in Lincoln Park — a client with a two-car garage who had spent three years adding floor shelving and was still drowning. We stripped the floor systems entirely and rebuilt the space from the walls inward. Within a month she told me the garage felt larger than it had before we added anything. That is what vertical design does. It redistributes the visual weight of storage and restores the floor plane, which is where your eye reads “open” or “crowded.”
Approaching wall storage as a design philosophy — rather than a DIY patch — changes what questions you ask before you buy anything. Instead of “what hooks should I get,” you start asking how much linear footage you actually have, which walls get the most use, what weight you need to support, and what the space needs to feel like when you are done. Those are interior design questions. They happen to apply to a garage.
Takeaway: Before buying a single panel or hook, walk your garage and measure every wall surface. Knowing your actual square footage is the first decision, not the last.
1. The Wall Panel Systems That Actually Hold Up Over Years of Use

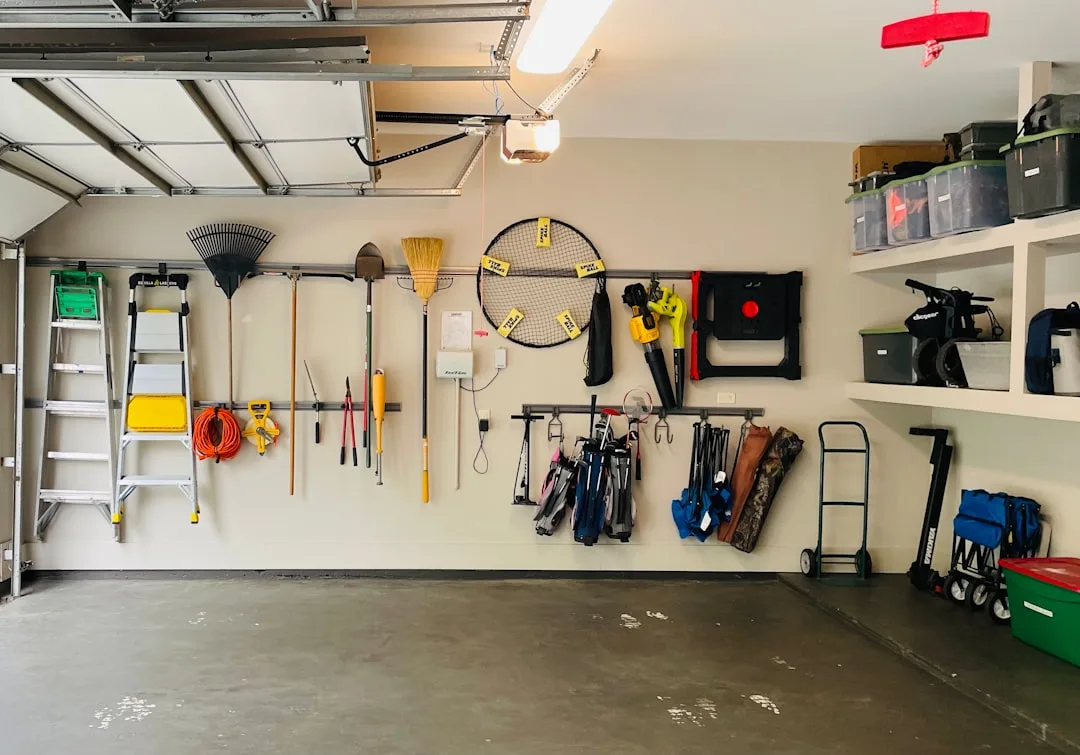
Slatwall is the category most people land on first, and for good reason — it is modular, it accepts a wide range of accessories, and it looks finished in a way that raw drywall never does. But “slatwall” covers an enormous range of product quality, and the distinction that matters most is almost never surfaced in product listings.
PVC-only slatwall versus metal-backed slatwall is not a cosmetic difference — it is a structural one. Metal-backed panels, which embed a steel substrate behind the PVC or MDF face, typically carry 75% more weight per linear foot than PVC-only versions. That gap matters when you are hanging a set of power tools versus a few garden trowels. I have watched PVC-only panels flex visibly under a loaded bike hook — and once a panel flexes, the accessories that depend on it holding firm start to work loose over time.
Panel color and texture are worth treating as interior design decisions, not afterthoughts. Lighter panel finishes — whites, light greys — read as intentional and make a dark garage feel larger. Darker finishes absorb light and tend to make the wall disappear, which can work as a visual trick if your goal is to minimize the presence of the storage system itself. The pattern I kept seeing in higher-end installations was clients who matched their panel color to either their garage floor coating or their cabinet hardware — treating it the way a kitchen designer treats finish consistency.
Load ratings deserve plain translation. When a product listing says “up to 50 lbs per hook,” that is a laboratory figure. In real use — with hooks that shift, panels that may not be fully anchored to studs, and accessories that accumulate weight unevenly — treat that as a ceiling, not a target. A good working rule is to load any single hook to no more than 70% of its rated capacity.
When evaluating panel systems, prioritize these factors in this order:
- Substrate material (metal-backed vs. PVC-only)
- Finish durability (powder-coat vs. painted vs. bare)
- Accessory compatibility (proprietary vs. universal slot spacing)
- Panel thickness (thicker panels flex less under point loads)
- Manufacturer warranty (five years minimum is reasonable for a quality system)
Takeaway: Ask the retailer or manufacturer specifically whether the panel has a metal substrate. If they cannot answer that clearly, the panel probably does not.
2. Pegboard Gets a Bad Reputation — Here Is When It Still Makes Sense
Most garage content dismisses pegboard in a sentence and moves on. I think that is lazy. Pegboard earns its dismissal in one specific form — the brown hardboard variety that comes in a four-by-eight sheet and starts sagging the moment Chicago humidity hits it — but powder-coated steel pegboard is a categorically different product that most guides never mention.
Steel pegboard can support up to 100 lbs per square foot when anchored properly to studs, which puts it in direct competition with mid-tier slatwall systems at roughly half the cost per square foot. That math is worth doing before you commit to a more expensive panel system by default.
Where pegboard actually outperforms slatwall is in reconfigurability speed. Slatwall accessories slide and lock — which is stable but not fast. Pegboard hooks pull out in a second. If you are running a garage workshop where your tool rotation changes by season, or a hobby station where the setup differs project-to-project, pegboard’s grab-and-go nature is a genuine advantage, not a consolation prize.
Styling pegboard so it reads as intentional is where most installations fail. The standard approach — a bare brown sheet, random hooks, tools hanging at odd angles — does look like a hardware store stockroom. Here is what actually changes that:
- Paint the pegboard to match or contrast your wall color before mounting it. A white pegboard on a white wall disappears cleanly. A black pegboard on a light grey wall reads as a deliberate design feature.
- Use consistent hook styles rather than mixing every accessory type you own. Matching bin holders, matching hook gauges, matching shelf brackets — visual consistency does more for the look than any single product choice.
- Outline tools in paint or marker so every item has a home that is visually defined. This is not just an aesthetic trick — it is the fastest way to notice when something is missing.
- Install pegboard with a standoff of at least half an inch from the wall surface. Without that gap, hooks have no room to seat properly, and the whole system underperforms structurally.
The honest case for pegboard is this: if your budget is limited, your tool collection changes frequently, and you are willing to spend thirty minutes on paint and consistent hook selection, steel pegboard delivers most of what expensive slatwall does at a fraction of the price.
Takeaway: Dismiss brown hardboard pegboard freely. Do not dismiss powder-coated steel pegboard without checking the price comparison against your slatwall shortlist first.
3. Bike Storage on Walls — Getting the Weight and Angle Right

Bikes are the item most likely to be stored badly in a garage. They are heavy, awkward, and usually end up leaning against a wall in a way that makes them impossible to access without moving three other things first. Wall-mounted bike storage solves all of that — but the category has enough bad product in it that the wrong choice can mean a bike on the floor and a damaged wall.
The two formats that actually work are horizontal hooks and vertical pulley systems. Everything else — the freestanding racks, the floor stands, the multi-bike wheel holders that require gymnastics to use — trades convenience for compactness in ways that rarely pay off in real daily use.
Horizontal hooks mount to your slatwall, pegboard, or directly to studs and hold the bike by the front wheel, frame parallel to the wall. This is the fastest format for bikes you use frequently — lift the wheel, hang it, done. The load consideration is real: a loaded mountain bike can hit 30 lbs, so any hook system needs to be anchored to studs, not just panel material. For slatwall installations, that means making sure the panel itself is stud-anchored at the mounting point, not just screwed into drywall.
Vertical pulley systems are the right answer for bikes used seasonally or when ceiling height is available. A properly installed pulley system puts the bike overhead, out of the vehicle zone, and frees the wall surface entirely. The installation is more involved — you are anchoring into ceiling joists, which requires locating them accurately and using appropriate hardware — but the payoff in floor and wall space is significant.
Angle matters more than most guides acknowledge. A horizontal hook that positions the bike at a slight downward angle toward the wall keeps the bike from swinging outward when the door opens. A perfectly horizontal hook is stable when nothing is moving nearby — but in a working garage, air pressure from a car door or a bump from a bag will start a pendulum effect that eventually works the hook loose.
Takeaway: Match the hook format to your use frequency. Daily-use bikes belong on horizontal hooks at arm height. Seasonal bikes belong on pulley systems at ceiling height.
4. Wall-Mounted Shelving — The Structural Decisions That Matter Before You Buy
Wall-mounted shelving is where I see the most expensive mistakes, because it looks simple and is not. A shelf is a shelf until it fails, and when it fails under a loaded bin at 11pm, the damage tends to be memorable.
The structural hierarchy for wall-mounted shelving goes: stud-anchored bracket, toggle bolt in drywall, adhesive anchor. That is also the hierarchy of what you should be willing to trust with real weight. Stud-anchored brackets, properly installed, can hold several hundred pounds per shelf. Toggle bolts in drywall can hold meaningful weight if the product is rated for it and installed correctly, but they are sensitive to the angle of load. Adhesive anchors are for decoration.
Bracket spacing is the variable most installations get wrong. The standard recommendation is a bracket every 16 to 24 inches, which holds for typical household loads. But if you are storing automotive fluids, canned goods, or anything else in the 50-lbs-per-linear-foot range, drop to 12-inch spacing or step up to heavier bracket stock. The shelf itself distributes load across brackets — but only if there are enough brackets to prevent the shelf from flexing at mid-span.
Shelf depth interacts with your wall space in ways that matter for circulation. A 16-inch deep shelf in a two-car garage is generous and useful. That same shelf in a single-car garage can push you into a situation where opening a car door requires a small prayer. Measure the clearance between your planned shelf position and the widest point of your car with the door open before committing to depth.
Material choices for garage shelving narrow quickly in real conditions. MDF swells in humidity. Particleboard is slightly better but still moisture-sensitive. Plywood is the right answer for most garage shelves — it is dimensionally stable, machines cleanly, and takes a painted finish well. Wire shelving is excellent for bins and boxes where airflow matters, but the wire surface is hostile to small items that fall through or tip over.
Takeaway: Anchor to studs, space brackets for your actual load, and measure door clearance before choosing shelf depth. These three decisions prevent 90% of shelving failures.
5. Track Systems — Why the Most Flexible Option Is Also the Most Misunderstood
Track storage systems — horizontal rails mounted to the wall that accept a family of hooks, baskets, and accessories — occupy a middle ground between pegboard’s flexibility and slatwall’s rigidity. They are genuinely excellent products that most buyers install wrong, which is why they develop a mixed reputation.
The core concept is straightforward: mount a horizontal track to studs, then hang accessories anywhere along the track’s length. Move accessories by lifting and sliding. No tools required for reconfiguration. The system grows by adding more tracks, stacking them vertically, or extending horizontally along the wall.
Where track systems fail is in stud alignment. Most tracks are designed to span multiple studs and be anchored at each one. In a standard garage with 16-inch stud spacing, a 48-inch track hits four studs — which gives it excellent structural redundancy. But installers who anchor only to the studs they can easily find, skipping the others, create a system with point-load concentrations that perform fine until they do not. Every anchor point matters.
Track systems genuinely shine in three specific use cases. First, mixed-use walls where the storage needs shift seasonally — summer sports equipment swaps out for winter gear without changing the infrastructure. Second, rental situations where you want a system you can take with you when you move. Third, walls with limited stud access or unusual stud spacing where panel systems would require custom cutting.
The accessory ecosystem for track systems has expanded significantly in the last decade. Beyond basic hooks and baskets, you can now find track-compatible bike arms, kayak holders, lumber supports, and folding work surfaces. Treating the track as infrastructure — rather than a hook-mounting product — unlocks the real value of the category.
Takeaway: Track systems reward careful installation and repay the investment in flexibility over years of use. Anchor every stud, not just the convenient ones.
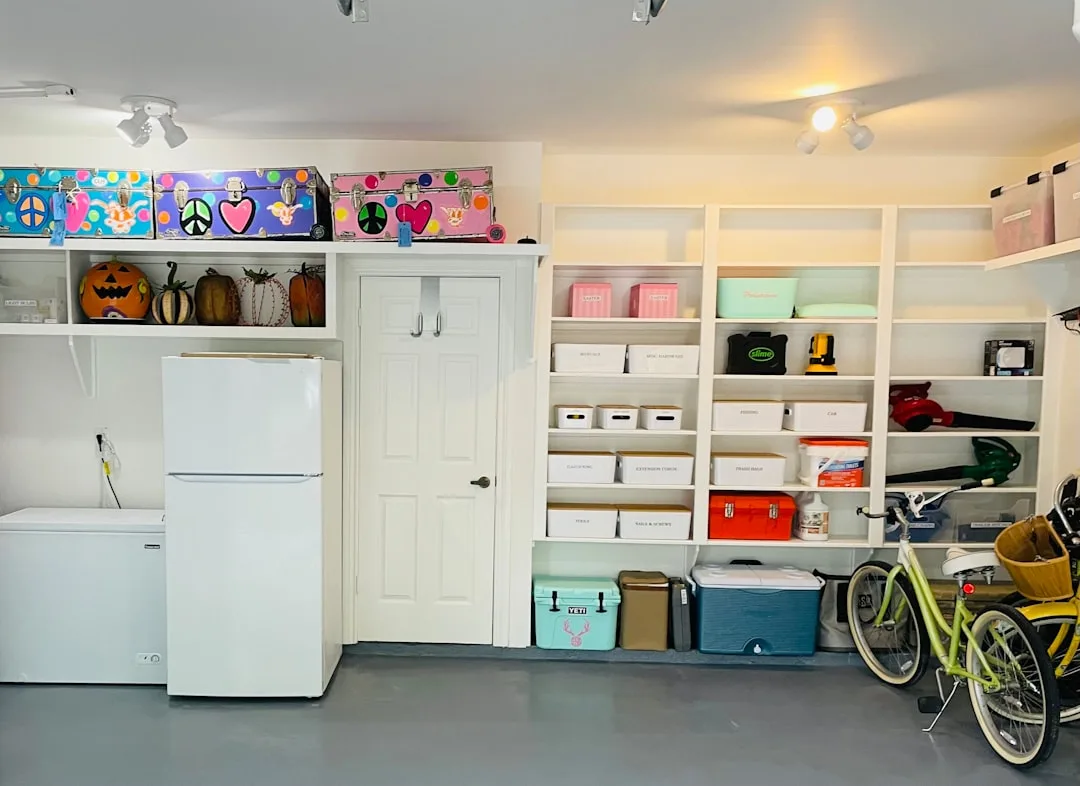
6. Cabinet Systems on Walls — When Enclosed Storage Makes More Sense Than Open

Open storage systems — slatwall, pegboard, tracks — have a visibility advantage: you can see everything. That same visibility is a disadvantage when what you are storing is visually chaotic, hazardous, or simply better off out of sight.
Wall-mounted cabinet systems solve the visual noise problem while keeping items accessible and organized. They are not the right answer for everything in a garage, but they are absolutely the right answer for certain categories: chemicals, automotive fluids, power tool accessories, children’s items that need to be out of reach, and anything valuable enough that a casual observer should not see it through a window.
The structural consideration for wall-mounted cabinets is more significant than for open systems, because cabinets add their own weight before you put anything in them. A 36-inch wall cabinet in steel or aluminum can weigh 40 to 60 lbs empty. Loaded with tools or fluids, it easily exceeds 150 lbs. That is a load that demands stud anchoring — period — regardless of what the manufacturer’s installation instructions suggest about alternative methods.
Cabinet material for garage environments narrows to steel, aluminum, and high-density polyethylene. Wood-based cabinets — even those with moisture-resistant finishes — are playing a long game they eventually lose in the temperature swings and humidity exposure of an uninsulated garage. Steel is the workhorse choice: durable, pest-resistant, and available in configurations that cover almost any storage need. Aluminum costs more but resists corrosion better, which matters in coastal climates or garages where chemicals are stored.
Locking mechanisms are worth paying attention to if any of your stored items are hazardous or valuable. The three-point locking systems on quality steel cabinets — where a single handle engages locks at top, middle, and bottom of the door — are meaningfully more secure than single-point cam locks. This is not about preventing determined theft; it is about keeping children out and casual opportunism from working.
Takeaway: Use enclosed cabinet systems for hazardous materials, high-value tools, and anything that creates visual clutter when visible. Anchor every cabinet to studs, accounting for loaded weight.
7. Overhead Wall-Adjacent Storage — Using the Zone Above Eye Level
The zone from roughly six feet up to the ceiling is the most neglected area in most garages — even among homeowners who have already installed wall systems below. This is a mistake, because that zone is genuinely useful for items accessed infrequently and stored without the need for daily visibility.
The design principle for overhead storage is simple: infrequent access, lightweight to moderate weight, and items that do not need to be seen to be used. Holiday decorations, camping gear, seasonal sports equipment, luggage — all of these belong overhead. Automotive parts you access monthly, tools you use weekly, bins you rotate through regularly — these belong at eye level and below.
Wall-mounted overhead shelving in this zone works differently than mid-wall shelving. The ergonomic constraint is real: you are reaching above your head, often with an item that has some bulk to it. Shelf depth should be shallower than mid-wall shelves — 12 inches is often the practical limit — and items should be in labeled bins with handles rather than loose on the shelf surface.
Ceiling-mounted platforms — a separate category from wall shelving — work in tandem with wall storage to create a complete vertical storage system. Platforms anchor to ceiling joists, not wall studs, and can carry significant weight when properly installed. The combination of wall systems at eye level and below, with overhead platforms for bulk seasonal storage, is how professionally designed garage wall storage organization systems actually use the full vertical envelope of a garage.
Lighting in the overhead zone deserves a mention that most guides skip entirely. If you cannot see what is on an overhead shelf without a flashlight, you will not use it effectively — and items stored there will become a mystery zone of forgotten bins. A simple battery-powered LED strip mounted to the shelf’s front edge, triggered by motion, costs under $30 and transforms the usability of overhead storage.
Takeaway: Reserve the overhead zone for infrequent-access items in labeled bins. Add lighting to the front edge of any shelf above eye level — it costs almost nothing and changes how usable the space is.
8. Zones and Layout — The Design Logic That Makes Everything Work Together
Individual storage products — slatwall, hooks, shelves, cabinets — are tools. The design logic that makes them function as a system is zone planning, and it is the step that separates a garage that works from a garage that has a lot of stuff on the walls.
Zone planning starts with activity mapping, not product selection. Walk your garage and identify every activity that happens there: parking cars, doing laundry, woodworking, gardening, working on bikes, storing seasonal items. Each activity is a zone. Each zone has a natural location — laundry near the door to the house, gardening near the exterior door, tools near the workbench — and that location should drive where you install storage, not the other way around.
The most common zone planning mistake is treating all walls equally. The wall you walk past every time you enter the garage is high-value real estate — it should hold the items you access most frequently, at the height that requires the least effort to reach. The wall behind where you park is low-value real estate — it should hold seasonal storage and items you access rarely.
Ergonomic height guidelines apply in garages the same way they apply in kitchens. The zone between waist height and shoulder height is where your most-used items belong. Below waist height is for heavy items that are moved infrequently — bins, buckets, automotive equipment. Above shoulder height is for lightweight items accessed seasonally. This is not a preference; it is a physics argument about how your body moves most efficiently.
Proper garage wall storage organization systems treat the entire wall surface as an integrated design problem — not a collection of individual storage decisions made one product at a time. That means planning the full layout on paper before purchasing anything, accounting for how zones interact with each other, and leaving deliberate empty space for the categories of items that will inevitably join your garage over the next five years.
Aisle width matters and is almost universally ignored in garage storage planning. A functional garage needs a minimum of 36 inches of clear aisle between any stored items and the car or the opposite wall. Less than that, and the storage that looked great in the plan starts generating daily friction — turning sideways to get past a bin, catching a sleeve on a hook, nudging a bike every time you open the car door. Design the aisle first, then fill the walls.
Takeaway: Map your activities before selecting products. Assign high-use items to high-value wall real estate at ergonomic heights. Plan your aisle width before you plan your storage.
9. The Installation Sequence That Prevents You From Doing Everything Twice
Most garage storage projects fail not in the planning or the product selection but in the installation sequence. The order in which you mount things to walls determines whether the finished system works as designed or creates a set of conflicts you have to undo and redo.
The correct sequence is: electrical and lighting first, then heavy infrastructure, then panels and tracks, then accessories. Doing it in any other order means moving things you just installed.
Electrical and lighting come first because any new outlet, overhead light, or switch involves opening the wall — and opening the wall after panels are mounted means removing panels. Even if you are not planning electrical work right now, this is the moment to identify where outlets exist, where you wish they existed, and whether the lighting is adequate for the system you are installing. Running a single new outlet before closing the wall costs a fraction of what it costs after.
Heavy infrastructure — cabinets, overhead platforms, workbenches — goes in before wall panels because these items often anchor to studs in ways that conflict with panel placement. A cabinet that anchors to studs at 16-inch intervals may not align cleanly with slatwall panels cut to a different module. Resolving that conflict on paper before installation is straightforward. Resolving it after both are mounted is an afternoon of frustration.
Wall panels and track systems go in after heavy infrastructure is confirmed, because panels need to run around cabinets and fixed elements cleanly. This is also the point at which you confirm your stud locations with a quality stud finder — not a cheap one — and mark them clearly. Every panel and track anchor that misses a stud is a future problem waiting to happen.
Accessories — hooks, bins, baskets, tool holders — go in last, after everything structural is confirmed and solid. This sequence feels counterintuitive because accessories are what you see and what motivates the project, but it is the right order. Hanging accessories before confirming panel stability means potentially moving everything when a panel section needs adjustment.
A complete set of well-planned garage wall storage organization systems, installed in the right sequence, typically takes one to two weekends for a two-car garage. The first weekend handles the structural work. The second weekend handles panel installation and accessory placement. Trying to compress that into a single day is how panels end up crooked and accessories end up in the wrong zones.
Takeaway: Follow the sequence — electrical, heavy infrastructure, panels, accessories — even when it feels slow. The sequence exists to prevent rework, and rework always takes longer than patience.
Frequently Asked Questions
How much weight can a typical garage wall hold for storage systems?
That depends entirely on what you anchor into. A single lag bolt into a 2×4 stud can hold 80 to 100 lbs in shear load. A properly installed slatwall panel anchored to studs at every 16 inches can hold several hundred pounds across its surface. The wall itself is rarely the limiting factor — the anchor method is. Studs are the foundation of any meaningful garage wall storage system. Drywall alone, regardless of anchor type, should not be trusted with loads above 20 to 30 lbs per anchor point.
What is the best garage wall storage system for a rental property?
Track systems are the strongest answer for renters, because the tracks mount with standard screws, the accessories remove in seconds, and the installation leaves minimal wall damage. A renter who patches four to six screw holes when they leave is in a very different situation than one who has to remove 40 square feet of slatwall and patch the full surface. Freestanding options — rolling carts, floor-based shelving — are the alternative if even minimal wall anchoring is not permitted.
How do I know whether to use slatwall, pegboard, or a track system?
The decision comes down to three variables: budget, load requirements, and reconfiguration frequency. Pegboard is the lowest cost per square foot and reconfigures fastest, but requires consistent accessory selection to look intentional. Track systems are mid-range in cost, highly flexible, and ideal for seasonal storage rotation. Slatwall is the highest-cost option but offers the most finished appearance, the widest accessory ecosystem, and the best load distribution when metal-backed panels are used. If you are storing heavy tools and want the system to look like a finished design, slatwall. If you are storing mixed items that change seasonally and want flexibility, tracks. If budget is the primary constraint, steel pegboard.
Should I insulate my garage walls before installing storage systems?
If you live in a climate with significant temperature swings and use the garage as a workspace — not just storage — insulating before installing panels is the right order of operations. Spray foam insulation can be applied directly to stud bays and then covered with panels, which actually improves the panel installation by giving a more consistent backing surface. If the garage is purely for storage and vehicles, insulation is a comfort and moisture-control decision rather than a structural one, and can be done incrementally without removing storage systems if you plan the panel layout carefully.
What is the biggest mistake people make when installing garage wall storage?
Not locating studs accurately before installation. A stud finder that gives false positives — and many inexpensive ones do — leads to anchors that hit drywall rather than wood, panels that seem solid until they are loaded, and hardware that works loose over time. The fix is simple: use a quality stud finder, verify every stud location by driving a finish nail first, and mark stud centers clearly before any panel or track goes up. This single step prevents the majority of structural failures in garage storage installations.