The average shower wall has enough square footage to store everything you own — and most of it is being used to hold nothing but grout. That’s not an aesthetic failure. It’s a spatial one. And the difference between a shower that works and one that makes you shuffle bottles around every morning comes down to one decision most people make too late, too fast, or not at all. If you’ve been searching for bathroom niche ideas shower wall solutions that actually hold up in daily use, the answer almost always starts with understanding what your wall can physically support — and what it can’t.
Quick Answer
The average shower wall has enough square footage to store everything you own — and most of it is being used to hold nothing but grout.
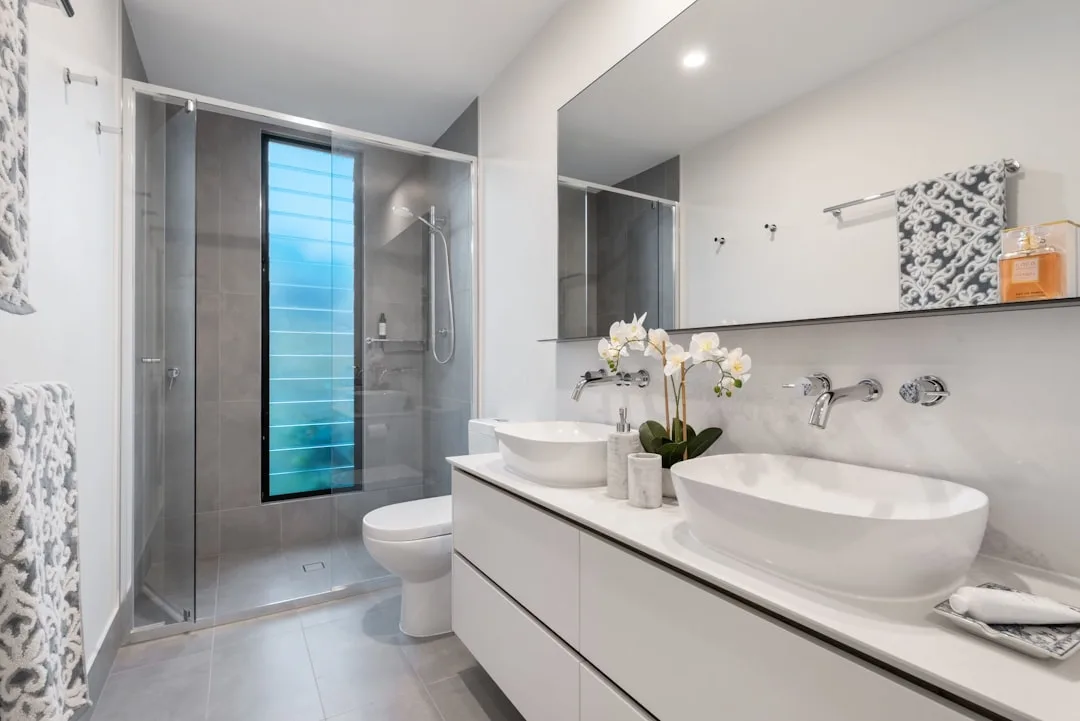
Why Most Shower Walls Waste Their Best Real Estate
In This Article
Somewhere around my fourth year doing residential interiors in Chicago, a client showed me her new master bathroom — freshly renovated, $22,000 spent, beautiful large-format marble tile. She’d placed a wire caddy over the showerhead because she ran out of niche planning time during construction. That caddy held six bottles, left rust streaks on the marble by month three, and became the first thing you saw when you walked in. The niche conversation happened two years too late.
Most homeowners think of a shower niche the way they think of a paint color — as a finishing touch, something to consider after the structural decisions are made. But a niche is a structural decision. A poorly placed or poorly sized niche creates more clutter, not less — and the average shower wall has 15 to 20 square feet of unused vertical surface that could be doing real work instead of just existing.
The standard niche depth is 3.5 inches, which is the interior dimension of a wall stud cavity. That’s not a design choice — it’s a physical constraint. Going deeper than that requires modifying structural framing, which adds cost and complexity that most remodeling budgets don’t account for. So the depth question is mostly settled by your wall. What isn’t settled is where you put it, how big you make it, and what you do to the surfaces inside it.
Retrofit options exist for finished walls, which means homeowners who already have a tiled shower aren’t locked out of this conversation — they just have a narrower set of solutions. More on that later. The more urgent point is this: most people only consider a niche during an active renovation, which means they’re under time pressure, deferring to whoever’s on the job site, and not asking the questions that would actually make the installation useful rather than decorative.
Takeaway: A niche planned under deadline pressure usually ends up in the wrong place. Settle the placement, size, and surface questions before tile work begins — not after.
The Placement Decision That Most Guides Never Mention
Here’s the placement mistake I’ve seen more than any other: a beautiful niche, centered on the wall, tiled in contrast mosaic, installed at roughly chest height because it looked right in the elevation drawing. And then the homeowner reaches for their shampoo at 6 a.m. with their elbow bent at an uncomfortable angle every single day for the next decade.
Niche height should match the primary user’s elbow height — roughly 48 to 54 inches from the floor for most adults — not the visual center of the wall. These are different measurements. A standard shower with an 8-foot ceiling has its visual midpoint at 48 inches, which happens to line up with ergonomic placement. But taller users need it higher. Households with significant height differences between partners should split the difference toward the taller person, since reaching down is less physically demanding than reaching up.
Two placement rules that aren’t negotiable:
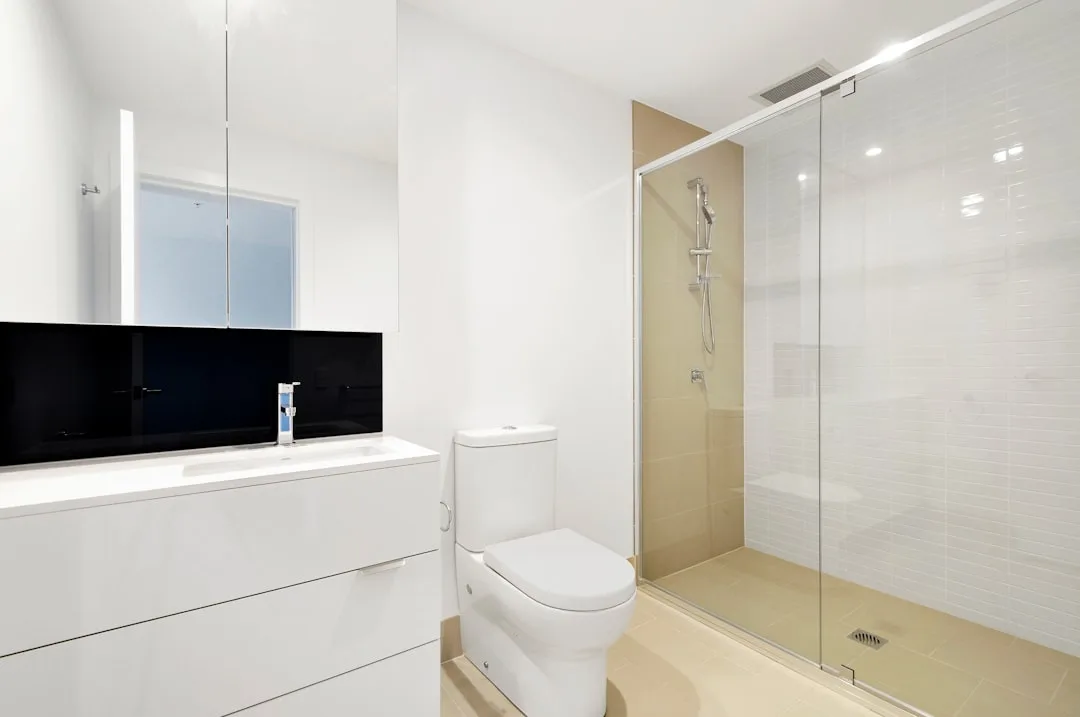
- Never put a niche on the same wall as the showerhead. Water streams directly into it. Grout deteriorates faster, water pools on the niche floor, and you’ve just built a wet box inside your wall. I’ve seen this done in otherwise excellent renovations and the grout typically starts failing within two years.
- Avoid exterior walls when possible. Cutting into an exterior wall interrupts insulation, creates a cold surface that can cause condensation inside the niche, and introduces moisture risk that interior walls don’t have. If an exterior wall is your only option, the waterproofing membrane and insulation detailing need to be specified carefully — not left to installer discretion.
Waterproofing a niche properly adds approximately $50 to $150 in labor to a tile installation. That number sounds minor. What isn’t minor is what happens when you skip it — water infiltrates through unprotected niche surfaces, migrates into the wall cavity, and causes structural damage that typically runs $1,500 to $4,000 to remediate. Skipping proper niche waterproofing is the single most common cause of niche-related water damage behind walls.
Takeaway: Before confirming niche placement with your contractor, stand in your shower, raise a bottle to the height where reaching for it feels natural, and mark that height on the wall. That mark beats any elevation drawing.
Horizontal vs. Vertical Niches: There Is a Right Answer for Your Shower
Vague advice like “choose the orientation that suits your style” is how you end up with a vertical niche in a wide shower that looks like a mail slot, or a horizontal niche in a narrow shower that fights the proportions of every tile around it. Orientation isn’t a style choice first. It’s a dimensional and functional decision that style follows.
Horizontal niches — landscape orientation — maximize shelf storage and suit wider showers. A standard horizontal niche spans 24 inches wide and 12 to 14 inches tall, which accommodates most full-size shampoo bottles (which average 10 to 11 inches tall) with clearance to spare. For two people sharing one shower, horizontal is almost always the right call because you can fit two rows of products without any bottle blocking another.
Vertical niches create a stronger visual line — they read as intentional architecture rather than a storage cutout — and they suit narrower showers or column-format layouts where a horizontal niche would require awkward tile cuts on both sides. Better for single-user spaces where product count is lower.
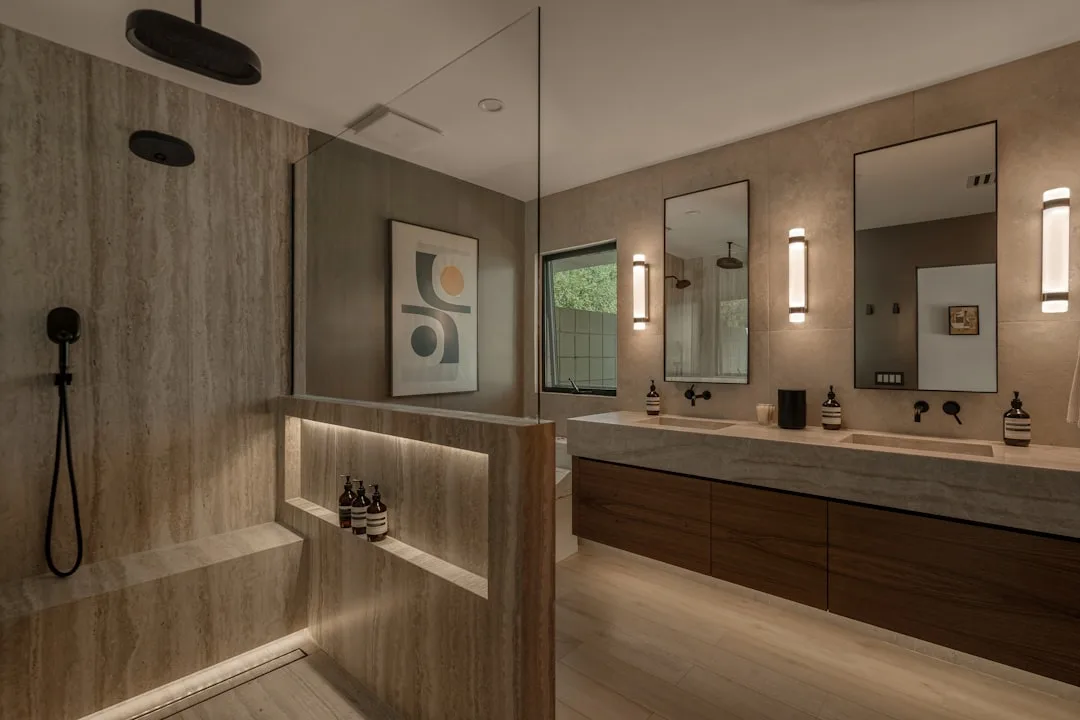
The configuration nobody talks about enough: stacked double niches. Two horizontal niches, one above the other, each assigned to a different person. I started recommending this around year six of my practice after watching too many couples complain about whose products ended up where. It’s not a style choice. It’s a household-management solution.
One more consideration most installers won’t raise: your existing grout line pattern. If your wall tile is 12×24 set horizontally, cutting a vertical niche into that grid means crossing grout lines at angles that require partial cuts on both the tile and the niche trim. That adds labor cost and creates a visual tension that’s hard to resolve cleanly. The wall tile’s grout line pattern should inform your niche orientation before you commit to dimensions.
Here’s the decision framework condensed:
- Wide shower (36+ inches), two users → horizontal, 24 inches wide min
- Narrow shower (under 36 inches), single user → vertical, 12 inches wide max
- Two users with different product counts → stacked double horizontal niches
- Subway tile or horizontal large-format wall tile → horizontal niche aligns with grout grid
- Vertical stack bond tile → vertical niche reads as intentional continuation of the pattern
Among the bathroom niche ideas for shower wall applications that consistently perform best in actual households, the stacked double configuration solves more daily-use friction than any single aesthetic decision — including tile selection.
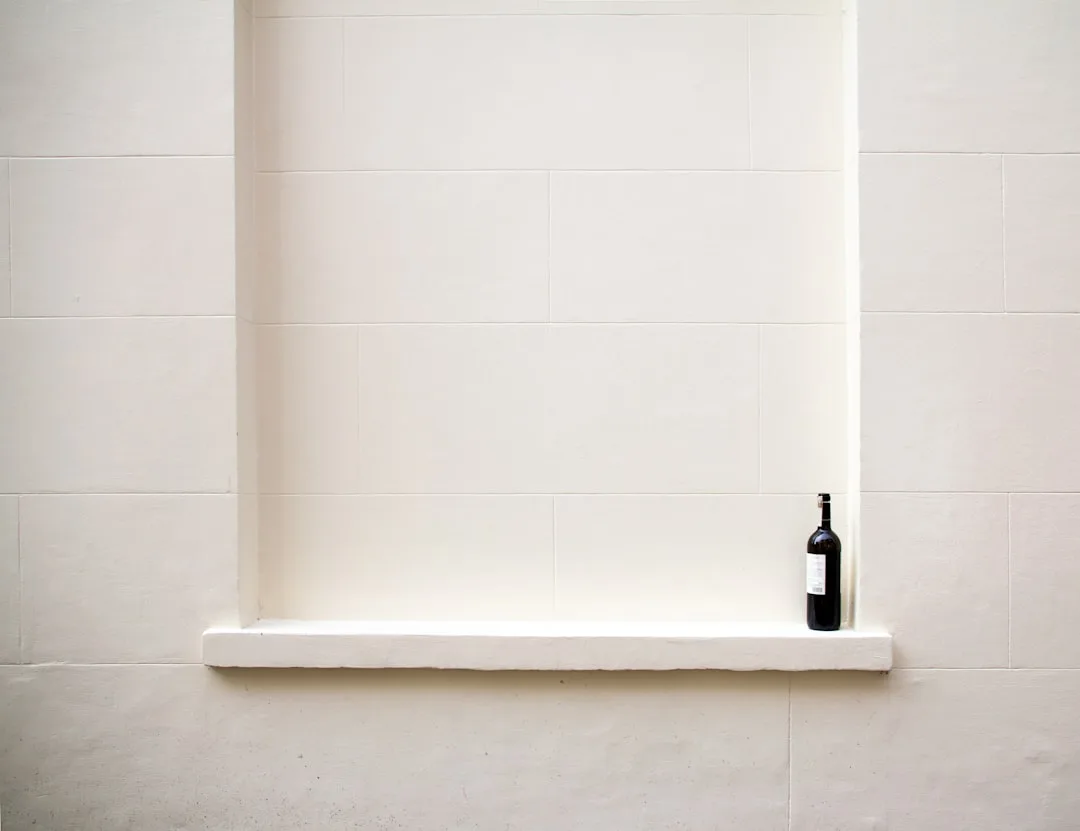
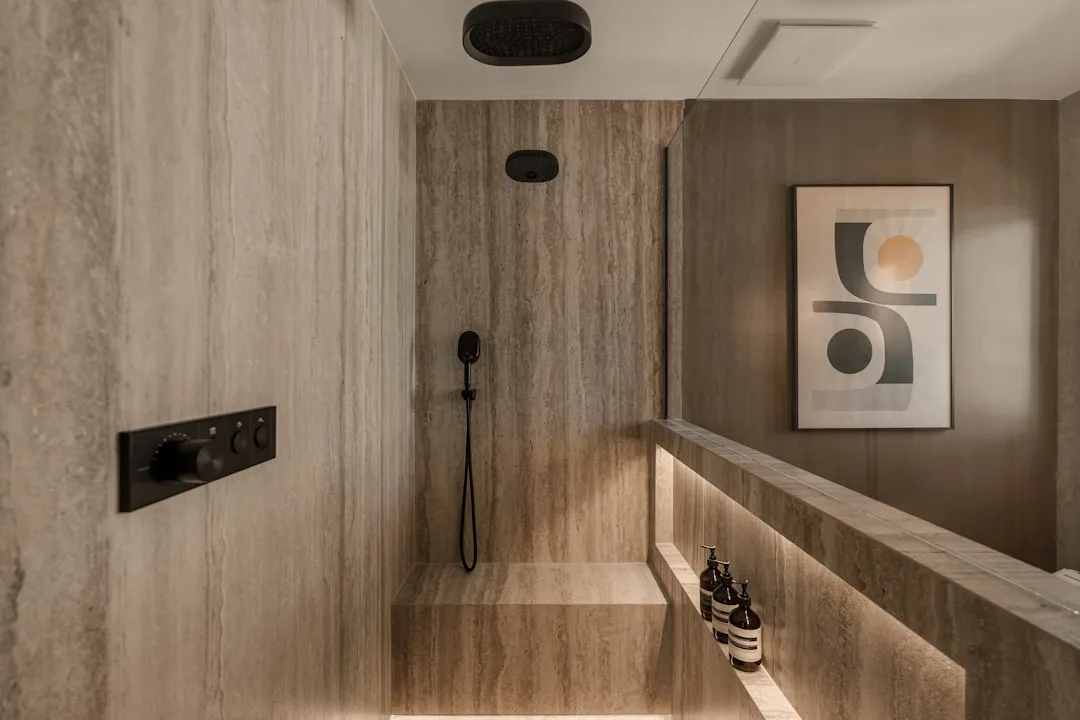
Surface Finishes Inside the Niche: Where the Design Work Actually Happens
The niche interior is the one place in a shower where a different material makes complete architectural sense. It’s a defined recess with its own planes — back wall, two sides, floor, ceiling — and treating it identically to the surrounding tile is a missed opportunity that most installers default to because it’s faster, not because it’s better.
Contrast mosaic on the back wall is the most common differentiation strategy, and for good reason. A 1×1 or 2×2 mosaic tile on the niche back wall creates visual depth that reads as intentional even from across the bathroom. It also solves a practical problem: mosaic tile on a small surface is much easier to waterproof thoroughly because the grout lines create more bonding surface for the membrane.
Slab material inserts — a single piece of marble, quartz, or porcelain slab cut to fit the niche back wall — eliminate grout lines entirely on that surface. This is worth specifying when budget allows. Fewer grout lines on a wet horizontal surface means less maintenance and less opportunity for water infiltration. The niche floor in particular benefits from slab material over mosaic because the floor takes the most direct water contact.
Integrated lighting inside a niche is a detail that costs roughly $200 to $400 to add during construction and is nearly impossible to add cleanly afterward. A small LED strip along the top interior edge of the niche illuminates the products inside, makes it easier to read labels in a steam-filled shower, and creates a visual anchor that gives the niche presence even when the shower isn’t in use. If you’re already opening walls for a renovation, this is a detail worth the budget.
One finish decision that’s often overlooked: the niche floor slope. A properly installed niche floor should pitch slightly toward the shower — roughly 1/8 inch per foot — so water drains out rather than pooling. This is a waterproofing standard, not a style preference. Most installers know this. Some skip it. Ask explicitly whether the niche floor will be sloped before tile work begins.
Takeaway: The niche interior is your highest-return design surface in the shower. Specify it separately from the surrounding tile, and treat the floor as a waterproofing decision before it’s a style decision.
Retrofit Solutions for Already-Tiled Showers
Not every homeowner is in the middle of a renovation. If your shower is already tiled and functional, cutting into the wall for a built-in niche means demolishing finished tile, opening the wall, waterproofing the cavity, and re-tiling — which is a full bathroom project, not a weekend fix. For most people in this situation, the math doesn’t work.
The retrofit alternatives that actually perform well:
Recessed niche inserts made from pre-formed polymer or stainless steel can be surface-mounted between existing studs if you’re willing to remove a section of tile. This is less disruptive than a full custom niche but still requires opening the wall in a targeted way. The advantage is that the insert comes pre-waterproofed — the box itself is the moisture barrier. Cost typically runs $150 to $350 for the insert, plus tile removal and re-tiling labor.
Corner tension shelving has improved significantly in the past decade. The better systems use compression-mounted poles rather than suction cups, which means they don’t fail when the surface gets wet. For a two-person household that can’t justify a renovation, a quality tension shelf system — not a wire caddy, a proper tiered shelf unit — solves the storage problem without touching the wall.
Magnetic organization systems designed specifically for shower walls use industrial-strength waterproof adhesive bases and magnetic-mount accessories. Several systems now on the market hold containers, razors, and soap dishes without drilling or permanent adhesion. They’re not permanent solutions, but for renters or homeowners with relatively new tile they don’t want to disturb, they work better than most people expect.
The honest answer is that none of these retrofit options perform as well as a properly planned built-in niche. But they perform significantly better than a wire caddy over the showerhead, which remains the default for too many people who didn’t plan early enough.
The Questions to Ask Your Contractor Before Tile Work Starts
Most niche-related problems are contractor communication problems. The installer knows how to build a niche. What they don’t know is where you want it, how you use your shower, or what your household’s product inventory actually looks like. Those details have to come from you, and they have to come before the tile work starts — not during, and not after.
The questions worth asking explicitly:
- Will the niche floor be sloped toward the shower drain? If the answer is uncertain, specify it in writing.
- What waterproofing system are you using on the niche surfaces? Liquid-applied membranes like Schluter Kerdi or RedGard are the standard. If the answer is “we’ll use cement board,” that’s not sufficient — cement board is not a waterproofing membrane.
- Where exactly will the niche fall relative to the stud bays? A standard 14.5-inch interior stud bay width limits your horizontal options. If you want a 24-inch niche, you’re spanning two bays, which may require additional framing. Know this before tile work begins.
- What are the finished interior dimensions? Rough dimensions and finished dimensions differ by the thickness of the tile and setting material on each surface. A niche framed at 24×14 finishes at approximately 22×12 after tiling. Make sure the finished dimensions accommodate your tallest bottles.
- Is there anything on the other side of this wall? Plumbing chases, electrical runs, and HVAC ducts can all make a particular stud bay unavailable for a niche. Your contractor should check this before placement is confirmed.
Getting these questions answered before the first tile goes up is the difference between a niche that works and one that becomes a design compromise you explain to visitors for the next ten years.
FAQ
How deep does a shower niche need to be to hold standard shampoo bottles?
Most full-size shampoo and conditioner bottles are 3 to 4 inches deep. The standard niche depth of 3.5 inches — which matches the interior stud cavity dimension — fits most bottles with minimal clearance. Pump dispensers are the exception: they often run 4.5 to 5 inches deep, which means they’ll protrude slightly from a standard niche. If your household uses pump dispensers, specify a niche depth of at least 4 inches, which requires planning around the framing before tile work begins.
Can a shower niche be added to an existing tiled shower without a full renovation?
Yes, but with significant limitations. A targeted tile removal — removing the section of tile over one stud bay, cutting into the backer board, framing the niche cavity, waterproofing, and re-tiling — is possible without gutting the entire shower. It requires finding tile that matches or accepting a visible patch. For most people, the cost and disruption of a targeted retrofit makes more sense when paired with other bathroom work rather than as a standalone project.
What’s the minimum shower size where a built-in niche makes sense?
There’s no hard minimum. Even a 32-inch prefabricated shower stall can accommodate a small vertical niche if it’s on an interior wall. The practical constraint is tile cuts — in a small shower, a niche that spans two stud bays may look disproportionately large, and a single-bay niche (roughly 14 inches wide) may be more appropriate. The orientation and size should be calibrated to the shower’s proportions, not to what looks good in a showroom photo.
How many niches does a two-person shower actually need?
One large horizontal niche with a center shelf divider works for couples with similar product counts. Two separate niches — stacked or side by side if the wall width allows — work better when one person uses significantly more products than the other, or when both people want clearly defined storage. The stacked configuration is almost always preferable to side-by-side because it doesn’t require as much horizontal wall space, and it naturally assigns top versus bottom without any ongoing negotiation.
Does the tile inside a shower niche need to be different from the surrounding wall tile?
No, but same-tile installations require more careful execution. When the niche interior uses the same tile as the surrounding wall, the alignment of grout lines across the transition between the wall face and niche surfaces needs to be planned precisely — misaligned grout lines at the niche edges look unintentional rather than designed. Using a contrast material inside the niche sidesteps this alignment challenge entirely, which is part of why it’s the more common recommendation among bathroom niche ideas for shower wall installations where design coherence matters.