The average compact food storage space has enough square footage to hold everything a household of four needs — the problem is that most of that space is currently occupied by air.
Quick Answer
The average compact food storage space has enough square footage to hold everything a household of four needs — the problem is that most of that space is currently occupied by air.
Not clutter, not overflow, not too many canned goods. Air. Dead vertical space sitting above a row of soup cans, beneath a shelf that was installed for someone’s Dutch oven collection, between items that have slowly drifted apart with no logic governing where they landed. I spent over a decade rearranging the interiors of real apartments — not staged model units, real kitchens with half-eaten cereal boxes and five varieties of vinegar — and the pantry was almost always the room’s most inefficient square footage, by a wide margin.
The fix is almost never more storage. It is almost always smarter geometry.
What follows is a room-by-room, shelf-by-shelf framework for small pantry organization ideas budget-minded households can actually implement over a weekend, without a contractor, and for under $30 in most cases. Not aesthetically driven. Not a “decant everything into matching glass jars” fantasy. A system that works the way your household actually behaves.
The Real Reason Your Tight Storage Space Feels Impossible to Tame
In This Article
- The Real Reason Your Tight Storage Space Feels Impossible to Tame
- Mapping What You Actually Store Before You Buy a Single Bin
- Vertical Stacking Systems That Cost Less Than a Dinner Out
- The Door Is a Storage Wall You Are Not Using
- Baskets, Bins, and Labels: The Hierarchy That Prevents Relapse
- Floor and Low-Shelf Strategy for Bulky Items Without Wasting Space
- The $30 Pantry Overhaul Shopping List That Skips the Aesthetic Tax
Most people walk into a crowded pantry and diagnose a space problem. What they actually have is a spacing problem — and those two words mean completely different things.
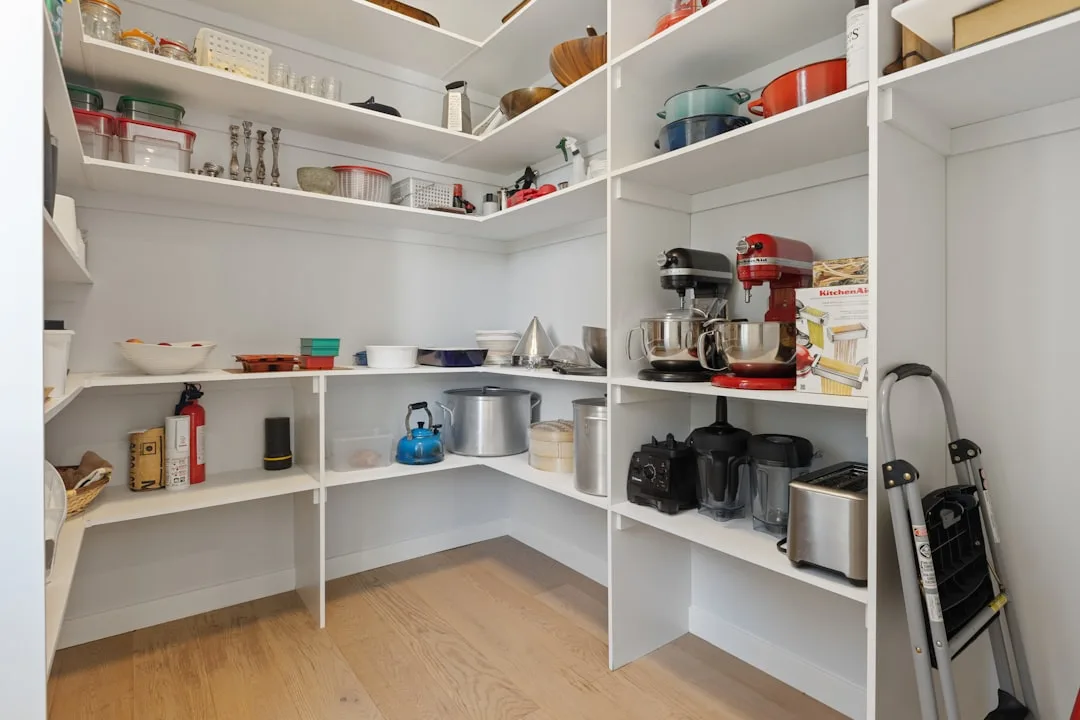
Fixed shelving installed at standard intervals — typically 12 to 16 inches apart — was designed to accommodate the tallest items a builder expected you to store. That’s a reasonable construction default. It is a terrible organizational outcome. The National Kitchen and Bath Association notes that the average American kitchen pantry runs only 15 to 20 inches deep, yet standard shelf spacing routinely wastes 6 to 8 inches per shelf on empty air above shorter items. Multiply that across four or five shelves and you have lost, conservatively, 30 to 40 inches of usable vertical height. On a pantry that’s only 72 inches tall, that is more than half your storage column gone.
The myth I kept running into with clients was this: “I just need another shelf.” Sometimes that’s true. But another shelf installed at the same interval solves nothing — you’ll store the same items in the same configuration and still have the same dead air above each row. What you need is adjustable or supplemented shelf intervals that match the actual height distribution of what you own.
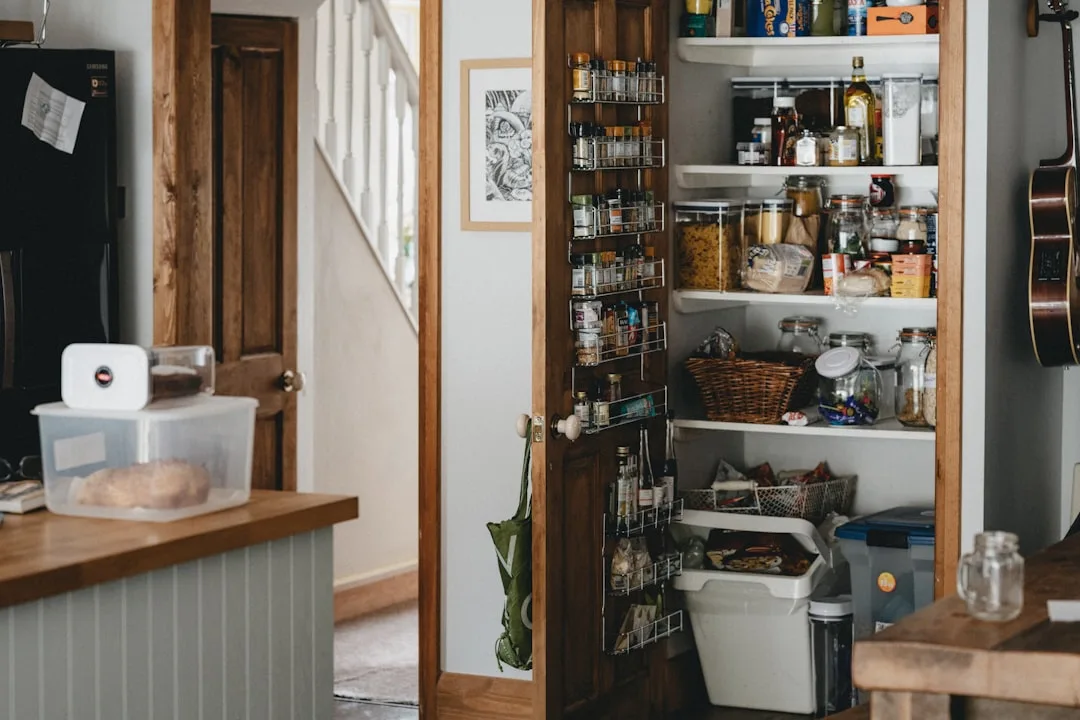
Door real estate is the other casualty. An interior pantry door panel — standard 80 inches tall, roughly 28 inches wide — offers approximately 560 square inches of usable storage surface. That is equivalent to adding a full extra shelf unit to a tight space. Most people use it for nothing. Some hang a single hook. The door is sitting there doing zero organizational work while the shelves behind it groan under mismanaged weight.
The pattern I saw repeatedly in Chicago walk-up apartments was pantries that felt chaotic not because they held too much, but because vertical dead zones made everything feel compressed and inaccessible at the same time — a strange contradiction, but one that shelf-adjustment alone can resolve within a weekend.
Actionable takeaway: Before purchasing a single product, stand in your pantry and count the inches of air above every row of items on every shelf. That number — in aggregate — is your actual available storage, and you have not touched it yet.
Mapping What You Actually Store Before You Buy a Single Bin
Here is the mistake that cost my clients the most money, consistently: buying bins and containers before they understood what they were containing.
A set of 12 matching square bins sounds efficient. Then you bring them home and realize your bulk rice bags are too wide, your cereal boxes are too tall, and your spice packets slip through the gap between the bin and the shelf. You’ve spent $40 on containers that fight your inventory instead of holding it. I watched this play out enough times that I started refusing to let clients shop until we had done what I call a height-frequency audit — a simple diagnostic that takes about 20 minutes and saves you from buying the wrong size of everything.
The audit works like this. Pull one shelf at a time — not everything at once, which creates chaos and the “now I can’t find anything” aftermath that lasts for days. Photograph each shelf before you touch it. That photograph becomes your reference map, a record of what existed and where, so that if the reorganization gets interrupted by real life (and it will), you have a return state.
A University of Minnesota study on household food waste found that visibility is the single strongest predictor of whether a food item gets used — items stored behind other items are roughly three times more likely to expire unused. This is not a minor organizational footnote. This is the reason you keep finding cans of chickpeas that expired in 2021.
Once you’ve photographed each shelf, sort your items into three storage archetypes:
- Bulk dry goods — large bags, big containers, items bought in quantity. These need floor-level or low-shelf placement and pull-out access. They do not belong on eye-level shelves where they block visibility.
- Everyday grab-and-go items — snacks, frequently used condiments, lunchbox staples. These need to live at the most ergonomically accessible height — typically between hip and shoulder — and must have zero-friction retrieval. No lids to remove, no bins to dig through.
- Occasional-use items — holiday baking supplies, specialty ingredients, backup pantry stock. These go on the highest or lowest shelves, behind reach, because you access them rarely enough that inconvenience is an acceptable tradeoff.
Plot each item group by both height (how tall is the item, which determines the shelf clearance you need) and frequency (how often you reach for it, which determines where on the vertical column it lives). These two variables together — not food category, not expiration date — determine shelf assignment.
Actionable takeaway: Photograph every shelf before you reorganize a single item. Then spend 20 minutes sorting your inventory into the three archetypes above. Do this before you set foot in a store.
Vertical Stacking Systems That Cost Less Than a Dinner Out
This is where the square footage actually comes back to you. And almost none of it requires drilling.
Tiered step risers are the single highest-return product in a budget pantry overhaul. At $6 to $12 depending on material and size, a two- or three-tier step riser turns a flat shelf holding one row of cans into a visible three-row display where every label faces forward. The difference sounds modest. In practice, it transforms how a shelf functions — you stop losing items behind other items, and you stop buying duplicates because you couldn’t see what you had.
Stackable wire shelf inserts — the kind that clip or sit on top of existing shelves — run about $8 to $15 for a pair and do something even more structurally significant. They recover 8 to 12 inches of vertical dead space per shelf. On a pantry with four shelves, that translates to up to 48 inches of recovered storage height — nearly four additional feet of usable space without touching a single wall anchor. Look for inserts with a weight rating of at least 15 pounds and a lip depth of at least one inch; shallower lips let lightweight items slide off during retrieval.
Then there’s the solution almost no one considers: tension rods. A curtain tension rod — $3 to $7 at any hardware store — can be installed vertically between shelves to create dividers for cutting boards, baking sheets, muffin tins, and flat trays that are currently lying flat and eating an entire shelf to store a single layer. Stand those items upright between tension rod dividers and you’ve just recovered that shelf’s full surface for other use.
- Step risers ($6–$12): Best for canned goods and spice jars. Orient labels forward, not up.
- Wire shelf inserts ($8–$15/pair): Best for fixed-shelf pantries where you cannot adjust height. Check lip depth before buying.
- Tension rod dividers ($3–$7): Best for flat bakeware and cutting boards. Install vertically between shelves, not horizontally.
None of these require tools, damage rental units, or come with a learning curve. I kept a set of wire shelf inserts in my car during my last two years of client work because I used them on nearly every pantry project.
Actionable takeaway: Start with one wire shelf insert on your most chaotic shelf. Spend $8, see the recovered space. Then decide what else you need — in that order.
The Door Is a Storage Wall You Are Not Using
That 560 square inches of door panel I mentioned earlier is not theoretical. It’s structural real estate sitting two feet from your shelves, and it costs nothing to access it beyond the price of a mount.
Over-door organizers with shallow pockets — typically $10 to $20 — are best suited for a specific category of item: thin, frequently grabbed, packet-format goods. Spice envelopes, seasoning packets, snack bars, foil roll boxes, parchment boxes. Things that currently live in a drawer or get lost at the back of a shelf because they have no vertical presence. Shallow pockets hold these items at eye height and in single-file, which means you actually see them. The mistake I see with over-door organizers is using deep pockets for irregularly shaped items that then topple and jam — shallow pockets are the correct product for door storage, not deep magazine-style slots.
For rental units or anyone reluctant to put holes in a door, Command hooks with S-hook chains are a remarkably underused configuration. A pair of adhesive hooks — $4 to $8 for a multi-pack — can hold S-hook chains that then suspend small baskets, measuring cup sets, or a row of oven mitts. The load limit on standard Command hooks rated for 3 to 5 pounds is lower than a fixed-mount system, so this isn’t the right approach for anything substantial. But for lightweight, frequently used items? It adds real function without risking your security deposit.
Clear over-door shoe organizers are the most repurposed item in small pantry organization. At $8 to $14, a 24-pocket over-door shoe organizer turned to pantry use gives you individual compartments that work exceptionally well for one specific demographic: households with children. Each pocket holds exactly one category of kid-accessible items — granola bars in pocket one, fruit pouches in pocket two, crackers in pocket three. No digging, no parental intervention required during lunch prep. The visual organization is clear enough that even young kids can retrieve and return their own snacks correctly.
Actionable takeaway: Measure your pantry door’s interior panel height before ordering any over-door product — some organizers hang at a length that clears the floor by less than an inch, which means the door stops closing properly. Measure first, always.
Baskets, Bins, and Labels: The Hierarchy That Prevents Relapse
Here’s the thing no organization article wants to tell you: the reason your pantry reverted to chaos three weeks after you last organized it is not because you lack discipline. It’s because the system created friction that your household unconsciously rejected.
Friction is the enemy of maintenance. A bin with a lid on an everyday-access shelf will be opened, emptied, lid set aside, and never properly closed again by the second week. A basket that requires two-handed removal from a shelf will not be replaced correctly when someone is holding a grocery bag in the other arm. The system fails not at the organizational moment but at the retrieval-and-return moment, and most container products are not designed with return motion in mind.
The fix is a three-tier containment logic:
- Open-top pull-out bins ($5–$10 each) for the highest-frequency category on each shelf. No lids. No latches. The grab-and-replace motion must be genuinely frictionless or the system fails within days.
- Closed bins with lids only for bulk stock items — backup pantry purchases, long-term dry storage — where access is infrequent enough that the slight friction of a lid is an acceptable tradeoff.
- Uniform sizing within each shelf zone. Mixing bin widths creates visual noise that makes a space feel messier than it is even when items are technically sorted. Organizational psychologist Dr. Sherrie Bourg Carter has written on how visual clutter competes for cognitive attention — a non-uniform bin arrangement can produce something close to the same stress response as a genuinely disorganized space. I saw this in practice constantly: clients who had technically organized their pantries but used a variety pack of bin shapes reported it still feeling chaotic.
Label hierarchy matters here too, and most people get it backwards. The category label — “SNACKS,” “BAKING,” “PASTA” — goes on the bin face, visible at a glance. The item-level label, if you use one, goes inside the bin on the bottom or front interior face. This prevents the wrong-bin problem that happens when multiple household members use the space and make judgment calls based on size rather than label.
Actionable takeaway: Replace every lidded container on your most-used shelf with an open-top bin this week. Just that one change will measurably reduce how quickly the shelf deteriorates.
Floor and Low-Shelf Strategy for Bulky Items Without Wasting Space

Most advice on this topic amounts to “store heavy things low.” Fine. Useless. Storing heavy things low in a deep pantry closet without a retrieval system means they disappear.
The ergonomic reality is significant here: in pantry closets deeper than 20 inches, kitchen ergonomics research consistently shows that items stored beyond 14 inches from the front edge of a low shelf are retrieved less than 20% as often as front-positioned items. Rear lower-shelf space might as well not exist for practical purposes. The solution is not to avoid using it — the solution is to bring the rear of the shelf to the front through a pull-out system.
Rolling utility crates or small kitchen carts — $15 to $25 at most discount retailers — are the most effective low-zone tool in a budget pantry overhaul. They slide out fully, exposing everything stored in them without requiring you to crouch and reach. In deep pantry closets especially, this transforms what is otherwise dead space into genuinely usable storage. Look for carts with locking wheels if the pantry floor is not level.
Lazy Susans belong on the floor zone, not just upper shelves. A turntable at floor level — $6 to $12 — solves the corner problem in pantries wide enough to have one: items that would otherwise sit in a fixed rear corner become reachable with a half-rotation. I installed one under a client’s bottom shelf to hold bulk cooking oils and vinegars, and she told me three months later it was the single change that had stuck. Small turnaround. Real result.
For bulk bags — chips, pasta, large dry goods — the floor zone is also where a vertical storage solution matters most. A simple magazine file holder at $4 to $7 holds bulk bags upright and separated so they stop collapsing into each other. Alternatively, a bungee cord system strung between two screw hooks keeps bags standing and separated without any container at all. The goal is upright and visible. Bags that collapse become invisible, and invisible food gets wasted.
Actionable takeaway: Pull everything off your lowest shelf or out of your floor zone right now. Measure the depth from front edge to wall. If it exceeds 16 inches, you need a pull-out solution before you put anything back.
The $30 Pantry Overhaul Shopping List That Skips the Aesthetic Tax
Let’s talk about where the money actually goes — and more importantly, where it absolutely should not.
The pattern I kept seeing in clients who had tried and failed at pantry organization was not that they had spent too little. Most had spent between $60 and $150. The problem was purchase sequencing: they bought labels before they had structure, bought matching woven baskets before they knew what they were containing, bought chalkboard jar sets before they had identified which shelves those jars would occupy. The money went toward aesthetics before function, which is exactly backwards.
The correct purchase order is: structural solutions first, containment second, aesthetics never on a tight budget.
Here is a working $30 budget breakdown using products available at dollar stores, hardware stores, and discount retailers — not boutique home goods shops:
- $8–$10: One pair of stackable wire shelf inserts (discount retailer or online — look for the OXO or Simple Houseware versions at Target or Amazon)
- $6–$8: Two tiered step risers (dollar store or discount bin — material doesn’t matter, function does)
- $4–$6: One over-door organizer, shallow-pocket style (dollar store occasionally stocks these; otherwise Amazon)
- $3–$5: Two or three tension rods repurposed as vertical dividers (hardware store)
- $4–$6: Two open-top pull-out bins (dollar store — the $1.25 plastic bins at Dollar Tree work fine)
- $0–$3: Labels — printed from any home printer on standard paper, cut and taped, or written in marker on masking tape
That is the entire system. It handles vertical stacking, door storage, flat-item dividers, and containment. Nothing matching, nothing ceramic, nothing that requires a dedicated aesthetic vision to maintain.
What to skip entirely: matching container sets, woven basket collections, chalkboard label systems, and anything sold as a “pantry organization kit.” The premium you pay for those products buys visual cohesion, not functional improvement. And visual cohesion — I want to be honest here — is the first thing that disappears when real life enters the pantry.
Consumer spending patterns suggest Americans spend, on average, around $127 annually on home organization products. The same data indicates that the majority of households report their storage spaces becoming disorganized again within six months. That is not a product problem. That is a sequencing and system-design problem, and no amount of aesthetic investment solves it.
Actionable takeaway: Today, right now — not after you’ve researched more products — spend $8 at a dollar store on two open-top bins and one tension rod. Install them. See what the structure reveals before you spend another dollar.
Frequently Asked Questions
How do you organize a pantry with very limited shelf space without spending a lot?
Start with what you already have before spending anything. The most common low-cost intervention is repositioning: move your highest-frequency items to the most ergonomically accessible shelf height (between hip and shoulder), move bulk and occasional-use items to the floor and top shelves, and get flat items — baking sheets, cutting boards — standing vertically instead of lying flat. That repositioning alone recovers significant space without any purchase. Once that’s done, a $6 tiered step riser on your most-used shelf and a tension rod for vertical dividers — total spend around $10 — will have more impact than any matching container set.
What is the most effective cheap product for adding storage to a small pantry?
Wire stackable shelf inserts are the highest-return product for the money. At $8 to $15 for a pair, they double the usable capacity of a fixed shelf by adding a second tier without drilling. They work in rented spaces, they install in about 30 seconds, and they recover 8 to 12 inches of dead vertical space per shelf. If your budget is even tighter — under $5 — a single tiered step riser at a dollar store is the next best option for making what’s already on a shelf visible and retrievable.
How do you keep a small pantry organized long-term so it doesn’t revert to clutter?
The answer is friction reduction, not willpower. Every container on a high-use shelf needs to be open-top. Every item needs a defined home that requires exactly one motion to return — not a lid to remove, not a bin to restack. The maintenance failure I saw most often in client spaces came from systems that were beautiful to photograph and genuinely annoying to use. Size uniformity matters too: a shelf of mismatched bins creates visual noise that registers as disorder even when items are technically organized, which subconsciously discourages maintenance. Build the system for the laziest possible version of your household, and it will hold.
Can you organize a pantry closet without any drilling or permanent fixtures?
Completely. Every product in the $30 budget breakdown above requires zero drilling. Wire shelf inserts sit on top of existing shelves under their own weight. Tiered risers just sit on shelf surfaces. Tension rods use spring pressure — no anchors, no adhesive, no wall contact. Over-door organizers hang from the door’s top edge without hardware. Command hooks with adhesive backing work for lightweight items in rental units without damaging door surfaces. The only caveat is load — adhesive hooks have weight limits around 3 to 5 pounds per hook, so don’t hang anything substantial from them. For everything else, a fully functional, non-permanent pantry system is achievable in under two hours with no tools at all.
Start today by doing exactly one thing: walk into your pantry with a measuring tape and count the inches of air above every row of items on every shelf. Write the total on a piece of paper. That number — whatever it is — is the storage you already own and aren’t using. Everything else follows from there.