Transforming attic into bedroom space is one of the highest-value home improvement projects available to a homeowner — but your attic might already meet the code requirements for a legal sleeping room, and there’s still a 60% chance the framing inside it makes a standard conversion structurally impossible without an engineer. That’s not a scare tactic. That’s the number you get when you look at how American residential construction shifted after 1970, and it’s the piece of information that most attic conversion guides bury so far down that you’ve already called three contractors before you encounter it.
Quick Answer
Your attic might already meet the code requirements for a legal sleeping room — but there’s a 60% chance the framing inside it makes a standard conversion structurally impossible without an engineer.
Transforming an attic into a bedroom is also one of the most technically specific projects in residential renovation. The margin between a project that sails through permits and a project that gets red-tagged mid-construction is almost always traced back to decisions made in the first two weeks. This is the sequence, the code reality, the cost framework, and the design logic — built for homeowners who don’t want to waste money finding out the hard way.
Before You Spend a Dollar: The Feasibility Check Most Guides Skip
In This Article
- Before You Spend a Dollar: The Feasibility Check Most Guides Skip
- What Is the 7 and 7 Rule for Attics — and Why It’s Just the Starting Point
- Is It Legal to Turn an Attic Into a Sleeping Room? The Permit Reality Nobody Explains Clearly
- Egress, Insulation, and the Systems That Determine What This Project Actually Costs
- The Real Cost Breakdown: What You’re Actually Buying for $25,000 vs. $75,000
- Design Decisions That Make a Small Attic Bedroom Feel Like a Real Room
Somewhere around 2005, I watched a client spend $4,200 on architectural drawings for an attic bedroom — beautiful, detailed plans — before anyone bothered to crawl up there with a flashlight and look at the framing. The attic was full of scissors trusses. Every single one. The drawings were useless.
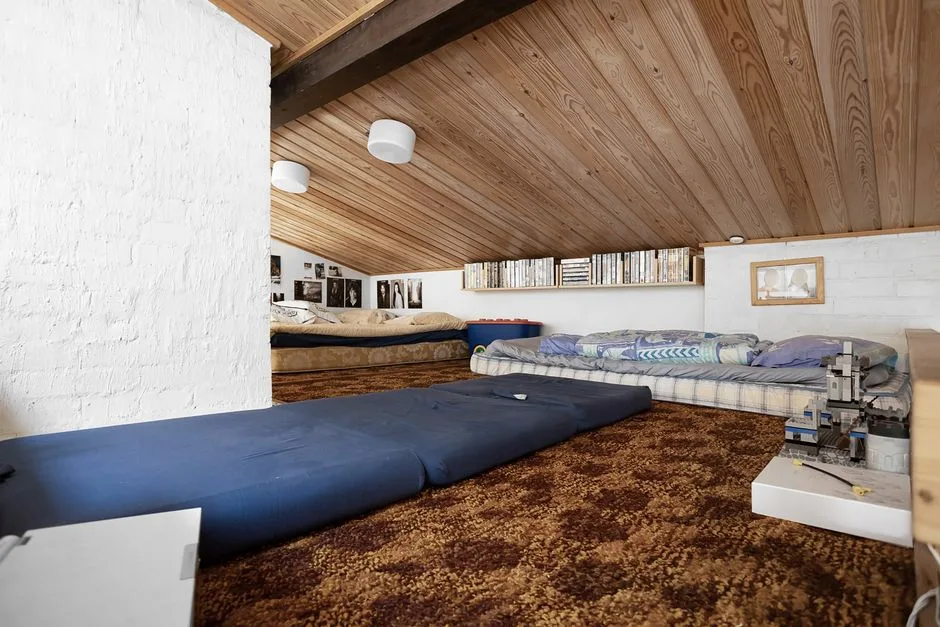
The single most important thing to understand before anything else is the structural difference between a truss-framed attic and a rafter-framed attic. These two systems look similar from below and feel identical when you’re walking under them. They are not interchangeable.
A rafter-framed attic uses individual lumber pieces — ridge board, rafters, collar ties — that create open triangular space inside the roof. That open space is where your bedroom goes. A truss-framed attic uses engineered pre-built triangles that distribute load through a web of interior members. Those interior members occupy exactly the space you’d need to live in. You cannot remove them without replacing the entire load path of your roof — and that means structural engineering, custom fabrication, and costs that can double or triple a standard conversion budget.
Roughly 60% of American homes built after 1970 use truss framing, making a standard conversion structurally impossible without engineering intervention. Most listicle guides omit this entirely, or mention it in a single sentence near the bottom. It belongs at the top.
Before you call a contractor, verify three non-negotiables yourself:
- Floor load capacity: Attic floors designed for storage typically support 10–20 lbs per square foot. Habitable rooms require 40 lbs per square foot. This almost always means sistering or replacing floor joists.
- Available headroom: Measure the vertical distance from the floor deck to the underside of the ridge — then subtract 6–8 inches for finish floor and drywall. What’s left is your actual ceiling height.
- Stair access footprint: A code-compliant staircase requires roughly 35–45 square feet of floor space on the level below. In a tight floor plan, this may not exist.
- Roof pitch: A 7-in-12 pitch or steeper gives you a realistic shot at meeting headroom requirements without dormers. Anything shallower and you’re likely building a dormer or abandoning the project.
- Existing mechanical systems: HVAC ducts, plumbing stacks, and electrical runs that pass through the attic may need rerouting. Identify them before pricing anything.
Hire a structural engineer for $500–$1,500 before you hire anyone else. That single report will tell you whether your project is a renovation or a major structural undertaking — and that distinction determines whether your budget is $25,000 or $80,000.
Actionable takeaway: Go into your attic with a tape measure and a phone. Photograph the framing, measure the ridge height, and look for the diagonal web members that signal trusses. If you see them, budget for structural engineering before you budget for anything else.
What Is the 7 and 7 Rule for Attics — and Why It’s Just the Starting Point

Most guides recite this rule in one sentence and move on. The recitation is accurate. The context is almost always missing — and the missing context is exactly what causes permit denials.
The 7-and-7 rule is shorthand for IRC Section R304.1 and R304.2 combined: at least 7 feet of ceiling height over a minimum of 70 square feet of floor area, with no horizontal dimension of that area measuring less than 7 feet. The International Residential Code Section R304 governs minimum habitable room size, but only 34 states have adopted the IRC without local amendments — meaning your local building department is always the final authority, regardless of what any website tells you.
Here is what competitors consistently fail to explain:
- The 7-foot measurement applies to finished ceiling height — after drywall, insulation, and any dropped mechanical chases. Raw rafter height at peak is not what inspectors measure. In a typical attic with 8-foot rafter height, adding 5/8-inch drywall, 3.5 inches of rigid insulation, and a 1.5-inch furring channel brings that number down to roughly 7 feet flat. There’s no margin.
- The slope rule cuts your usable floor area significantly. Most code interpretations count only the area with 5 feet or more of headroom toward the 70-square-foot minimum. In a steeply pitched roof, the 5-foot line might only be 4 or 5 feet from the center ridge — leaving you with a narrow corridor of “qualifying” floor area surrounded by unusable sloped walls.
- Some municipalities require 7.5 or even 8 feet for a space to be permitted as a sleeping room. This is not a theoretical edge case. I’ve seen it applied in Chicago suburbs, in parts of New Jersey, and in several California jurisdictions. You must check your local code, not the IRC baseline.
- Knee wall areas count differently depending on jurisdiction. Some building officials will count knee wall space toward square footage if it can be accessed and used for storage; others exclude it entirely from the habitable area calculation.
- Dormer additions change the math entirely. A shed dormer that extends across the full roof width can double your qualifying floor area and solve headroom problems in a single construction phase. If you’re borderline on square footage, a dormer should be in your feasibility conversation, not your afterthought conversation.
The practical test: stand under your ridge with a 7-foot-and-1-inch stick. If the stick clears with room to spare and you can pace off 7 feet in two directions from that point, you’re a candidate. If you’re stretching to make it work on paper, you’re not.
Actionable takeaway: Before any permit discussion, pull your municipality’s adopted building code — not the IRC — from your county or city’s official website. Look for R304 equivalents and any local amendments to ceiling height requirements for sleeping rooms specifically.
Is It Legal to Turn an Attic Into a Sleeping Room? The Permit Reality Nobody Explains Clearly

Short answer: yes, with permits. The more useful answer is that “legal” is not binary in residential construction — there are three distinct designations that mean entirely different things for your insurance, your appraisal, and your ability to sell the house.
A bonus room is finished space that doesn’t meet all the requirements for habitable occupancy. A habitable room meets IRC standards for ceiling height and area. A legally permitted sleeping room meets all of those requirements plus egress, fire safety, and access requirements — and has been inspected and signed off by a building official.
That distinction matters enormously when you sell the house. Real estate appraisers cannot count unpermitted finished space toward square footage in a formal appraisal. More importantly, if something goes wrong — a fire, an injury, a water intrusion — and your insurer discovers the space was unpermitted, your claim exposure is significant. “Finished attic” and “legal bedroom” are not synonyms, and treating them as such is one of the most expensive mistakes a homeowner can make.
The permit process for an attic conversion typically involves several sequential steps:
- Pre-application meeting with your local building department — most jurisdictions offer free 30-minute consultations that can save weeks of back-and-forth later.
- Structural drawings prepared or reviewed by a licensed engineer, showing existing conditions and proposed modifications to framing and floor joists.
- Architectural or design drawings showing the room layout, window placement, stair design, and egress path.
- Mechanical, electrical, and plumbing plans if you’re adding HVAC, outlets, or a bathroom.
- Permit application submission with fees that typically range from $500 to $2,500 depending on jurisdiction and project value.
- Phased inspections — framing, rough electrical, rough HVAC, insulation, and final — each requiring a scheduled inspector visit before the next phase can proceed.
The homeowners who get red-tagged mid-project almost always skipped step one. A 30-minute conversation with the building department before you’ve spent anything is the single highest-return action in the entire process.
Egress, Insulation, and the Systems That Determine What This Project Actually Costs
This is where most conversion projects either stay on budget or become a different project entirely. The headline number you see in renovation roundups — “$20,000 to $75,000” — spans that range almost entirely because of these three variables.
Egress
IRC Section R310 requires every sleeping room to have at least one emergency escape and rescue opening. For an attic bedroom, this almost always means a window or skylight that meets minimum opening dimensions:
- Minimum net clear opening: 5.7 square feet (or 5.0 square feet for grade-floor openings)
- Minimum opening height: 24 inches
- Minimum opening width: 20 inches
- Maximum sill height from floor: 44 inches
A standard attic gable window rarely meets these requirements as-installed. You have two realistic options: replace the gable window with a larger egress-compliant unit, or add a dormer with an egress window. Dormer additions run $15,000–$40,000 depending on size and complexity. Egress window replacement in an existing gable runs $1,500–$4,000 including framing modifications. The difference is substantial, which is why egress analysis belongs in the feasibility stage, not the design stage.
Skylights can also satisfy egress requirements if they meet the opening dimensions — but the sill height rule is interpreted differently for roof-mounted skylights in some jurisdictions, and you’ll need explicit confirmation from your building department before designing around one.
Insulation
Attic insulation in a converted bedroom is categorically different from attic insulation in an unconditioned storage space. An unconditioned attic is insulated at the floor level. A conditioned attic bedroom is insulated at the roof line — the rafters and knee walls — which requires a completely different approach and substantially higher R-values.
The current IRC requires R-49 in climate zones 5–8 and R-38 in zones 3–4 for roofs. Meeting those values between rafters with standard batt insulation is often geometrically impossible — a 2×8 rafter bay holds roughly R-25 of batts, and you’re left with a significant deficit. The solutions most contractors use:
- Closed-cell spray foam applied directly to the underside of the roof deck. At 2 inches per R-12, you need roughly 4–5 inches to hit R-49 — costly ($3–$7 per square foot installed) but effective and vapor-barrier compliant in most climates.
- Rigid foam above the roof deck combined with batt insulation below. This requires re-roofing, which dramatically increases cost but achieves the highest performance.
- Hybrid assemblies using a layer of closed-cell spray foam at the deck plus batts in the rafter cavity to reach code minimums.
The insulation decision also affects your finished ceiling height. Every inch of foam or furring you add to the underside of the rafter deck reduces your headroom. In a project where you’re already at 7 feet 2 inches, adding a 2-inch spray foam layer and 5/8-inch drywall brings you to exactly 7 feet — with no tolerance for an inspector who measures differently than you did.
HVAC and Electrical
Attics are thermally extreme environments. Without proper conditioning, a finished attic bedroom will run 15–20°F hotter than the rest of the house in summer and require disproportionate heating in winter. Your existing HVAC system almost certainly wasn’t sized to condition this space. The common solutions, in order of cost:
- Extending existing ductwork from the floor below — possible if your system has capacity, but requires a Manual J load calculation to confirm.
- Ductless mini-split system — typically $3,000–$6,000 installed for a single-zone unit. Efficient, effective, and doesn’t require duct runs through cramped rafter bays.
- New dedicated HVAC zone off the existing system with new supply and return runs — mid-range cost but the most integrated solution.
Electrical requirements for a legal sleeping room include AFCI-protected circuits, a minimum number of outlets per wall run, and smoke detector installation. If your panel is near capacity, this project may also trigger a panel upgrade — typically $1,500–$3,000.
The Real Cost Breakdown: What You’re Actually Buying for $25,000 vs. $75,000
Transforming attic into bedroom space at the lower end of the budget range means you’re working with a rafter-framed attic that already has adequate headroom, a staircase location that doesn’t require floor plan reconfiguration, and an egress solution that doesn’t involve a dormer. At the upper end, you’re looking at truss modifications, a full shed dormer, spray foam insulation throughout, a mini-split system, and a custom staircase that had to be carved from a small hallway.
Here is a realistic line-item breakdown for a mid-range project — approximately 350 square feet of finished space, rafter-framed, requiring one egress window replacement and no dormer:
| Line Item | Estimated Cost |
|---|---|
| Structural engineer report | $750–$1,200 |
| Permits and plan review fees | $800–$2,000 |
| Floor joist sistering (full room) | $3,500–$6,000 |
| Egress window replacement | $1,500–$3,500 |
| Spray foam insulation (roof plane) | $4,000–$7,000 |
| Staircase (simple straight run) | $3,000–$7,500 |
| Electrical rough-in and finish | $2,500–$4,500 |
| Mini-split HVAC | $3,500–$6,000 |
| Drywall, tape, and finish | $2,500–$4,500 |
| Flooring | $1,500–$3,500 |
| Trim, paint, closet, finish details | $2,000–$4,000 |
| **Total** | **$25,550–$49,700** |
Add a shed dormer and the total climbs to $55,000–$85,000. Add truss modifications with engineered framing and you’re looking at $70,000–$110,000 before finishes.
These numbers matter because the $20,000–$75,000 range you see everywhere is technically accurate and completely useless without understanding where on that spectrum your specific project sits. The feasibility check in the first section of this article determines that — not the finish selections.
Design Decisions That Make a Small Attic Bedroom Feel Like a Real Room
The structural and code work gets the space permitted. The design decisions determine whether anyone actually wants to sleep there. Attic bedrooms have a specific set of spatial constraints that require different thinking than a rectangular room on a standard floor.
The most effective design moves for tight attic conversions:
- Place the bed under the slope. The lowest part of the room — typically where knee walls meet the roof — is useless for standing but perfect for a bed platform. Building a low platform here puts sleeping height exactly where headroom is lowest and frees up the center of the room for circulation.
- Use knee wall cavities as built-in storage. The dead space behind knee walls is typically 3–4 feet deep and runs the full length of the room. Access doors every 4–6 feet turn this into the most efficient storage per dollar you can build anywhere in a house.
- Avoid overhead light fixtures at the ridge. A flush-mounted ceiling light directly under the ridge peak creates an uncomfortable focal point and draws attention to the sloped ceiling rather than working with it. Wall sconces, floor lamps, and recessed lights set into the knee wall plane read as architectural rather than compensatory.
- Install windows in the gable ends, not just dormers. Gable-end windows bring in light without breaking the roof line and are substantially cheaper than dormers. A well-placed pair of gable windows can make an attic room feel bright without a single dormer.
- Use consistent flooring throughout. Attic rooms feel smaller when flooring changes mid-room or when area rugs interrupt the floor plane visually. Running the same flooring into knee wall alcoves and across the full footprint makes the room read as larger than it measures.
- Keep the ceiling finish consistent with the slope. Attempting to flatten a sloped ceiling with a dropped soffit generally makes the room feel lower and smaller. Following the roofline with drywall and painting the entire ceiling surface a single light color creates a sense of volume rather than enclosure.
The most important design decision isn’t a finish choice — it’s staircase placement. A poorly placed staircase that enters the room at the low edge of the slope can consume 20% of the usable floor area. A well-placed stair that rises through the center of the room or emerges at the gable end preserves the maximum usable footprint. Get this right in the drawing stage. Moving a staircase after framing is one of the most expensive design corrections in renovation.
Frequently Asked Questions
Do I always need a permit to convert my attic into a bedroom?
Yes, in virtually every jurisdiction in the United States. An attic conversion involves structural modifications, egress requirements, electrical work, and HVAC — all of which require permits and inspections. The rare exception is a space that was already permitted as habitable and merely needs cosmetic updating. If you’re adding framing, insulation, electrical circuits, or a staircase, you need permits. Skipping them doesn’t save money; it defers costs to the worst possible moment — the home inspection before your sale, or a denied insurance claim after a loss.
How long does an attic conversion typically take from start to finish?
For a straightforward project — rafter-framed attic, no dormer, permit-ready drawings — expect 8 to 14 weeks from permit submission to final inspection. Add 4–8 weeks if a dormer is involved. Permit review alone can take 2–6 weeks depending on your jurisdiction’s workload. The physical construction, once permitted, typically runs 4–8 weeks for a crew of 2–3. Homeowners who budget 6 months from first contractor call to certificate of occupancy are rarely wrong.
Will an attic bedroom conversion add to my home’s appraised value?
It depends entirely on whether the space is permitted and meets the legal definition of a sleeping room. A permitted attic bedroom adds to square footage, bedroom count, and therefore comparable value — typically returning 60–80% of project cost in appraised value in most markets. An unpermitted finished attic adds zero to the formal appraisal and may actually complicate your sale by requiring disclosure. The permit isn’t optional if resale value is part of your calculation.
What’s the difference between transforming attic into bedroom space and just finishing an attic?
The difference is legal and functional. Finished attic space — insulated, drywalled, floored — that doesn’t meet egress, headroom, and area requirements can be listed as a bonus room or flex space but cannot be counted as a bedroom on a listing or an appraisal. Transforming attic into bedroom space that meets IRC sleeping room requirements and has received a final inspection can be counted as a bedroom in every legal and financial context. The construction cost difference between the two is often small; the value difference is significant.
Can I convert a truss-framed attic into a bedroom without replacing the roof structure?
In rare cases, yes — but only with engineered drawings and custom-fabricated replacement trusses or a structural alternative designed by a licensed engineer. Some truss designs, including raised-heel trusses and attic trusses, are specifically engineered to leave open habitable space in the center of the roof. If your home was built with attic trusses, you may have a viable conversion path. If it was built with standard Fink or Howe trusses, modification requires full engineering involvement and typically costs $15,000–$35,000 in structural work before any finish work begins. This is why the framing identification step in the feasibility check isn’t optional.
How do I find a contractor who has actually done attic conversions before?
Ask specifically for their permit history, not their portfolio. Any contractor can show you photos of a finished room. Ask them to describe the last attic conversion permit they pulled — which jurisdiction, what type of framing, what egress solution they used, and how long the permit process took. A contractor who has done this before will answer those questions fluently. One who hasn’t will pivot to finish photos. Also verify that they work with a structural engineer on framing modifications rather than making those calls themselves — that’s a professional standard, not overcaution.