The average American bathroom is 40 square feet — roughly the size of a parking space — yet most households try to store the contents of a small pharmacy inside it. If you’ve been hunting for bathroom storage ideas for small spaces that actually hold up in daily life, you already know the problem: most advice looks great in photos and falls apart by Thursday. According to the National Kitchen and Bath Association, the average person keeps 26 personal care products in that space. Multiply that by everyone in your household and you’re not dealing with a clutter problem. You’re dealing with a storage architecture problem that no amount of Pinterest-browsing will fix.
The good news: small bathrooms have more usable storage potential than most people ever access. The bad news: most advice you’ll find online treats every small bathroom as identical — a generic list of floating shelves and baskets that looks organized in a staged photo and falls apart within a week of real use. This article takes a different approach. You’ll audit your specific space, identify which storage zones you’re ignoring, and get a layout strategy matched to your bathroom’s actual shape.
Why Most Small Bathroom Storage Advice Fails You
Open any listicle on bathroom storage ideas for small spaces and you’ll find the same suggestions reshuffled in a different order: over-the-toilet shelving, floating shelves, baskets, hooks. The photography is beautiful. The application to your actual bathroom? Usually useless.
Here’s the core problem. Generic storage advice ignores the fact that small bathrooms come in at least three fundamentally different configurations, each with its own constraints and opportunities. A narrow galley bathroom — the kind common in 1970s ranch houses and apartment buildings — has two long walls and almost no floor space to work with. A square box bathroom, typically 7×6 feet, has dead corners and a central floor that becomes a traffic obstacle. An awkward corner bathroom, often found in converted spaces or older homes, has angled walls, sloped ceilings, or odd dimensions that make standard products fit poorly or not at all.
Most storage content treats the symptom — clutter — rather than the cause, which is the absence of a coherent storage system matched to how you actually use the room. There’s a difference between storage that photographs well and storage that functions on a Tuesday morning when three people are getting ready simultaneously.
The other failure is the aspiration gap. A beautiful recessed niche looks achievable until you realize you’ve never cut into a wall before and aren’t sure which walls are load-bearing. A custom built-in vanity looks attainable until you price one out. Good storage strategy means knowing which solutions belong in each tier — what you can implement this weekend for under $50, what requires a contractor, and what falls somewhere in between.
Treat bathroom storage as a system, not a collection of products, and the entire problem becomes more tractable. Start with an audit.
Takeaway: Before buying anything, identify which of the three bathroom archetypes you have — galley, square, or corner. Every recommendation you implement should be filtered through that lens.
Step 1 — Audit Your Bathroom Before Buying a Single Storage Product
Most people skip straight to buying things. A tension-rod organizer, a set of floating shelves, a pretty basket or two. Six weeks later the bathroom looks roughly the same, except now there are more things in it. The audit step is what separates a storage upgrade that sticks from one that doesn’t.
The Four-Zone Audit
Walk into your bathroom and examine it in four distinct categories:
- Vertical wall space — How many linear inches of wall are genuinely available between fixtures, towel bars, and existing hardware? Most small bathrooms have more than residents realize, particularly the wall directly opposite the toilet and the space above the door frame.
- Dead corners — Corners where two walls meet are almost universally underused. Even a corner that currently holds nothing represents 2–4 square feet of potential storage volume.
- Door backs — The back of a bathroom door can hold 6–12 pounds of product with the right organizer, but most people either ignore it entirely or hang a single hook.
- Under-fixture cavities — The space beneath your sink (whether pedestal or vanity), beneath a freestanding tub if you have one, and the space at the very base of your toilet tank all qualify.
Measuring What Actually Matters
Don’t just measure the room’s dimensions. Measure the clearance zones — the code-minimum and functionally necessary space you can’t obstruct. A toilet requires a minimum of 15 inches of clearance from its centerline to any side wall or obstruction, though 18 inches is far more comfortable. A shower or bathtub needs at least 24 inches of clear standing space at the entry point. A sink needs roughly 21 inches of knee clearance in front. Whatever is left after protecting those zones is your genuine storage real estate.
Categorize by Frequency of Use
Design researchers have found that items used daily should be stored within a 30-inch reach zone from the point of use — a principle borrowed from kitchen ergonomics and increasingly applied in bath design. This translates directly to a practical sorting exercise:
- Daily-reach items (toothbrush, face wash, daily medications, deodorant): must live within arm’s reach of where you use them
- Weekly-reach items (extra razors, hair masks, backup products): can live in lower cabinets, back of shelves, or higher up
- Long-term storage (first aid supplies, travel-size extras, seasonal products): belongs in the least accessible areas — top shelves, under-sink back corners, over-door pockets
Takeaway: Complete the four-zone audit on paper before shopping. You’ll likely discover two or three underused zones you hadn’t consciously registered, and your shopping list will shrink.
Vertical Space Strategy: The Most Underused Dimension in Small Bathroom Storage
Floor space in a small bathroom is spoken for the moment you account for fixtures and clearance zones. Vertical space is where the real opportunity lives — and most people stop at eye level.
The Three Vertical Tiers
Think of your bathroom wall as three horizontal bands:
- Eye-level prime zone (48–66 inches from the floor): This is your highest-value real estate. Items stored here require no bending or reaching and are visually prominent. Reserve this zone for daily-use products, your most attractive storage containers, and anything you want to access quickly. Medicine cabinets, open shelving for frequently used items, and your best-looking organizational pieces all belong here.
- Lower utility zone (below 48 inches): Below countertop height, this zone requires bending. It’s well-suited for cleaning products, backup supplies, spare towels, and anything you need occasionally rather than daily. Under-sink storage lives here.
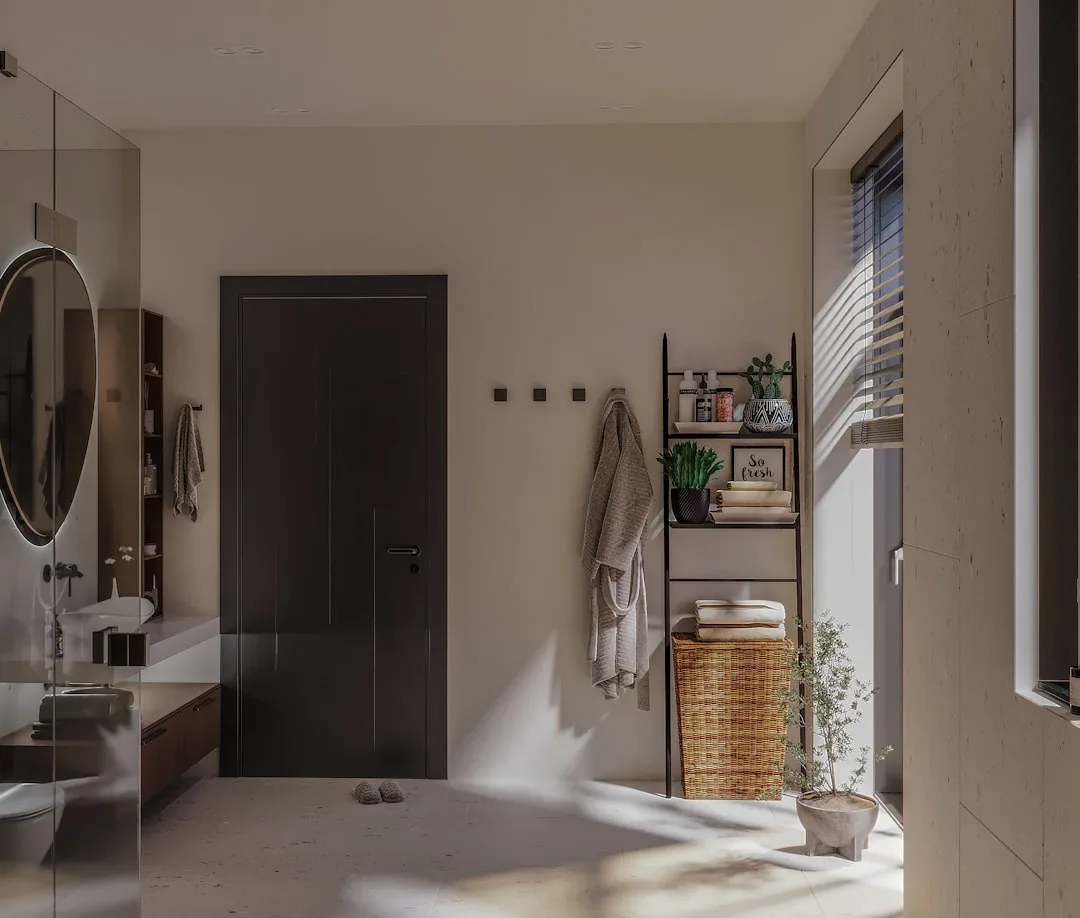
- High storage zone (above 66 inches): Most people treat this as dead space. It isn’t. Tall, narrow cabinets that run to ceiling height can add 30–40% more storage capacity to a small bathroom without consuming a single inch of floor space. The trade-off is accessibility — this tier is right for products you need monthly rather than daily. A small step stool stored flat behind the door makes the high zone genuinely functional rather than theoretical.
Making Vertical Storage Work in Each Bathroom Archetype
In a galley bathroom, the two long walls are your primary vertical canvas. Staggered floating shelves — shelves that alternate heights on opposing walls rather than mirror each other — prevent the visual tunnel effect while doubling accessible surface area. Avoid mounting anything that protrudes more than 8 inches from the wall on both sides simultaneously; in a narrow galley, opposing protrusions eat into the circulation space faster than the measurements suggest.
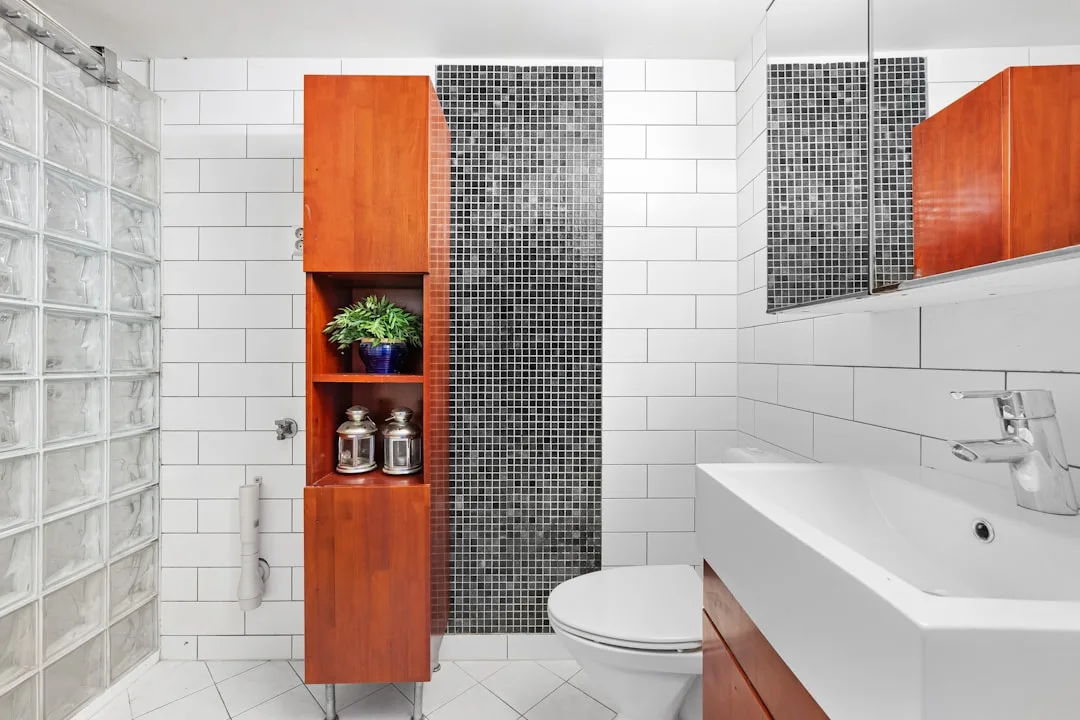
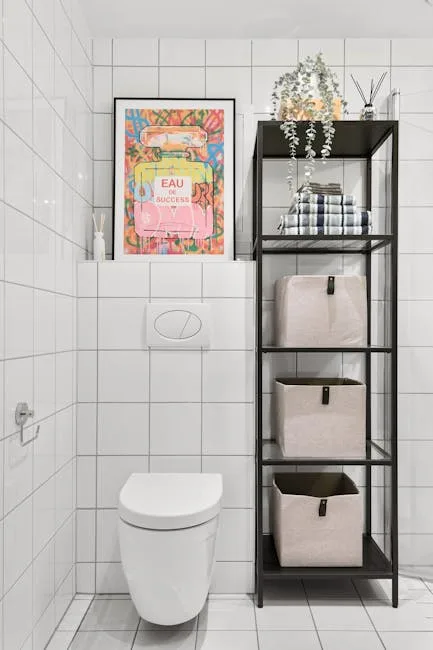
In a square box bathroom, the wall directly behind the toilet is almost always underused. A properly mounted over-toilet shelving unit — not a freestanding etagere, which tends to wobble, but a wall-anchored unit — can hold the equivalent of two medicine cabinets worth of product without touching the floor plan. The corners are equally valuable: a corner-mounted shelf tower starting at 24 inches off the floor and running to ceiling height turns otherwise dead space into your most efficient storage column.
In an awkward corner bathroom, standard rectangular shelving rarely fits cleanly. Adjustable-bracket shelving systems — where you mount vertical tracks and slide shelf brackets in at any height — adapt to irregular wall lengths and angled dimensions that would make fixed-bracket units look sloppy. For sloped ceiling situations, the triangular wall section beneath the slope is a natural recess for built-in open shelving that looks intentional rather than improvised.
Takeaway: Divide your walls into three tiers before deciding what goes where. The high zone above 66 inches is the single most underused storage tier in most small bathrooms — and the easiest to add without any plumbing or electrical work.
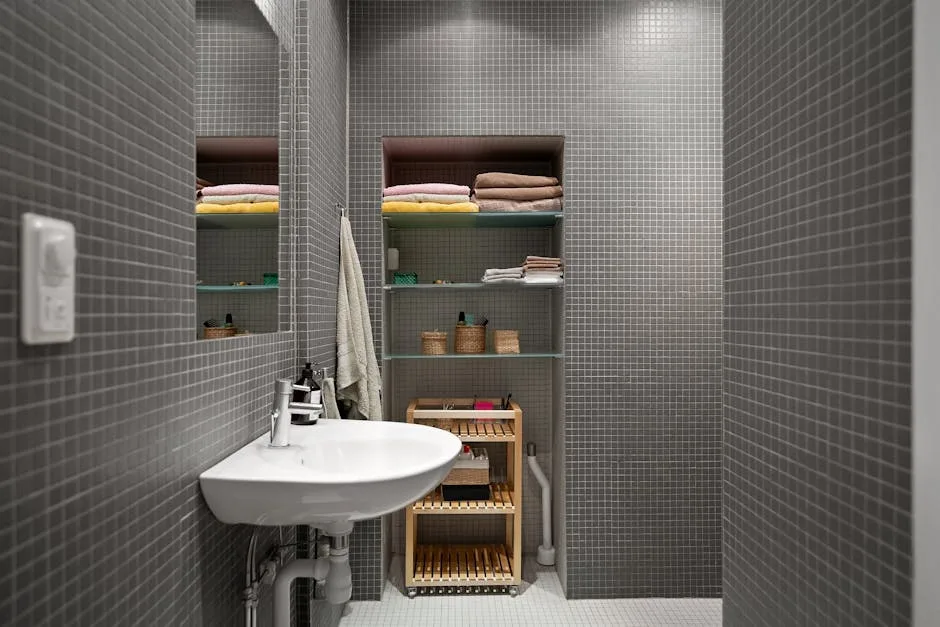
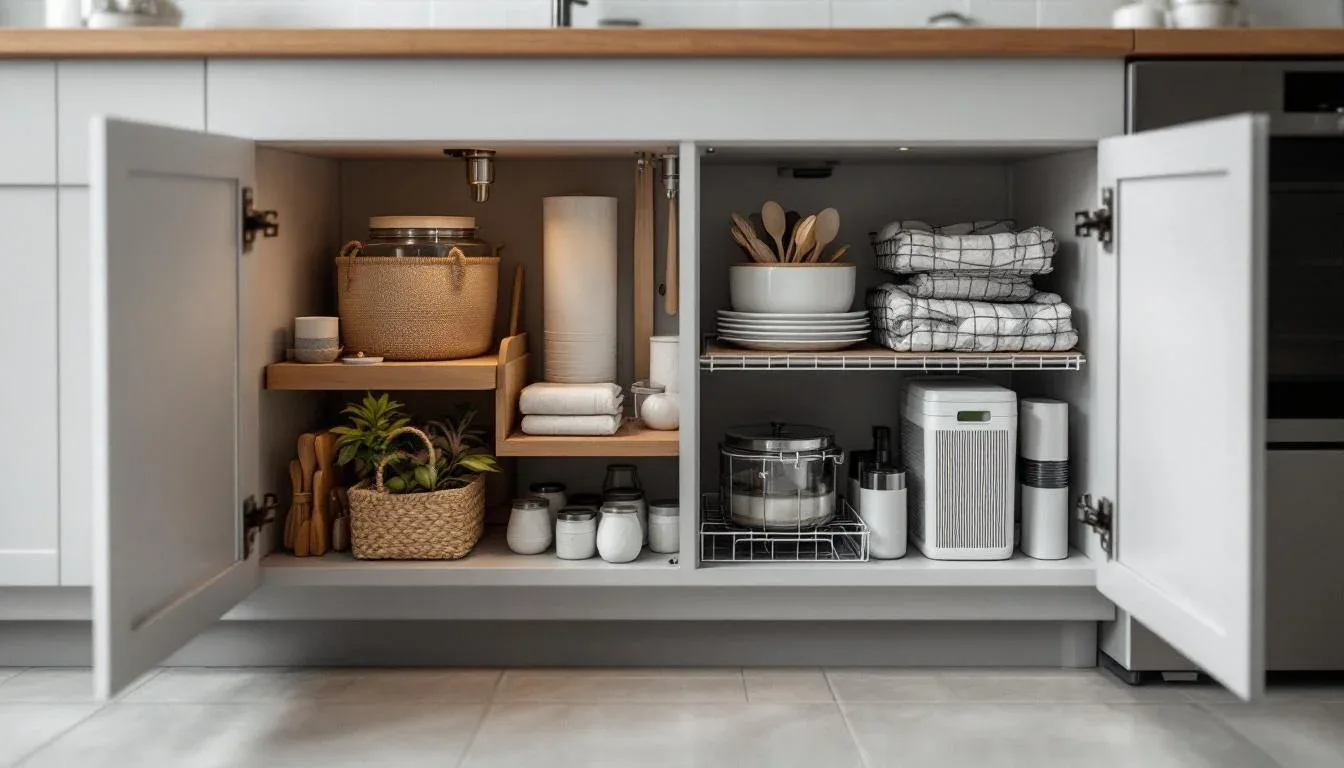
Under-Sink Storage: Turning the Most Wasted Space Into Your Most Organized Zone
The cabinet beneath a bathroom sink is almost universally disorganized. A tangle of cleaning products, spare soap, items that were put “temporarily” under there and never moved. In the context of bathroom storage ideas for small spaces, this zone deserves more strategic attention than it typically gets — because it’s one of the few areas in a small bathroom with genuine three-dimensional depth.
The Pedestal Sink Problem
Pedestal sinks are beautiful and they destroy your under-sink storage options. With no cabinet surrounding them, the space beneath is open but awkward — there’s a pipe in the way, the visual exposure means everything is permanently on display, and freestanding solutions tend to look provisional.
The most effective fixes for pedestal sinks:
- Tension-rod curtain enclosure: A small curtain rod mounted between the wall and a tension bracket on the pedestal leg hides a freestanding organizer completely. This costs under $25 and takes 20 minutes.
- Slim rolling carts: A cart that’s 6–8 inches wide and 24 inches deep can slide into the space beside the pedestal drain pipe, holding a surprising amount of product in a footprint smaller than a standard magazine.
- Wall-mounted side storage: If the pedestal sits near a wall, a small wall-mounted cabinet positioned 18–20 inches off the floor at the side of the pedestal essentially serves as the missing under-sink cabinet.
Vanity Cabinet Organization
If you have an under-sink cabinet, the default configuration — one open shelf, two doors, everything jumbled — is rarely the best configuration. Three upgrades consistently make the biggest difference:
- Add a second shelf: Most vanity cabinets come with one shelf positioned roughly in the middle. That leaves significant empty space above and below. A simple cut-to-fit shelf board adds another full storage tier for under $15 in materials.
- Install door-back organizers: The inside faces of vanity cabinet doors are almost always bare. Small adhesive or screw-mounted organizers — sized for cleaning spray bottles, hair tools, or rolled towels — turn those surfaces into useful storage without taking any shelf space.
- Use pull-out bins for the back half: The back 8–10 inches of an under-sink cabinet is hard to access and tends to become a graveyard for forgotten products. Pull-out bins or low-profile drawer organizers on slides make that depth fully accessible and turn the space from a black hole into a functional storage tier.
Takeaway: Whether you have a pedestal or vanity, the under-sink zone almost always has untapped capacity. Tackle it with a second shelf and door-back organizers before buying anything else — the return per dollar spent is higher here than almost anywhere else in the bathroom.
Over-the-Toilet Storage: What Works and What Wastes Your Money
The wall space above the toilet is consistently the most discussed zone in bathroom storage advice and also the most commonly botched. A few approaches that actually hold up:
Etagere vs. Wall-Mounted Units
Freestanding etagere shelving units — the three-tier towers that straddle the back of the toilet — are popular because they require no tools and no wall damage. They are also inherently unstable, tend to wobble when anything on the upper shelves is touched, and look cheap in most bathrooms. If you rent and cannot mount anything to the wall, an etagere is a reasonable compromise. If you can put screws in a wall, a wall-anchored shelving unit over the toilet is categorically better: more stable, cleaner-looking, and capable of holding meaningfully more weight.
Recessed Medicine Cabinet Expansion
If your bathroom already has a medicine cabinet, you may have room to expand it without a full remodel. Medicine cabinet extensions — essentially a second cabinet mounted flush beside or above the existing one — can double your mirrored storage in an afternoon. The key measurement is the distance between studs: standard stud spacing of 16 inches on center creates a natural recess that fits most 14-inch-wide recessed cabinets perfectly.
Open Shelving Reality Check
Open shelves above the toilet look organized in design photography because the photos are staged with matching containers and a carefully edited product count. In daily use, open shelves above the toilet tend to accumulate visual clutter quickly unless every item on them is containerized. The practical rule: anything on open shelving above the toilet should be in a container. Bare product bottles on open shelves read as clutter within days of a reset.
Door and Wall Cavity Storage: The Zones Most Bathrooms Never Touch
Behind-the-Door Organization
A standard interior bathroom door — approximately 80 inches tall, 28–32 inches wide — has roughly 18–22 square feet of surface area on its back face. An over-door organizer rated for 15–25 pounds converts that surface into a serious storage zone. The most functional over-door systems for bathrooms combine:
- Clear pockets at eye level for frequently grabbed items (hair ties, cotton rounds, daily supplements)
- Deeper bins lower down for bulkier products
- Hooks at the top for robes, towels, or a hair dryer
For renters: over-door organizers require no wall penetration and come down cleanly. For owners: a door-mounted cabinet — essentially a shallow cabinet with its own door, mounted flat against the back of the bathroom door — is a more refined solution that adds approximately 18 inches of depth when the door is closed and folds entirely out of the way when the door is open.
Wall Cavities and Recessed Niches
The space between wall studs — typically 3.5 inches deep and 14.5 inches wide — is a storage zone that exists in every bathroom but goes unused in most. A recessed niche cut between studs in the shower wall for shampoo bottles is the most common application, but the same principle applies to any non-load-bearing wall in the bathroom. A recessed medicine cabinet, a built-in niche beside the vanity mirror, a shallow display shelf above the light fixture — all of these are cut-into-the-wall projects that add real storage volume without reducing the room’s interior dimensions by a single inch.
The practical barrier is skill and confidence. If you’ve never cut into a wall, a bathroom niche is not the right first project. But it’s also not the renovation-level undertaking many people assume. For a non-load-bearing interior wall with no plumbing or electrical runs, framing out a simple recessed niche is a realistic afternoon project for a competent DIYer — or a half-day job for a handyman at a cost well under $500 including materials.
A Room-by-Room Storage Strategy by Bathroom Archetype
By now you have the components. Here’s how they assemble into a coherent strategy for each bathroom type — a practical set of bathroom storage ideas for small spaces matched to your specific layout.
Galley Bathroom Strategy
Priority order: Vertical walls first, door back second, under-sink third.
In a galley bathroom, floor space is the scarcest resource and wall space is the most abundant. Your primary move is staggered floating shelves on both long walls, keeping each shelf no deeper than 6–8 inches to preserve circulation. Add a full over-door organizer on the entry door. If the bathroom has no window on the end wall, that wall becomes prime real estate for a floor-to-ceiling shelving column — the one place in a galley where depth doesn’t obstruct movement.
Avoid: Freestanding floor units of any kind. A freestanding anything in a galley bathroom narrows the already-tight corridor. Everything should be wall-mounted or door-mounted.
Square Box Bathroom Strategy
Priority order: Over-toilet wall, corners, under-sink, door back.
Square bathrooms have more corner real estate than galley bathrooms but tend to have shorter wall runs between fixtures. The over-toilet wall and the two corners flanking it form a natural storage cluster. A wall-anchored unit above the toilet flanked by corner shelf towers on each side creates a built-in look without any cabinetry work. The center of the room stays clear.
Avoid: Large freestanding items in the center floor zone. The central floor of a square bathroom is the circulation space — anything placed there creates a squeeze point that makes the room feel smaller than it measures.
Corner/Irregular Bathroom Strategy
Priority order: Adjustable wall systems, door back, custom corner shelving.
Irregular bathrooms resist standard products, which is why so many of them end up cluttered — everything bought for them fits poorly. Adjustable bracket systems (vertical wall tracks with sliding shelf brackets) are your best friend here because they adapt to whatever wall lengths you actually have. For angled or sloped ceiling sections, commission a local carpenter for a single custom built-in rather than fighting standard products into spaces they weren’t designed for. The cost is typically $200–$600 for a simple built-in shelf unit, and the result looks intentional in a way that jury-rigged standard products never do.
FAQ
Q: What’s the single highest-impact change I can make to a small bathroom’s storage without spending much money?
A: Add an over-door organizer to the back of your bathroom door. It costs $15–$40, requires no tools, takes less than ten minutes to install, and immediately creates a new storage zone that previously held nothing. For renters in particular, this is the most efficient bathroom storage upgrade available.
Q: How do I add storage to a bathroom with a pedestal sink and no vanity?
A: Three approaches work well together. First, hang a curtain from a tension rod to enclose the space beneath the pedestal and hide a small freestanding organizer inside. Second, add a slim rolling cart (6–8 inches wide) beside the pedestal for daily-use products. Third, treat the wall space immediately beside and above the sink as your primary storage zone — a wall-mounted cabinet positioned at shoulder height beside a pedestal sink essentially replaces the vanity you don’t have.
Q: Are open shelves a bad idea in a small bathroom?
A: Not inherently — but they require more discipline than closed storage. The rule that makes open shelves work long-term: every item on an open shelf must be in a container. Bare product bottles on open shelves look cluttered within days. Matching canisters, small baskets, or even uniform apothecary jars create the visual order that makes open shelving functional rather than just decorative.
Q: How much does it actually cost to add a recessed niche to a bathroom wall?
A: For a non-load-bearing wall with no plumbing or electrical runs inside it, a basic recessed niche is a $150–$500 project depending on whether you DIY or hire a handyman. Materials (framing lumber, drywall, tile or paint to finish) run $50–$150. Labor for a handyman typically adds $100–$350. A tiled niche finished by a tile setter will cost more — budget $400–$800 including materials — but looks fully custom and adds real resale value.
Q: What’s the biggest mistake people make when organizing a small bathroom?
A: Buying storage products before completing an audit. Most people see a product they like and buy it without measuring, without checking whether they’ve already used the zone it occupies, and without thinking about whether it fits their bathroom’s specific archetype. The result is a bathroom that has more storage products in it but isn’t actually better organized. Spend 20 minutes with a tape measure and a notepad before spending any money, and your hit rate on purchases that actually improve the space goes up dramatically.