Category: Interior Design

  • Bathroom Disasters to Avoid

    Bathroom Disasters to Avoid

    If there is one thing we’ve learned from a quarter-century of attendance on this revolving ball of rock we call earth it’s that you should never underestimate the stupidity of some people. Perhaps we’re being a little harsh here, as we all make mistakes at some time or other…

    Yes, nobody is immune, and we’re afraid that includes you and other designers when it comes to putting together a bathroom suite. Whether these are for public or private use, bathrooms are – first and foremost – a functional space, and thus require technical thought to assure they are as practical as possible. As we’ll see from the below examples though, this is not always the case – learn from their mistakes.

    Get Your Measurements Right

    Bathroom-tall-stall

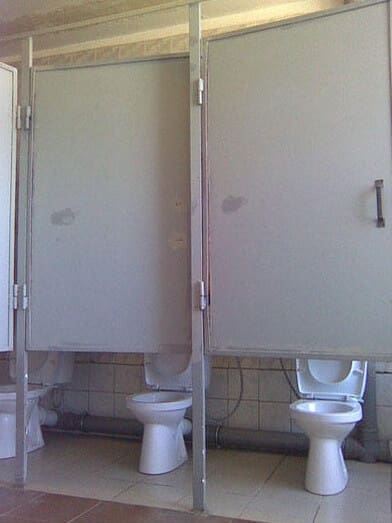
    You could be forgiven for feeling a little bit exposed, here. We can’t tell if this is a mismatch of measurements or merely the maladroit locating of hinges, but either way it’s a disaster. Be sure to measure up components and plan properly when researching your bathroom, as this kind of thing can happen. Actually, while we’re here, just get a professional to fit it – the extra expense would be worth it to avoid a catastrophe.

    Make the Most of Available Space

    Toilet-against-wall

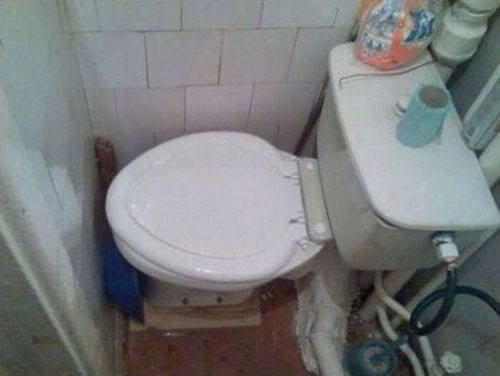
    In some ways you have to admire this person, who has not allowed the fact that this room isn’t big enough to swing a gnat, never mind a cat, to put him off.  Only a gymnast would be able to use this toilet. The lesson here is to be flexible in smaller bathrooms. Fit storage cupboards to a wall to create floor space, for instance, or install a small cloakroom basin in the corner as opposed to stuck obstructively in the middle of the wall. Also, to make this plain, do not wedge your toilet into a corner where nobody can access it, as the object has not so much been defeated there as trounced. Similarly, do ensure your solid metal shower heads go in the shower enclosure…

    Don’t Confuse Functions

    Bathroom-toilet-confusion

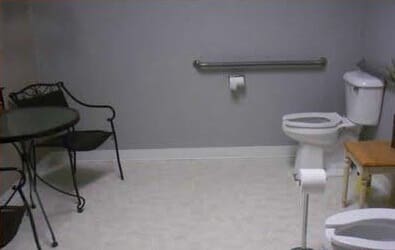
    This isn’t as gross as it sounds, honest. We mean room functions, not – ahem – never mind. The example above is a good exemplification of designing at cross-purposes. Those chairs and that table are for sitting out on the veranda, perhaps sipping a glass of chilled white wine with a book in your lap, the sun gently warming your face. Instead, the setup here seems to be for the exhibitionist, who simply cannot visit the toilet without a rapt (though comfortable) audience. There are plenty of other rooms of the home, so don’t try and ram all sorts in the bathroom.

    Think Carefully About the Look

    Ugliest-bathroom

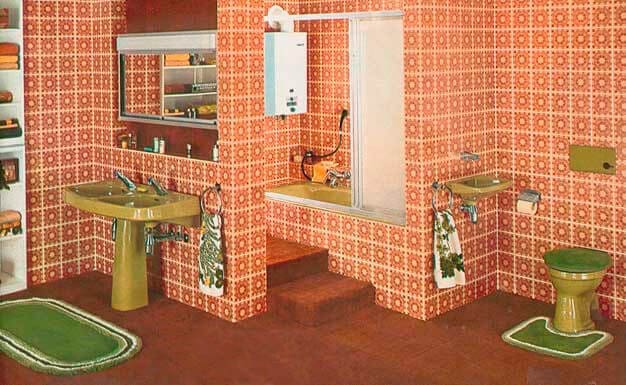
    We admit to tiptoeing slightly here, as there is nothing more invidious than making strident opinions about something as subjective as taste. However, we urge you to think long and hard about what you want to put in your bathroom. Granted, a putrid pink wall with a dazzling array of green stars on it might look modish (to you) now, but in five years are you going to want to tear it all out – at the expense of money and time – when you are being laughed at by all and sundry and the design is making you want to hold your head under when in the bath. We bet the person who installed the bathroom in that photo thought the mucus-hued ceramics and explosion-in-a-baked-bean-factory walls were wacky and unique, but I’m afraid they were just badly, badly wrong. This isn’t anything cool LED shower heads or a set of trendy vertical radiators can even rescue. Future-proof your design, for the sake of your wallet and sanity.


  • Shower Kits – The Essentials

    Shower Kits – The Essentials

    No modern bathroom would be complete without the effortless convenience of a shower. Baths are all well and good, and definitely have their place, but I would always trade extra time in bed in the morning against a warm bath!

    The best – and most value for money – way to get yourself a quality shower is to invest in a full shower kit, which is provided by almost every bathroom retailer worth its salt. Below is a quick run over the important things you will have to consider when you opt for a shower kit for your bathroom.

    Valves

    You will not get too far without a shower valve. This is the essential central component, which works to provide your shower head (and other fittings) with the water from the system. The main decision to make here is whether you go with a thermostatic valve or not. A thermostatic valve will automatically keep your flow at a temperature of your choosing, precluding the need for that frustrating balancing act with the taps you might be familiar with from mixer shower taps or standard shower valves!Round-Bar-Mixer-with-Bath-Filler

    Stylistically, you must also decide on whether you want a concealed or exposed set. This is really down to your personal taste, though do bear in mind that concealed valves will require certain access and clearance in your bathroom walls to be installed and operated properly.

    Enclosure or Glass

    This is perhaps a decision that might be taken out of your hands, depending on the size and layout of your bathroom. An enclosure is always a good way to go, as it sets aside a discrete part of your room for the shower; alcove, quadrant and corner models are available with a variety of doors, including sliding, bi-fold and standard hinged units.

    traditional-bathroom

    Shower Heads

    Another absolute essential are shower heads. What was once a fairly standard decision – shape and size – has been complicated here by a range of exciting shower head innovations. These range from rainfall effect head to the dazzling LED shower heads, which use the pressure of the water going through the head to activate an array of lights studded in to the head unit.

    modern-bathroom

    Add-Ons

    The last thing to consider is the additional, fairly non-essential things that you can use to accessorise your shower. These include luxury items, such as body jets, or more practical items such as a hand held shower head. Do be aware that if you want to attach extra fittings like this you will need at the very least two- or three-way shower mixer valve.

  • Contemporary Apartment Renovation in the Gothic Quarter, Barcelona

    Contemporary Apartment Renovation in the Gothic Quarter, Barcelona

    Barcelona based architectural design company YLAB, founded by Tobias Laarmann and Yolanda Yuste, manages to accomplish spectacular results each time it gets to a new project. Specialized in modern design, YLAB Arquitectos creates striking designs for a wide range of clients, both with commercial and private needs.

    Contemporary-living-room

    In this post, we want to share with you one of their gorgeous renovations that we liked very much. Situated in the heart of Barcelona’s Gothic Quarter, Spain, this 130 m2 apartment showed in these images is defined by contemporary design style. The architects had a strong intervention creating identity for each one of the different spaces, however respecting the original structure. They reinterpreted the existing spatial composition and redefined the allocated functions and uses with the aim of designing new spatial and visual connections where modern elements to predominate instead of the traditional ones.

    The young owner of the apartment wanted to have a peaceful environment that combines in an intelligent way both privacy (bedroom and work space) and social places (for parties and meals). All rooms are modern and stylish, dressed in a neutral color scheme that induce a feeling of warmth,elegance and cleanness thourghout. We cannot decide which of the rooms is the most beautiful; they all look amazing and each one of them have something special to share with the owner. Even that kitchen-dining room is superb. Very spacious, elegant too, with modern minimalist furniture, it recalls the old clubs and cafes. The overall design makes it unique, but the ceiling that continues with the longitudinal wall is definitely something creative and give this space a whole new dimension. Beginning in the entrance vestibule, the ceiling and longitudinal wall are paneled with tinted pine woods slats, assembled by hand. How do you think this kitchen-dining area look like?

    Modern-bathroom-renovation

    Contemporary-bedroom

    Bedroom-sliding-doors

    Living-room-details

    White-apartment-hall

    Modern-dining-table

    Dining-table-with-modern-lamp

    Kitchen-detail

    Modern-kitchen-renovation

    Photos © 1-9: Jordi Canosa /© 10: Ciro Frank Schiappa


  • Steps for Staining Your Concrete Floor

    Steps for Staining Your Concrete Floor

    One of the methods of adding depth of color and marbling to your concrete floor is through application of stain. But before applying a stain, you will need to work on the floor using concrete grinders. Doing this can easily be done by following the following simple instructions.

    Stained-concrete-floor

    Photo © Greenbelt Homes

    Step 1#: Remove the Trim Work

    If the floor being acid stained is preexisting one, you will need to ensure that all baseboards and trim works are removed. Failure to do this could lead to extensive damage of the stain mixture.

    Step 2#: Masking the Walls

    Make sure the walls are covered using twelve inch masking paper. This is necessary so as to prevent the occurrence of discoloration when the staining is being done. Cover all your walls and lower parts of cabinets which may be exposed. Make sure you wrap the tape around your finger so that it can have adhesive on both sides. Position the paper on the wall and pull it tight and ensure you secure it after every 12 inches using pieces of painter’s tape. Ensure that knobs on the bottom side of the cabinet cover together with metal screws are covered with painter’s tape.

    Step 3#: Mix the Acid Stain

    Mix the stains in an exterior place where there is enough ventilation. One of the key ingredients of the mixture is hydrochloric acid and this can be harmful at times. You should make sure that you wear protective devices because of the acidic nature of hydrochloric acid. The acid stain should be added to the water and not water to the acid. For floors that are machine trowelled, make sure that the ration of stain is one to one. When you add water, you are able to control how deep the color will be. Try using the sprayer outside and ensure there is good flow before using it on the inside.

    Stained-concrete-floor-01

    Photo © Artisan Custom Homes

    Step 4#: Apply the Acidic Stain

    When you are applying the stains, you should make sure that the spray is about 18 inches above the floor. The spraying should be in random and it’s imperative that the floor be made wet. The acid that forms part of the stain reacts with lime thus giving it a hue appearance. The places where there is more lime will turn to be darker. The first and second coat should be separated by an hour. Repeat the process until when the floor reaches the desired color.

    Step 5#: Neutralize the Stain

    The hydrochloric acid which is found in the stain should be neutralized using one part of ammonia and four parts of water. The mixture of water and ammonia should be applied using a two gallon plastic pump sprayer.

    Step 6#: Clean the Floor

    Make sure that you allow the floor to dry and clean it using a mop. Any extra water should be vacuumed up and the floor should be allowed to dry before you start sealing.

    Step 7#: Seal the Floor

    This is very important as it really helps to prevent the floor from everyday wear and tear. There are many types of concrete sealers that can be used to achieve this goal. The sealers should be applied in multiple layers rather than a whole one.

     Author Bio:-

    Meggie Haneckow is a writer and blogger who loves to write about hot and trending topics. He is currently writing for free spa maintenance eBook.

  • Ideas for Bringing the Fall Atmosphere into Your Home

    Ideas for Bringing the Fall Atmosphere into Your Home

    With the weather getting cooler and the leaves turning yellow, it’s starting to become apparent that fall is upon us. This is a great time to redecorate your home and start using accents to add fall into your home. Since summer is over, you’ll want to make your home feel cozier for the upcoming seasons. Here are a couple of tips for making this happen:

    Bedroom-decorations-for-fall

    Photo © Shelley Gardea Photography

    Invest in quality pieces for your home. Furniture and lighting that you can use year after year, and even season after season, are great ways to add a touch of fall to your home. Lamps with burnt orange shades, dark oak tables, and Hunter Fans are all a good start to decorating your home for fall. These are timeless pieces that will last a long time, and you don’t even need to redecorate next spring! You can also find tablecloths for your existing furniture with cute and quirky fall symbols like pumpkins and leaves.

    Oak-kitchen-cabinetry

    Photo © risa boyer architecture

    Dark-oak-table

    Photo © Edmunds Studios Photography

    Nothing screams fall more than the smell of pumpkins and cinnamon spice. It’s easy to just run to the store and grab a couple of candles, but did you know it’s pretty easy to make candles too? You can even make vegan candles with soy instead of beeswax. These candles don’t take longer than an afternoon to put together. You can add whatever fragrance you want – whether fall reminds you of mulled cider, pumpkin spice lattes, or crisp leaves. You may never go back to store bought candles again! Check out this cute tutorial for some ideas on turning baby pumpkins into candles as well!

    Fall-centerpiece

    Photo © Amy Renea

    Try some inexpensive projects that children can participate in. With fall break approaching and endless teacher work days, you might have more time with your children than you expected. Here is a quick activity that you can use to entertain your children: Take old crayons and using a regular pencil sharpener make crayon shavings. Simply sharpen the crayon as if it were a pencil. This is a project easy enough for children and with a little help they can turn out quite pretty. To do this, you can simply take the crayon shavings and place them in between two pieces of wax paper and iron them together. On this blog, they add a cut out tree making this a really cute craft. Hanging these up in windows allows light to shine through them and adds warm fall colors to your home.

    These are just a few ideas for bringing the fall atmosphere inside. There are tons of crafts on the internet you can find that are perfect – from utilizing the crunchy leaves on the ground to creative jack-o-lanterns. What do you and your family do to prepare for fall?

    Fall-table-decorations

    Photo © Anita Diaz

  • Wooden Floor Lamp with Unique Design from ABADOC

    Wooden Floor Lamp with Unique Design from ABADOC

    Universality and simplicity are the main important aspects when it comes to ABADOC‘s products. With an interest on design and wood, Polish design and manufacturing workshop ABADOC’s goal is to create objects with original shapes for interior design that have not been created before, although they are present somewhere in space. Their source of inspiration are the natural forms found in the surrounding environment, which they strive to underline in their projects. This beautiful floor lamp which we’re showing you in this post is their newest addition to their small, but already interesting portofolio.

    Woobia-lamp-in-living-room-01

    Carefully hand-modeled, Woobia is a stylish floor lamp made entirely of wood, which showcases a unique style through its eye-catching shape with an exceptional symbolism and features- an arc. Its creative design with a flexible, rounded lampshade pays tribute both to art and practicability, answering the needs of modern living. Thanks to the use of knots, which allows them to utilize a small amount of wood in its production, Woobia has a very natural look which fits perfectly in both modern and traditional interior arrangements, adding that much needed lighting twist.

    The attached energy-saving LED light bulb enables the adjustment of light’s colour and its saturation, making it an object always present in your living room for all kinds of activities. The lamp’s wooden surface is covered with varnish or natural oil, and its dimensions are base 40 x 49 cm,  high 160 cm.

    Woobia-lamp-in-living-room

    Woobia-by-ABADOC


    Woobia-lampshade

    Stainless-steel-mechanism

    Photos © ABADOC


  • Gas Vs. Electric Bosch Tankless Water Heater

    Gas Vs. Electric Bosch Tankless Water Heater

    Are there any people who have recently tried to choose the best type of high efficiency water heater for their apartment? Just wanted to share some of my ideas as for this issue. I have a task for the next two weeks which is to trim my bathroom with a new water heater. So, I have made some preliminary investigations concerning this matter.

    Active-Indirect-Water-Heater-Diagram

    Principles-tankless-water-heater

    I should say at once that the best place for such investigations is Westside Wholesale. It offers a unique choice of diversified water heater models and brands. There you can find almost anything that a modern technology progress can suggest for home marketing.

    As for the brand I have almost no doubts. Bosch is my favorite one. This company has a long history and provides its customers with high quality products and good warranty and post-warranty services. If any spare part is broken, you are sure to replace it quickly and without some immense material contributions. So, returning back to Westside Wholesale website and their Bosh tankless water heaters page, here starts the main problem. What is more reasonable to choose a gas tankless water heater or an electric tankless water heater?

    Bosh-Westside

    I have made up a list of the most important characteristics that can influence your choice. If there will be any additions I will be glad to read them as it will help not only me, but other readers as well.

    The first crucial characteristic for any tankless water heater is its efficiency level. Here are two main concerns to be thought over. Both electric and gas tankless water heaters are highly efficient, but they have one big difference. Gas tankless water heaters need less time for heating the water while exploitation of electric tankless water heaters costs less in monthly energy expenses.

    The second point is the price. Bosh gas tankless water heaters usually cost more than Bosh electric tankless water heaters. The price range differs significantly, though I have found several models that are of more or less similar prices for both gas and electric supplied water heaters. Just compare Bosch Tankless Water Heater, 240V 120A Electric Single-Point Powerstream Pro Canadian Model- Indoor and Bosch Tankless Water Heater, Natural Gas 117,000 BTU Max Piezo Ignition Non-Condensing Whole House – Indoor, 5.2 GPM. Both cost about $700.00, have free shipping and feature a wide specter of useful characteristics.

    Installation challenges. Again it is a two-fold situation. Electric tankless water heater installation is more difficult and usually should be performed by a professional which makes it more expensive. While gas tankless water heater installation process is not so complicated, but operating with gas related appliances is of great risk for your safety because natural gas fuel is easily exploded.

    The environmental issue can also be of great importance especially for those who are concerned about this problem. It has been proved that gas water heaters use natural resources which negatively reflects on our planet. Besides, government testing states that electric tankless water heaters are safer.

    The last crucial point that comes to my mind is Bosch tankless water heaters durability. The minimum life span of tankless water heaters, provided that they have been installed and maintained correctly, is about 10 years. Still following all the manufacturer’s requirements these terms can be significantly prolonged. Depending on size, installation process and corrosion and mineral build-up amount, Bosh electric tankless water heaters have an average life span as long as 25 years while Bosh gas tankless water heaters are more likely to serve you for about 20 years.

    As for me I am still thinking what type of Bosch tankless water heater to buy. I will highly appreciate any advice from your side.


  • Gorgeous House with Green Features Overlooking Sydney Harbor in Australia

    Gorgeous House with Green Features Overlooking Sydney Harbor in Australia

    Situated in Sidney, Australia, this beautiful home overlooking the Syndey harbor and iconic Anzac Bridge has been designed to serve the living needs of a young couple. In designing it,  the architecture & design practice Fox Johnston had to deal with a small 241-square metre north facing site, which led to some architectural constraints requiring particularly sensitive handling of height, volumes, overshadowing to maintain neighbours’ sunlight, views and privacy.

    Faceted-timber-volume

    With the objective to create simple, functional, private, generous and luminous spaces in such a tiny urban cottage, the architects make use of various design techniques to maximum advantage every single part of the dwelling, while incorporating a natural and often recycled material palette. The illusion of a bigger space is created by realizing a dialogue between indoors and outdoors, so each interior or exterior area take space from one another maximizing volume, light and air. Many large openings allow natural ventilation and plenty of daylighting contributing to the illusion of a larger home. The natural ventilation system is delivered in the new house, using a temperature controlled extractor fan over the central void.

    Dining-room

    This void also has large sashless windows that enable all the heat to be quickly expelled from the house on hot summer evenings. All natural and sustainable materials were used in construction and for the interior finishings. The Balmain House was intelligently designed to ensure also the family’s privacy and to fit in the tiny allocated space, but without compromising the privacy of the multiple surrounding neighbours.

    The material palette used is simple, natural and textural with sustainability and reducing energy usage key considerations, resulting in an exquisite modern home. The main bedroom, ensuite, library/gallery and study are situated within the sculpted, faceted timber volume which seems to float above the ground. All the upstairs spaces retain sunshine and neighbouring views, while ensure views to garden vistas and the surrounding harbour and Anzac Bridge views. The energy-efficient home is heated hydronically, having in this way a small energy footprint.

    Open-living-area

    Dining-sofa

    Faceted-timber-volume-at-night

    Kitchen-details

    Kitchen-detail-01


    First-floor-roof1-Balman-House Garage-Ground-Balman-House

    Site-plan-section1-Balman-House

    Photos © Brett Boardman


    Project details:

    Architects: Fox Johnston
    Location: Sydney NSW, Australia
    Area: 360 sqm
    Year: 2012
    Builder: Owner Builder
    Structural Engineer: Partridge & Partners
    Planner: Warren Long
    Hydraulic Engineer: ITM