If you’ve been searching for kitchen breakfast nook design ideas, you’ve probably found a hundred photos of cushioned benches with throw pillows and zero information about why the one you built last year never gets used. The corner of your kitchen is likely the most expensive wasted square footage in your home — and a $47 floor cushion is not going to fix it.
Quick Answer
The corner of your kitchen is likely the most expensive wasted square footage in your home — and a $47 floor cushion is not going to fix it.
What it actually needs is a layout decision. Not a styling decision. Not a throw pillow decision. A structural, spatial, committed choice about how that corner serves your life between 6:45 and 8:30 in the morning, which is the only time most of us have to sit down before the day eats us.
I spent eleven years helping people build rooms they’d actually use — not rooms that photographed well. The number of kitchen corners I’ve walked into that held a sad plant, a recycling bin, and a chair nobody ever sat in is somewhere in the dozens. Every single one of those clients told me they “wanted a breakfast nook.” What they actually had was a corner without a plan.
That’s what this guide fixes. These nine kitchen breakfast nook design ideas are organized by layout type — not by aesthetic — because the layout decision is the one that determines whether you actually use the space or eventually put a plant in it.
Why Most Built-In Seating Fails Before a Single Cushion Is Chosen
In This Article
- Why Most Built-In Seating Fails Before a Single Cushion Is Chosen
- 1. The L-Shaped Banquette: When It Works and When It Steals Square Footage
- 2. The U-Shaped Wrap: Maximum Seating, Minimum Flexibility
- 3. The Window-Centered Nook: Borrowing Light as a Design Element
- 4. The Single-Wall Banquette: The Underrated Layout for Small Kitchens
- 5. The Freestanding Bistro Setup: The Layout That Moves With You
- 6. The Bay Window Conversion: Turning Architectural Surplus Into Seating
- 7. The Booth-Style Nook: Borrowing From the Diner for a Reason
- 8. The Island-Adjacent Nook: When the Kitchen Already Has a Gathering Point
- 9. The Reclaimed Awkward Space Nook: Making Structure Work for You
Most people discover the problem after the carpenter has left. The cushions arrive, they sit down for the first time, and something is immediately wrong — their knees hit the table, or their partner has to turn sideways to get out, or the whole thing just feels like sitting inside a closet. By that point, fixing it means tearing something out.
The three planning errors I see most often are wrong traffic clearance, undersized table depth, and building with your back to the light. None of them are glamorous mistakes. They don’t show up on mood boards. But they are the reason the nook gets abandoned.
On clearance: the National Kitchen and Bath Association sets the minimum recommended walkway clearance beside a seated dining area at 36 inches. Most Pinterest-style nooks get built at 24 inches — a full foot short — which means every person walking through the kitchen while someone is seated either grazes their shoulder or does an awkward sideways shuffle. Every single morning.
On depth and height, here are the minimums that most design guides conveniently omit:
- Seat depth: 18 inches minimum — anything shallower and adults perch rather than sit
- Knee clearance: 12 inches between seat surface and table underside
- Table height for bench seating: 30 inches, not the standard 29-inch dining table height — that one inch compounds over time
- Bench-to-table gap: 10 to 12 inches from seat surface to tabletop edge
On light direction: I once watched a client spend $4,200 on a custom banquette that faced a west-facing window. Beautiful in the evening. Unusable at breakfast because the morning light came from behind and cast the whole table into shadow. She ate in the kitchen instead. Always audit your light direction — sit in the corner at 7 AM before you build anything.
Takeaway: Before measuring for furniture, sit in your target corner at breakfast time, map the traffic paths, and verify you have 36 inches of clearance on the exit side.
1. The L-Shaped Banquette: When It Works and When It Steals Square Footage
The L-shaped banquette is the layout most people envision when they say “breakfast nook,” and it earns that mental default — when the room can actually support it.
The operative word is “when.” I’ve seen L-shaped banquettes crammed into 5×6-foot corners where they technically fit but created a seating experience that felt less like breakfast and more like a penalty box. The honest minimum footprint for an L-shaped banquette is 7×7 feet of dedicated nook space — not total kitchen square footage, but the actual area the nook can claim without conflicting with a traffic path, an appliance door swing, or a window casing.
On seating capacity: the functional standard is 20 to 24 inches of bench length per person. That means a 48-inch arm seats two people on one side, comfortably. A standard L-shaped configuration with a 48-inch pedestal table comfortably seats four adults — adding a fifth requires extending one bench arm by at least 22 inches, which most room layouts cannot absorb without blocking a door or window. Know your number before you spec the bench length.
The storage question is where most built-in guides wave their hands and say “you can add storage.” Here is when to actually do it and how:
- Drawers: Use for daily-access items — dish towels, napkins, kids’ placemats. Drawers require a minimum 4-inch face frame and won’t work well on benches under 16 inches of internal height.
- Lift-top: Use for seasonal or bulky storage — tablecloths, extra throws, board games. Lift-top lids require about 24 inches of clearance above the seat, which means your table must be movable to access them.
- Skip it entirely if your bench internal depth is under 12 inches — the resulting storage cavity is too shallow to be useful and weakens the bench frame.
Where L-shapes genuinely fail is in galley-adjacent layouts — kitchens where one long wall is the primary work corridor. An L-bench on either end of a galley chokes the exit. In that configuration, a straight single-wall banquette almost always performs better.
Takeaway: Measure your corner at 7×7 feet before committing to an L-shape — if you’re short, the single-wall layout in section four will serve you better.
2. The U-Shaped Wrap: Maximum Seating, Minimum Flexibility

U-shaped nooks are genuinely impressive at one thing: packing seating into a footprint that would otherwise hold a standard table and chairs serving fewer people. A fully enclosed U-shaped nook with a 60-inch oval table can seat six to eight people in roughly the same footprint a standard dining table and chairs would seat four — the trade-off is zero chair repositioning flexibility once guests are seated.
That trade-off matters more than most design content admits.
U-shapes are brilliant for households with young children — and genuinely inconvenient for everyone else. Children don’t need to get up quickly, don’t mind being hemmed in, and benefit from the containment. Adults who work from home, couples who eat in shifts, anyone who frequently needs to exit mid-meal — they will resent a U-shaped nook within six months. I’ve seen it happen.
The footprint reality is non-negotiable: a U-shaped nook requires a minimum 9×9 foot dedicated footprint to avoid what I call the cave feeling — that enclosed, slightly airless sensation of sitting inside furniture rather than at it. To test this before committing to any construction, tape the outline on your kitchen floor and sit inside it for fifteen minutes with another person. The tape test is free. Tearing out a built-in is not.
The exit problem is one that contractors frequently skip unless you specifically raise it. A full U-wrap with no egress gap means every person seated on the back bench must slide out past seated neighbors or wait for the table to be moved. The practical solutions:
- Intentional gap on one arm: Leave 20 inches of open space at the end of one bench arm — it reads visually as part of the design and functions as an exit lane
- Pedestal table: A single-leg pedestal allows the table to swing or roll aside, which solves the exit problem without cutting into bench length
- Drop-leaf insert: One section of the table surface on a drop-leaf hinge allows that segment to fold down when someone needs to exit from the back bench — particularly useful when the nook opens toward a wall rather than a walkway
Takeaway: If your household includes anyone over twelve who eats on a variable schedule, build an intentional exit gap into at least one bench arm before the carpenter pours a single nail.
3. The Window-Centered Nook: Borrowing Light as a Design Element
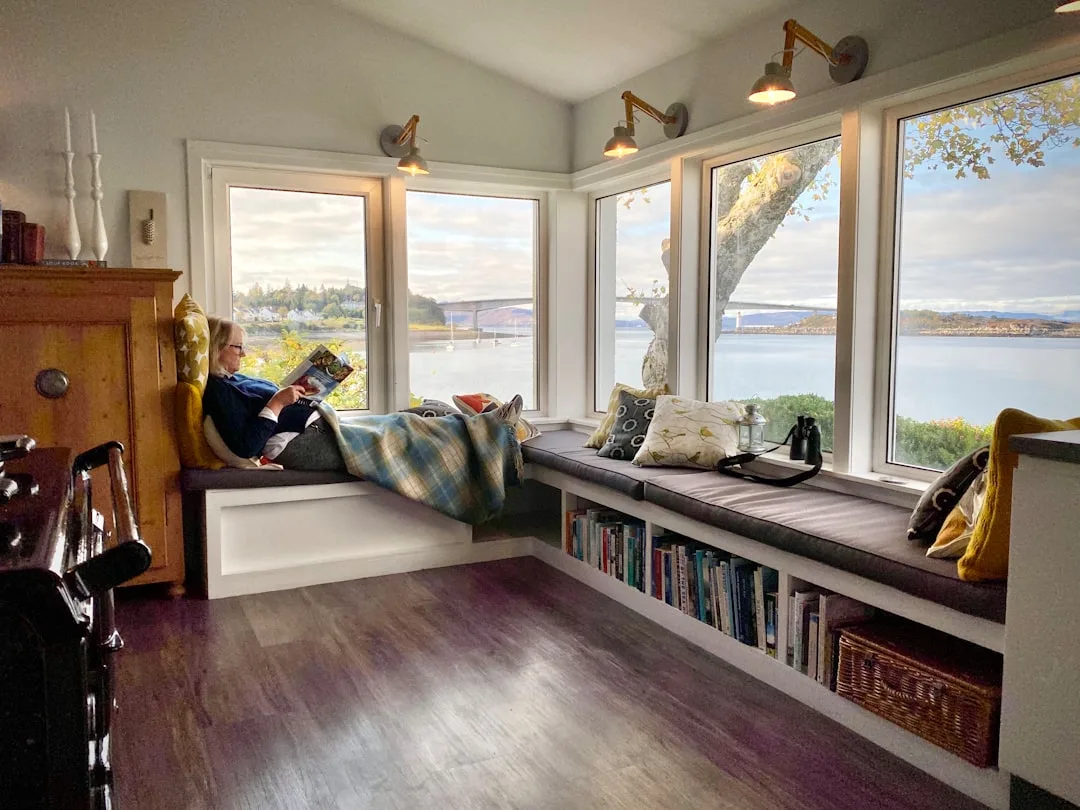
The window-centered nook is the layout that photographs best — and for once, that’s not a reason to dismiss it. When it’s done correctly, it’s also the layout that gets used most consistently, because it solves the single biggest reason people stop using their nook: the space feels closed off.
Centering a nook on a window, rather than in a corner, changes the spatial experience from enclosure to destination. There is a functional reason for this beyond aesthetics: natural light at breakfast reduces the need for overhead task lighting, which tends to be harsh in early morning. A properly oriented window-centered nook — east or southeast facing — delivers diffuse morning light directly to the table surface without glare.
The structural requirements for this layout are specific. You need a window rough opening of at least 36 inches wide to anchor a table adequately — narrower windows create a visual mismatch where the table appears to be reaching toward a slit rather than opening toward a view. The bench configuration on either side of the window should be symmetric and set at equal depth — asymmetric benches on a window-centered nook read as an afterthought rather than a decision.
Radiator conflicts are the most common construction obstacle with this layout and the least discussed. Many kitchens have baseboard radiators or HVAC returns centered under windows — exactly where bench framing needs to go. Your options are: relocate the radiator run (expensive, requires HVAC work), build the bench with a ventilation channel that allows airflow through the bench cavity (requires a skilled carpenter and specific grille placement), or switch to a freestanding table-and-chair configuration that leaves the radiator accessible. The third option is not a failure — it is often the correct answer.
Takeaway: Before designing a window-centered nook, locate every HVAC element within 18 inches of the window — resolving a radiator conflict on paper costs nothing; resolving it after framing costs significantly more.
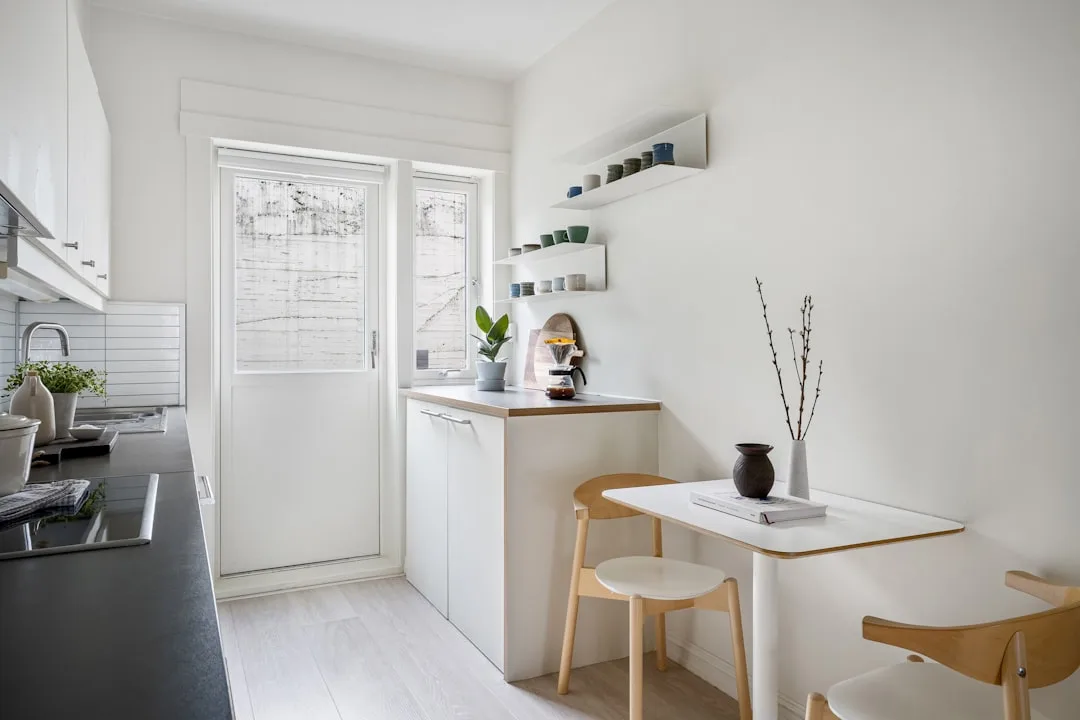
4. The Single-Wall Banquette: The Underrated Layout for Small Kitchens
The single-wall banquette gets dismissed as a compromise. It is not a compromise — it is the correct layout for a specific and very common kitchen condition: the room where one wall can be claimed for seating without conflicting with a traffic path, but no corner is available or functional.
A single-wall banquette along a 6-foot wall with a freestanding table in front seats four people with better per-person comfort than most L-shaped configurations built in the same square footage. The math is straightforward: a 72-inch bench at 20 inches per person seats three comfortably on the banquette side, with one or two chairs on the opposite side — no one is wedged into a corner, everyone exits freely.
The chair-versus-bench-opposite question comes up in nearly every single-wall project. Here is the honest answer: chairs opposite the banquette provide more flexibility and are easier to reposition for households where the number of seats needed varies day to day. A second shorter bench opposite creates symmetry but reduces exit flexibility and requires more floor clearance. If your household has consistent, predictable seating needs, the second bench works. If it varies, chairs are better.
Floating versus wall-mounted tables are a genuine decision point for single-wall layouts:
- Freestanding pedestal: Most flexible, easiest to clean around, allows the bench to function as solo seating when the table is pushed aside
- Wall-mounted drop-leaf: Recovers floor space when not in use — ideal when the kitchen also serves as a through-route, but requires solid blocking in the wall for the bracket load
- Fixed built-in table: Only appropriate when the nook is truly dedicated — it eliminates every inch of layout flexibility in exchange for a cleaner visual line
Takeaway: If your kitchen has a clear 6-foot wall run that isn’t interrupted by appliances, doors, or traffic, price a single-wall banquette before assuming you need a corner configuration.
5. The Freestanding Bistro Setup: The Layout That Moves With You
Every layout discussed so far involves some degree of permanence. This one does not — and that is its specific advantage, not a deficiency.
The freestanding bistro setup — a 36-inch round table with two to four chairs or stools — is the correct kitchen breakfast nook design approach for renters, for people in homes they plan to sell within three years, and for anyone who genuinely cannot commit to a fixed layout until they’ve lived with the space longer. The commitment required to tear out a built-in banquette that turns out to be in the wrong location is not trivial. A bistro table can be moved in four minutes.
The table size specification matters more than most people expect. A 36-inch round accommodates two place settings with genuine elbow room, and three place settings with manageable but real compression. A 30-inch round — often sold as a bistro table — is a coffee table pretending to be a dining surface for adults. Buy the 36-inch.
Stool height versus chair height is the decision that determines whether this layout actually reads as a nook or just as furniture that happens to be near a kitchen wall:
- Counter-height stools (24 to 26 inches) with a counter-height table (36 inches): Creates a more casual, diner-adjacent feel — works well in open-plan kitchens where the nook needs visual distinction from the main dining area
- Standard dining chairs (18-inch seat height) with a 30-inch table: Creates a more formal breakfast feel — works better in kitchens with lower ceilings where counter height reads as cramped
Anchoring the space visually matters when nothing is built in. A small pendant light centered over the table, a small area rug under the table legs, or a narrow floating shelf at eye level on the adjacent wall all give a freestanding bistro setup the territorial definition that built-in nooks get automatically from their framing.
Takeaway: If you’re not certain about your layout, a properly specified freestanding bistro setup is not a placeholder — it is a legitimate kitchen breakfast nook design that you can commit to without committing to a carpenter.
6. The Bay Window Conversion: Turning Architectural Surplus Into Seating
Bay windows in kitchens are one of the most consistently underused architectural features in residential design. The typical fate of a kitchen bay window is: one awkward chair that nobody sits in, a collection of plants that block the view, and a window seat cushion that was purchased with good intentions and used twice.
The bay window conversion — building a continuous bench that wraps the three faces of the bay with a table positioned at the center face — is the most spatially efficient kitchen breakfast nook design idea available when the bay is present. The bay itself already provides the three-wall enclosure that a U-shaped nook requires construction to create. You are filling existing geometry rather than building new geometry.
The structural considerations are specific to bay windows and rarely discussed in general nook guides:
- Verify the bay subfloor: Bay windows are cantilevered over exterior space, and their subfloors are sometimes undersized for the load of built-in bench framing plus occupants. A structural engineer review costs between $200 and $500 and is worth it before any construction begins.
- Insulation cavity: The bench cavity in a bay window sits directly against exterior walls. Without insulation batt added before the bench face is closed, this cavity becomes a cold sink in winter — benches that are uncomfortable to sit on in January are benches that get abandoned by February.
- Electrical in the bay: If you want sconce lighting, USB charging ports, or a pendant drop above the table, rough electrical needs to be run before the bench framing is closed. This is not something you can add easily afterward.
The table configuration options for a bay conversion differ from standard nook layouts. Because three walls of seating wrap a center face, a round or oval table almost always works better than a rectangular one — rectangular tables create dead corner seating at the angled bench joints where nobody wants to sit.
Takeaway: Before building a bay window conversion, verify the subfloor load rating and add insulation to the bench cavity — both are invisible after construction and both matter every single winter morning.
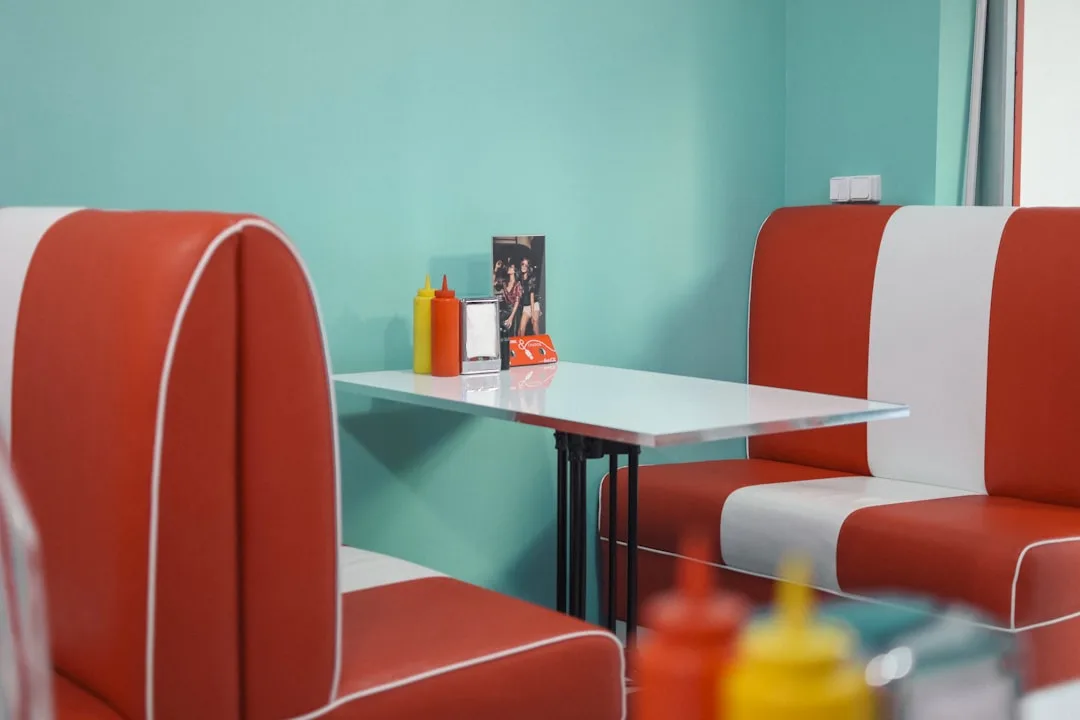
7. The Booth-Style Nook: Borrowing From the Diner for a Reason
Diner booths have not changed meaningfully in eighty years because they work. The booth configuration — two opposing bench seats with a fixed table between them — solves the breakfast nook problem of side-exit traffic interruption by eliminating it entirely. Everyone enters and exits from the same open end. The people seated at the back can exit without disturbing the table.
The booth-style nook is the correct layout when your kitchen has a natural alcove, a bump-out, or a section of wall that is visually separated from the main work area — and when your household prioritizes efficient seating for two to four people over flexibility. It is also, frankly, the layout that creates the strongest sense of morning ritual, because it is architecturally intentional in a way that a freestanding table never quite achieves.
The dimensional specifications for a functional booth are tighter than most guides acknowledge:
- Table width: 24 to 28 inches — narrower than standard dining tables, which is appropriate because booth seating positions diners closer together than chair seating
- Bench length: Minimum 48 inches per side for two-person comfortable seating; 60 inches for three
- Total booth depth (back wall to open end): 52 to 56 inches — shorter and knees hit the table end; longer and the booth loses its contained feeling without gaining useful space
- Aisle width at open end: 24 inches minimum — this is the measurement between the table end and any opposing wall, cabinet, or island
The upholstery decision in a booth-style nook matters more than in any other configuration because the backs are typically higher and the fabric covers more visible surface. Vinyl is easier to clean and historically appropriate to the reference; upholstered fabric with a performance weave is warmer and acoustically softer. Avoid tufted backs in a kitchen booth — the tufting channels collect food debris and are nearly impossible to clean at the seam depth.
Takeaway: Specify booth table width at 24 to 28 inches rather than standard dining width — the closer face-to-face positioning is what makes booth seating feel intentional rather than merely efficient.
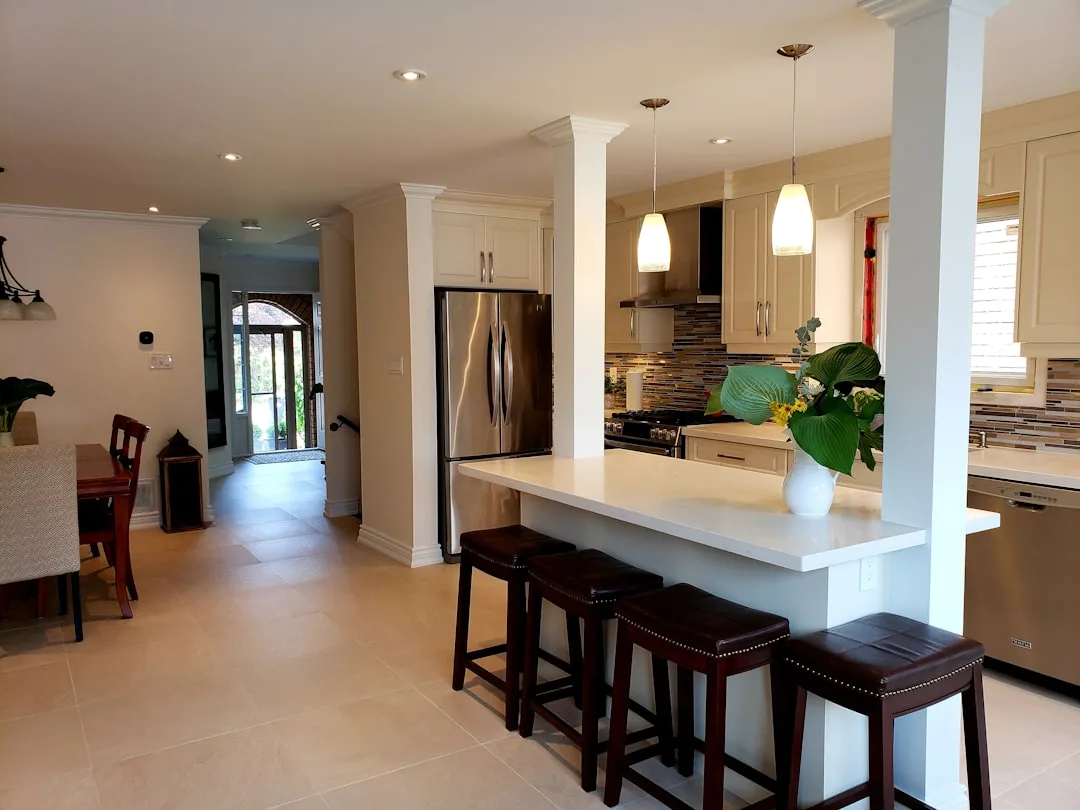
8. The Island-Adjacent Nook: When the Kitchen Already Has a Gathering Point
Most kitchen breakfast nook design ideas treat the nook as a standalone zone — a destination you walk to. The island-adjacent nook treats it as an extension of where people already congregate, which is often the more honest description of how a kitchen actually gets used.
The island-adjacent nook positions a bench or banquette along the wall directly beside or behind a kitchen island, so that the island functions as both a workspace and the table surface for nook seating. This eliminates one piece of furniture — the nook table — and integrates the seating into the primary kitchen workflow rather than separating it.
The configuration requires specific island dimensions to work correctly. The island overhang on the seating side needs to be a minimum of 12 inches to allow knee clearance — standard countertop overhangs of 1 to 1.5 inches do not work for this application and require a custom overhang extension. The seating height determines whether you use a standard bench with a counter-height island (island surface at 36 inches, bench seat at 24 to 26 inches) or a standard bench with a lowered island section (island surface at 30 inches, bench seat at 18 inches).
The lowered island section is the more expensive option and requires advance planning in the island construction — it cannot be added after the fact without rebuilding the island cabinet structure. The counter-height option is simpler but requires counter-height stools or a specifically built elevated bench, and it creates a more casual seating posture that some households prefer and others find uncomfortable for longer use.
Traffic flow around this configuration is the primary failure point. The bench placement must not block the primary working path around the island — the standard minimum clearance between an island and a perimeter counter is 42 to 48 inches for one cook, 48 inches minimum for two. The bench cannot borrow from that clearance. If adding the bench brings the island-to-wall measurement below 42 inches, the layout doesn’t work safely.
Takeaway: Measure your island-to-wall clearance before designing this configuration — the bench has to live outside the 42-inch working zone, not inside it.
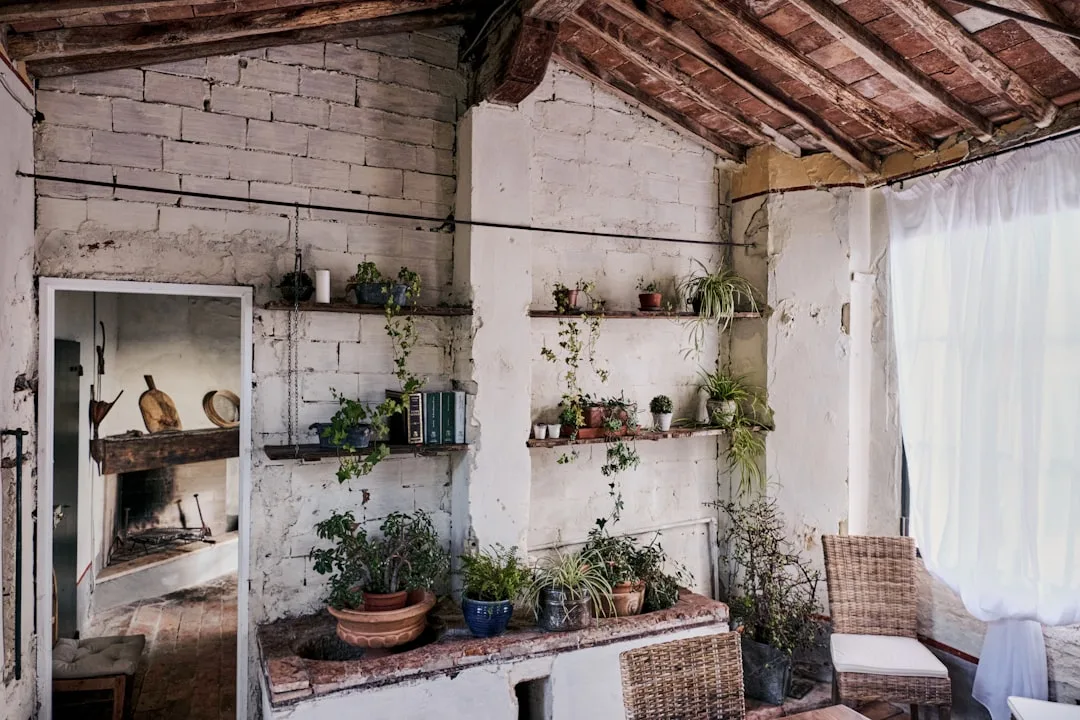
9. The Reclaimed Awkward Space Nook: Making Structure Work for You
Every kitchen has at least one architectural feature that the original builder treated as a problem: a soffit that drops lower than the surrounding ceiling, a structural column that interrupts a wall run, a doorway that was closed off during a renovation and left as a recessed wall section, a staircase soffit that creates a sloped ceiling over one corner. These features are almost universally treated as obstacles.
The reclaimed awkward space nook treats that architectural obstacle as the thing that defines and shelters the seating area — which is a fundamentally different design posture, and one that produces nooks with more character than anything built in a clean, regular corner.
A structural column in a kitchen corner, for instance, can become the anchor point for a wraparound bench that treats the column as a visual centerpiece rather than an intrusion. The column provides the enclosure that the nook needs without additional framing — the bench wraps two sides, the column provides a third, and a table positions against it. The result is a nook that feels genuinely embedded in the architecture of the house rather than installed against it.
Soffit-defined nooks work similarly. A dropped soffit over a corner — typically the result of ductwork or a beam above — creates a lower ceiling plane over the seating area that reads as intentional enclosure when a bench and table are positioned beneath it. Lighting a soffit-defined nook with recessed fixtures inside the soffit itself, rather than relying on general kitchen lighting, reinforces the sense that the nook is a distinct space within the kitchen.
The construction approach for reclaimed awkward space nooks differs from standard built-in work in one important way: you are working around existing structure rather than building from a clean surface. This requires a contractor who is comfortable with adaptive framing — fitting bench components to irregular angles, dealing with varying ceiling heights, and scribing built-in faces to imperfect wall conditions. Not every finish carpenter has this skill set. Ask to see examples of adaptive built-in work, not just standard square installations, before hiring.
Takeaway: Take photographs of your kitchen’s awkward structural features and bring them to a carpenter experienced in adaptive built-ins — what reads as a problem in the photos is often the thing that makes the finished nook memorable.
The nine kitchen breakfast nook design ideas above cover the full range of spatial conditions from the straightforward corner with adequate footage to the kitchen that seems to have no workable nook location at all. The layout you choose should follow your room’s geometry and your household’s actual behavior — not the layout that photographed best on someone else’s renovation blog.
Sit in the corner. Measure the clearances. Audit the light. Then build something you’ll actually use before 8:30 in the morning.