The average unfinished basement is roughly the same square footage as a Manhattan studio apartment — and most homeowners use it exclusively to store holiday decorations and a broken treadmill. That’s not a storage problem. That’s a failure of imagination compounded by a complete absence of design logic, and it costs people real money every single year they leave that square footage dormant. The good news is that unfinished basement designs don’t have to mean drywall, permits, and a $30,000 contractor invoice — and that’s exactly what this guide is about. Whether you’re working with 400 square feet or 1,400, the structural approaches here apply to virtually every unfinished basement design scenario you’ll actually encounter.
Quick Answer
The average unfinished basement is roughly the same square footage as a Manhattan studio apartment — and most homeowners use it exclusively to store holiday decorations and a broken treadmill.
What I want to address here isn’t how to finish your basement. Finishing a basement is a construction project. What I’m talking about is something more nuanced — how to make a raw, unfinished lower level feel like it was meant to look exactly the way it looks. Industrial lofts in Chicago’s West Loop sell for $600 per square foot. They have exposed concrete, raw ductwork, and visible ceiling joists. Nobody calls those spaces unfinished. The difference isn’t the materials — it’s the intentionality applied to them.
According to the National Association of Realtors, finished basements recoup roughly 70% of their cost at resale. But the smarter play for most homeowners — the one I’ve watched work dozens of times in actual spaces with actual budgets — is strategic partial improvement. You can capture most of that perceived value without the permits, the contractor timeline, or the $30,000 price tag. These nine approaches are how you do it.
Why Most Unfinished Basement Designs Fail Before They Start (And How to Fix That First)
In This Article
- Why Most Unfinished Basement Designs Fail Before They Start (And How to Fix That First)
- 1. Treat the Concrete Floor as a Design Surface, Not a Default
- 2. Exposed Ceilings Done Right: The Rules for Making Joists Look Intentional
- 3. Concrete Block Walls: The Surface Most Homeowners Try to Hide and Shouldn’t
- 4. Zone Without Walls: How Area Rugs and Furniture Placement Create Room Logic
- 5. Lighting Design for Spaces That Have None: Building a Three-Layer System From Scratch
- 6. Storage as Architecture: Making Utility Systems and Mechanicals Part of the Design
- 7. Acoustic Treatment Without Acoustic Panels: Managing Sound in Raw Spaces
- 8. Vertical Surfaces Beyond Paint: Wall Treatments That Work With Raw Architecture
- 9. Plants and Organic Material: The Counterintuitive Solution for Hard Industrial Spaces
- Putting It Together: How the Nine Approaches Work as a System

Walk into an unfinished basement that feels neglected and walk into one that feels deliberately raw — the difference is almost never the materials. I’ve been in $800/month Chicago walk-ups that had exposed brick and concrete floors that felt like boutique hotels. I’ve also been in basements where a homeowner spent $4,000 on random improvements and the space still felt like a crime scene.
Three specific problems create the “neglected” feeling, and they work together. Fix one without addressing the others and you’ve wasted your money.
The first problem is no anchor point. Every space that reads as designed has something the eye lands on first — a rug, a piece of furniture, a wall treatment, a lighting moment. Unfinished basements typically offer the eye nothing but a concrete slab, a water heater, and whatever boxes accumulated over the last six years. The eye doesn’t know where to go, so the brain reads the space as chaotic.
The second problem is no lighting hierarchy. A single overhead bulb — which is what most unfinished basements have — doesn’t illuminate a space, it exposes it. Illuminating and exposing are opposite experiences. One makes a room feel considered. The other makes it feel like something is being revealed against its will.
The third problem is material inconsistency — what I call “accidental materiality.” Raw concrete next to a beige carpet remnant next to painted drywall on one wall and unpainted block on another. Each material came from a different decision made at a different time with no relationship to the others. Industrial lofts work because someone chose all the raw materials deliberately and made them cohere.
The fix isn’t complicated, but it has to happen in the right order: solve moisture first, establish your anchor point, build a lighting plan, then address surfaces. Every Pinterest basement transformation that fails does so because someone skipped to step three and ignored the first two entirely. I’ve watched it happen. The rug grows mold and the epoxy peels and the homeowner concludes that basements just can’t be nice, which is wrong.
Actionable takeaway: Before buying a single item, stand in your basement and identify what the eye lands on first. If the answer is “nothing” or “the water heater,” you don’t have a decorating problem yet — you have an anchor problem. That gets solved first.
1. Treat the Concrete Floor as a Design Surface, Not a Default
Most people walk past the concrete slab every time they go to the basement and never once think of it as a design decision they’ve already made. But leaving raw gray concrete untreated is a choice — just not a deliberate one. The floor covers more visual surface area than any wall or ceiling in the space, which means it has more influence over whether the room feels designed than almost anything else you could do.
You have three realistic options for transforming a concrete basement floor without full replacement, and they are not interchangeable:
- Concrete paint costs roughly $0.15–$0.25 per square foot in materials and is the most accessible option. It’s also the most failure-prone. Paint sits on top of concrete rather than bonding with it — moisture migrating through the slab from below will eventually cause it to peel, sometimes within a year. It works in genuinely dry basements; it fails in anything else.
- Acid staining penetrates the concrete and creates a variegated, almost marbled effect that reads as genuinely beautiful in raw industrial spaces. It doesn’t chip because it becomes part of the slab. Cost runs $2–$4 per square foot DIY or $4–$8 professionally installed.
- Epoxy coating is the workhorse — professional epoxy coating runs $3–$12 per square foot installed, meaning a 1,000-square-foot basement floor transformation runs $3,000–$12,000 professionally done. DIY epoxy kits bring that down to under $300 for materials, though surface preparation determines whether it lasts five years or five months.
The preparation step most DIYers skip is mechanical grinding. Concrete must be ground or etched before epoxy application so the coating can actually bond to the surface. Skipping this is the primary reason DIY epoxy jobs fail within 12 months — the coating looks fine for the first season, then starts lifting at the edges.
For cracked or uneven slabs, self-leveling concrete compound fills low spots and can be purchased for roughly $30 per bag. Address this before any coating treatment. For moisture-prone slabs, epoxy is still viable but requires a moisture-vapor barrier primer as the first coat.
Area rugs do design work that floor treatments can’t — they zone the space into perceived rooms. A large jute rug under a seating area and a separate runner near a work table create the visual language of two different spaces without any walls required.
Actionable takeaway: Do the moisture test before buying any floor product. Tape a 12-inch square of plastic sheeting to the slab for 24 hours. Condensation underneath means moisture is migrating through the slab, and any coating you apply without addressing it will fail. This test costs nothing and can save you hundreds.
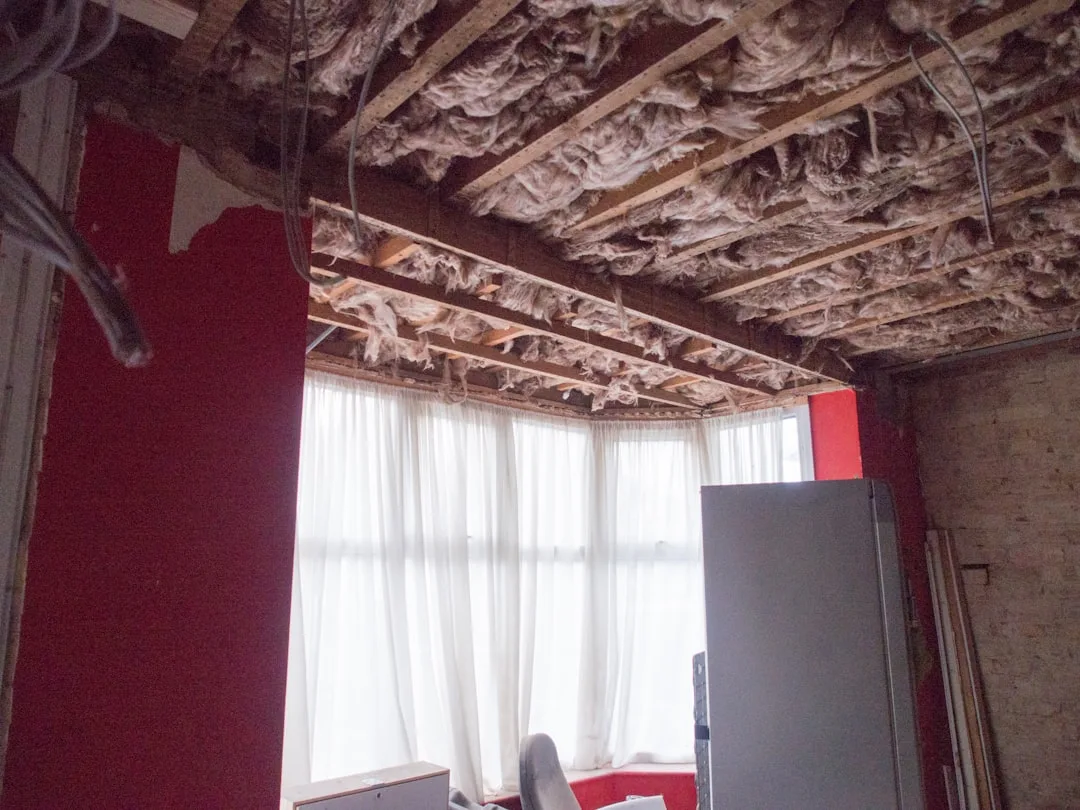
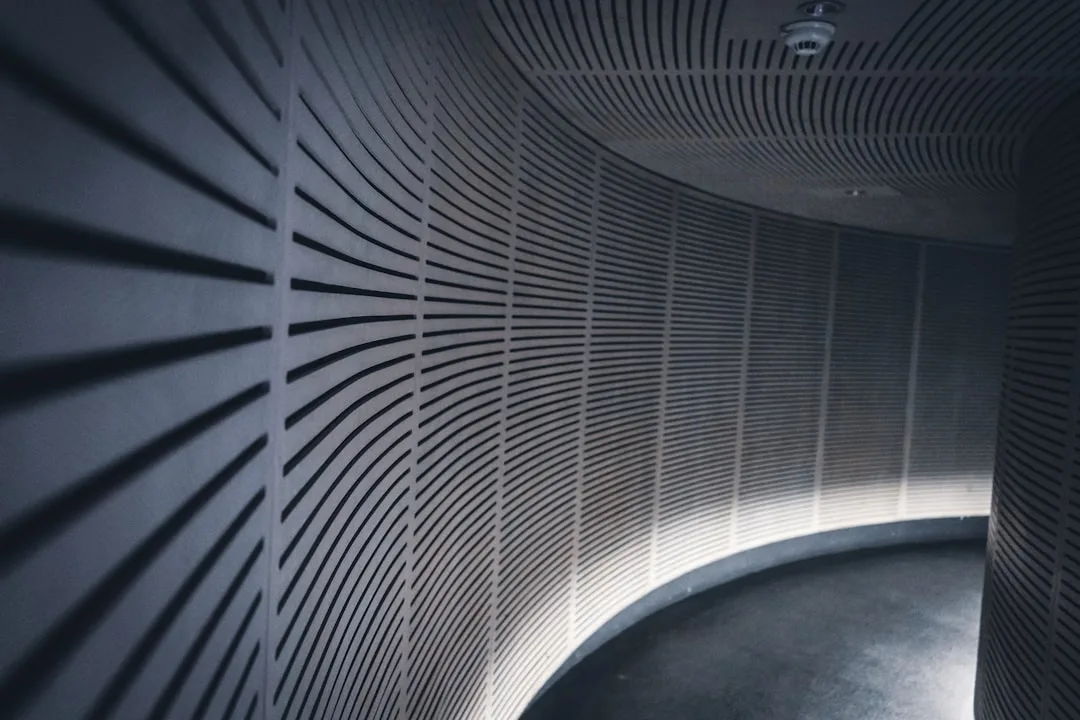
2. Exposed Ceilings Done Right: The Rules for Making Joists Look Intentional
Here’s the thing about exposed ceiling joists: they either read as “industrial design choice” or “the owner ran out of money.” The difference comes down to three variables — paint color, consistency, and what’s sharing the ceiling plane with the joists.
Paint is the most powerful tool you have for an exposed ceiling. Painting the entire ceiling cavity — joists, subfloor above, ductwork, pipes, electrical conduit, everything — in a single dark color (black, charcoal, deep navy) is the move that transforms a chaotic overhead mess into something that reads as intentional. The logic is counterintuitive but consistent: when everything is the same color, the eye stops cataloging individual elements and reads the whole as a unified surface. Contrast, on the other hand, makes every pipe and wire fight for visual attention.
Matte black is the most forgiving choice for this application. It absorbs light rather than reflecting it, which means imperfections, uneven surfaces, and that one weird pipe that goes sideways for no apparent reason all become visually subordinate. Flat or matte finish is non-negotiable here — any sheen will catch light and highlight exactly what you’re trying to subordinate.
What to do with ductwork specifically: Large HVAC ducts are often the biggest visual obstacle in an unfinished basement ceiling. You have two approaches. The first is the paint-everything approach described above — ductwork painted the same matte black as everything else disappears into the ceiling plane. The second is the opposite: treat large ductwork as an architectural feature by painting it a contrasting accent color, boxing it in with simple wood framing to give it crisp edges, or wrapping the exposed section nearest a focal wall with the same material used elsewhere in the space. This only works if the ductwork runs in a reasonably straight line and the rest of the ceiling is handled consistently.
Ceiling height determines which approach is viable. If your basement ceiling is under 7 feet, painting everything dark will make the space feel lower and heavier — the opposite of what you want. In low-ceiling basements, paint everything white or a very light warm gray instead. The goal is still visual unity, just achieved through lightness rather than depth. At 8 feet or above, dark ceilings work exceptionally well and create a cocoon-like quality that many people find genuinely appealing.
The lighting integration step most guides skip: Exposed ceilings require pendant lighting or track lighting to look finished. A bare bulb on a cord looks accidental. The same bulb in an industrial-style pendant cage looks deliberate. Track lighting systems allow you to direct light where you need it without requiring any new electrical rough-in — you’re just replacing a single fixture with a track that uses the same junction box. Budget $150–$400 for a quality track system that covers a 12–15 foot run.
Actionable takeaway: Before painting, spend one evening with a flashlight cataloging everything on your ceiling — every pipe, wire, conduit run, and duct. Anything that can be rerouted to run parallel to the joists rather than perpendicular will dramatically clean up the visual result. Electrical conduit is often easy to reroute; HVAC ducts almost never are. Knowing this before you paint prevents the frustration of painting around something that could have been moved for $50 in materials.
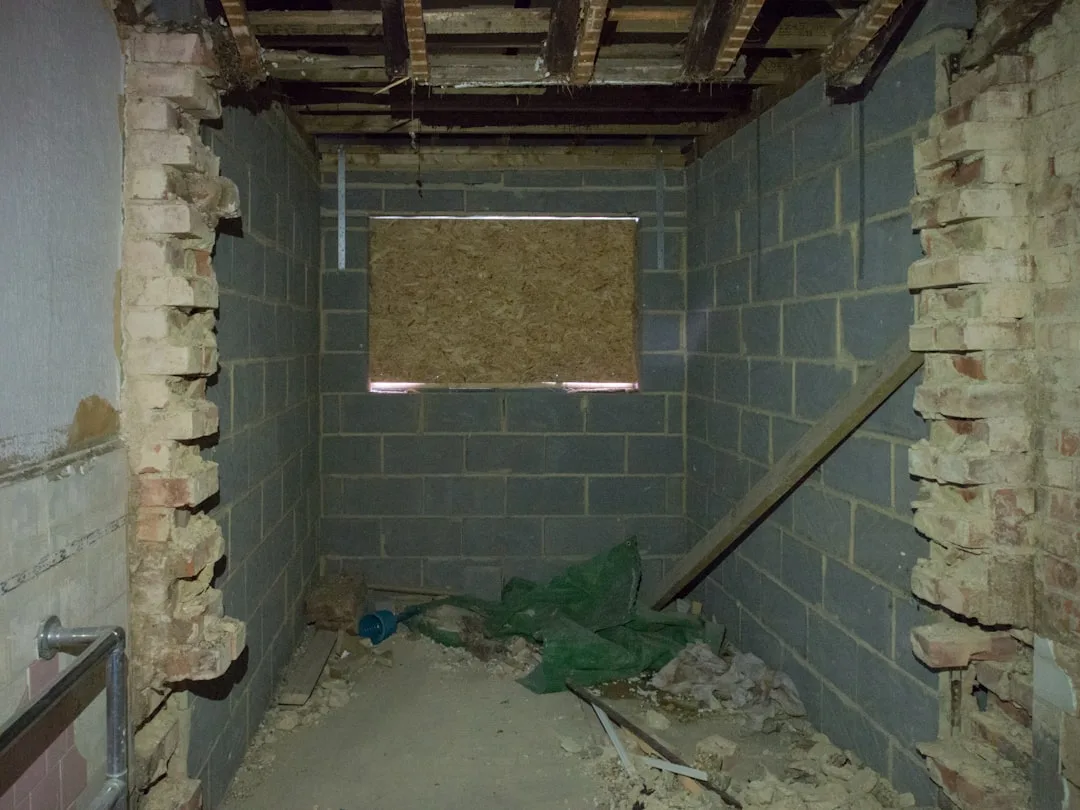
3. Concrete Block Walls: The Surface Most Homeowners Try to Hide and Shouldn’t

Concrete block walls — CMU walls, in contractor terminology — are treated as a liability in most basement improvement conversations. The standard advice is to fur them out, add insulation, add drywall, and cover the whole thing. That advice makes sense if you’re doing a full finish. It’s completely backwards if you’re working within the unfinished design framework.
CMU walls have genuine texture, rhythm, and industrial character. The problem isn’t the material — it’s that most exposed CMU walls in basements are the wrong color (dingy gray), have moisture staining, and exist in a visual context that makes them read as neglected rather than intentional.
Painting CMU walls is a high-return intervention. Masonry paint — specifically designed to penetrate and seal concrete block rather than sit on top of it — costs roughly $30–$50 per gallon and covers approximately 75–100 square feet per gallon on CMU (the texture eats paint). Budget $150–$300 in materials for an average basement. The color choice matters enormously:
- Bright white reads as clean and intentional and dramatically increases light reflection in a space that typically gets no natural light. This is the most forgiving choice.
- Warm white or cream adds a slight softness that works well if you’re incorporating wood elements or warmer-toned furnishings.
- Dark colors on CMU walls work only if the ceiling is light and the lighting is excellent. In a typical basement, painting block walls dark and the ceiling dark simultaneously creates a tunnel effect that no furniture arrangement can fix.
The limewash approach is worth knowing about. Limewash paint applied to CMU walls creates a layered, aged effect that reads as genuinely beautiful and costs approximately the same as standard masonry paint. The application technique — stippling rather than rolling, working in small sections — is slightly more involved, but the result has a depth that standard paint doesn’t achieve. It’s particularly effective in basements being designed around a more organic, earthy aesthetic rather than hard industrial.
One accent wall of brick or stone veneer can anchor an entire unfinished basement design without requiring you to treat every surface. Thin brick veneer panels (not individual bricks — panels that mimic the look) install directly over CMU or concrete using construction adhesive and cost $4–$8 per square foot in materials. A 10-foot by 8-foot accent wall represents roughly $320–$640 in materials. The visual weight this creates is disproportionately large relative to the investment.
Actionable takeaway: If your CMU walls have white mineral deposits (efflorescence), address this before painting. Efflorescence is salt migration from moisture moving through the block, and painting over it without treatment guarantees the paint will bubble and peel within one season. A wire brush removes the deposits; a diluted muriatic acid wash neutralizes the surface. This step adds two hours to your prep time and is the difference between paint that lasts eight years and paint that fails in eight months.
4. Zone Without Walls: How Area Rugs and Furniture Placement Create Room Logic

The single most disorienting thing about an open basement floor plate — no interior walls, just columns if you’re unlucky enough to have a post-and-beam foundation — is that it gives the brain no information about how the space is meant to be used. Rooms work psychologically because they have edges. They tell you where one activity ends and another begins.
You can create that same psychological information without building a single wall, and the primary tool for doing it is floor plane differentiation.
Area rugs are the most cost-effective room-creation tool available. A correctly sized area rug — one large enough that at least the front legs of all seating furniture sit on it — defines a room boundary as clearly as a wall does, but does it through implied rather than physical separation. The brain reads “area rug plus furniture grouping” as “room” even when there are no walls. This isn’t a design opinion — it’s how spatial cognition works. Define the floor plane, and the room exists.
For basement applications, the material choices that hold up are: polypropylene (completely moisture-resistant, cleanable with a hose), jute (acceptable in dry basements, will mildew in any humidity), and indoor-outdoor rugs (designed for exactly the conditions a basement presents and increasingly available in designs that read as genuinely sophisticated).
Furniture arrangement is the second tool. Furniture facing inward — toward a central point — creates a room. Furniture pushed against walls creates a waiting room. This is the single most common furniture mistake in basements and in living rooms equally: people push everything to the perimeter because it “makes more space,” and the result is a space that feels larger but functions worse and reads as undesigned. Float your seating group in the center of the rug. Accept that there will be space between the furniture and the wall. The space will feel more designed immediately.
Open shelving units serve double duty as partial room dividers. A 6-foot-tall open shelving unit positioned perpendicular to the main traffic path creates visual separation between zones without blocking light or airflow. In a basement being used as both a seating area and a home office, this is the functional solution that doesn’t require permits or construction. IKEA’s KALLAX and Billy systems, used as room dividers, are workhorses for exactly this application and cost $150–$400 for a configuration that meaningfully divides space.
Lighting zones reinforce furniture zones. A pendant or floor lamp positioned over or near a furniture grouping signals “this is a place” in the same way a rug does. In an open basement plan, running a dedicated circuit to a floor lamp position and using smart plugs to control it separately from overhead lighting creates two distinct visual zones at night — the lit seating area and the dimmer surrounding space — which reads as two different rooms even though it’s one continuous floor plate.
Actionable takeaway: Before buying any furniture or rugs, tape out your intended zones on the concrete floor with painter’s tape. Use actual-scale rectangles representing the furniture footprints. The most common mistake is underestimating how much floor space furniture occupies — a sofa, coffee table, and two chairs in a living room arrangement typically require a minimum 10×12-foot zone to function comfortably. If the tape exercise shows your intended zones are too small, you’ll find out before spending money rather than after.
5. Lighting Design for Spaces That Have None: Building a Three-Layer System From Scratch
Most unfinished basements have one of two lighting situations: a single ceiling bulb on a pull chain, or a small number of can lights installed during some previous partial improvement. Neither of these is a lighting plan. A lighting plan has three layers — ambient, task, and accent — and each layer serves a distinct purpose.
Ambient lighting is what most basement lighting systems stop at. It’s the general fill light that makes the space visible. In a properly designed lighting system, ambient light is the least interesting layer — it’s the floor, not the ceiling. Getting ambient light right in a basement means getting enough of it. Basements have zero natural light, which means artificial lighting has to work harder than in any other room of the house. A minimum of 50 foot-candles at floor level is the target for a functional ambient light level; most single-bulb basement setups deliver 5–15.
Track lighting systems are the most practical ambient upgrade for unfinished basements because they use a single junction box to power multiple directional heads. A 6-head track system covering a 20-foot run can deliver 3,000+ lumens of directed ambient light and installs in a few hours with basic electrical knowledge. If you’re not comfortable with electrical work, this is a $150–$200 job for an electrician.
Task lighting serves specific functional zones. A work table needs a dedicated task light that delivers 50–70 foot-candles at the work surface. An LED shop light — the kind that hangs from chains — costs $35–$80 and delivers 4,000–5,000 lumens over a 4-foot workspace. They look intentionally industrial in an exposed-ceiling basement and require no new wiring if positioned near an existing outlet.
Accent lighting is what makes an unfinished basement design feel finished. It’s the layer that signals deliberateness. Specific applications that work well in basement contexts:
- LED strip lighting tucked behind open shelving units or along the top of a bookcase creates a glow that makes the shelving read as a designed feature rather than storage.
- Directional spotlights aimed at an accent wall or architectural feature (exposed brick, a gallery wall) create the kind of dramatic shadow and highlight that makes materials look intentional.
- Edison bulb pendants over a bar area or work table serve as both task and accent lighting simultaneously — they provide functional light while also being visually interesting objects in their own right.
Smart bulbs are disproportionately useful in basements because they allow you to shift the color temperature of your ambient lighting between work mode (5000K, cool and alert) and relaxation mode (2700K, warm and dim) without changing fixtures. A basement that functions as both a home office during the day and a media room in the evening needs this flexibility, and smart bulbs provide it for $8–$15 per bulb.
Actionable takeaway: Calculate the lumen requirement for your basement before buying any lights. Multiply your square footage by 50 (lumens per square foot for a general living space) to get your target ambient lumen output. A 600-square-foot basement needs 30,000 lumens of ambient light — which sounds like a lot and is. Most homeowners dramatically underlight their basements and then wonder why the space never feels quite right. It’s because the brain registers dim light as incomplete, regardless of how good everything else looks.
6. Storage as Architecture: Making Utility Systems and Mechanicals Part of the Design
Every unfinished basement contains a collection of functional infrastructure — water heater, HVAC equipment, electrical panel, sump pump, possibly a utility sink — that most homeowners treat as embarrassing necessities to be hidden. The problem is that hiding them badly is worse than leaving them alone. A hastily built closet around a water heater, finished in unpainted OSB, reads as more unfinished than the exposed water heater itself.
The alternative is to treat utility zones as a distinct design district within the basement rather than something to be concealed.
Cluster and organize mechanicals before trying to design around them. Water heaters, pressure tanks, and HVAC air handlers often have associated pipes, wires, and connections running in multiple directions with no organizing logic. Before any aesthetic decisions, spend time organizing the visual chaos: bundle and secure wires with cable management clips, paint pipes that run along walls to match the wall color, and ensure any mechanical equipment is clean and labeled. An organized mechanical area reads as industrial-intentional. A disorganized one reads as neglected.
Open metal shelving near utility zones creates a visual connection between the functional and the design elements. A wall-mounted metal shelving system adjacent to your mechanical area — used for organized storage of tools, seasonal items, or supplies — creates visual rhythm and makes the whole zone read as intentional. Garage-style metal shelving costs $100–$200 for a 6-foot section and is designed to exist near exactly the kind of equipment in your mechanical zone.
Pipe and conduit can be design elements rather than problems. Copper pipes, properly cleaned and sealed, are genuinely beautiful. Black iron pipe used for gas lines has a raw industrial quality that interior designers literally specify intentionally in high-end projects. If your basement has these materials, consider treating them as features: clean the copper, and ensure the black iron pipe runs in organized parallel lines where possible. A run of parallel copper pipes along a wall, properly organized and lit, reads as architecture rather than plumbing.
The utility sink, if you have one, can function as a design moment. Replacing a basic white utility sink with a farmhouse-style stainless steel laundry sink on legs ($150–$300) and adding an organized tool and supply station around it creates a functional zone that reads as designed rather than accidental. Add a simple pegboard panel above it ($20–$40) for organized tool storage and you have a workshop zone that looks intentional in any industrial-leaning basement design.
Actionable takeaway: Map your mechanical zone on paper before buying anything. Draw a simple floor plan noting the locations of every piece of equipment and every pipe or conduit run. Then identify which elements can be reorganized or improved for under $100 and which require professional involvement. Most of the visual chaos in a mechanical zone can be resolved with cable management, paint, and organization — not construction.
7. Acoustic Treatment Without Acoustic Panels: Managing Sound in Raw Spaces

Concrete and block are acoustically hostile surfaces. They reflect sound rather than absorbing it, which means an untreated basement has a reverb quality that makes voices echo and music sound muddy. This is one of the primary reasons unfinished basements feel uncomfortable for extended occupation — the acoustic environment is subtly but consistently unpleasant.
Acoustic panels are the standard fix, but they’re not the only fix, and in an unfinished basement design context, there are approaches that solve the acoustic problem while also contributing to the overall design.
Textile mass is the most versatile acoustic solution. Heavy curtains, upholstered furniture, area rugs, and bookshelves full of books all absorb sound. A 9×12-foot area rug on a concrete floor reduces reverb more than most people expect. An upholstered sofa and two upholstered chairs in the same space reduce it further. A bookshelf wall — shelves filled with books, plants, and objects — breaks up sound reflections and absorbs a meaningful amount of reverberation. These are all things you’d add to the space anyway for design reasons; the acoustic benefit is secondary but real.
Ceiling treatment makes the biggest acoustic difference. Sound in a room with a hard floor and a hard ceiling bounces between those two surfaces repeatedly. Treating one of them breaks the bounce. In an exposed-ceiling basement, hanging textiles from the joists — large woven wall hangings, macramé panels, or even fabric panels mounted to simple frames — absorbs ceiling-level sound and adds visual warmth simultaneously. This is a particularly good solution for the joist bays between ceiling beams, where a fabric panel can be mounted in a few minutes with hooks and creates a coffered-ceiling visual effect.
Actionable takeaway: Clap your hands once in your empty basement and listen to how long the sound takes to decay. In a heavily reverberant space, the decay will last a full second or more. After adding rugs, upholstered furniture, and at least one textile wall or ceiling treatment, repeat the clap test. The difference in decay time is a direct measure of how much more acoustically comfortable the space has become.
8. Vertical Surfaces Beyond Paint: Wall Treatments That Work With Raw Architecture

Painting CMU walls is addressed in section 3, but paint isn’t the only tool for vertical surfaces in an unfinished basement. Several wall treatment approaches work specifically well in raw structural contexts and cost less than most homeowners expect.
Vertical wood slat panels installed directly over concrete block create warmth, texture, and acoustic benefits simultaneously. Pre-made slat wall panels — the kind that come as 4×8-foot sheets with evenly spaced wood strips over a fabric backing — install using construction adhesive and cost $80–$150 per panel. A single accent wall in a 10-foot-wide basement requires 2–3 panels, representing $160–$450 in materials. The visual transformation is dramatic because wood is the material most cognitively associated with comfort and warmth, and introducing it into a concrete-dominant environment immediately shifts the perceived character of the space.
Painted geometric patterns on a single accent wall turn a liability (plain concrete block or poured concrete) into a feature. A simple grid pattern using painter’s tape and two paint colors creates a graphic wall treatment for under $30 in materials. More elaborate geometric patterns — chevrons, large-scale diamonds, abstract color blocking — are within the reach of anyone with patience and a level. The concrete texture actually enhances hand-painted geometric patterns by adding a slight imperfection that reads as artisanal rather than machine-made.
Gallery walls work in basements when sized correctly. The mistake most people make with gallery walls in basements is using the same scale they’d use in an upstairs room — small frames, closely grouped. In a basement with 8-foot ceilings and concrete walls, small frames look undersized and timid. Go larger: prints should be at minimum 18×24 inches, and frames should be substantial. A gallery wall of three large-format black-and-white photographs in simple black frames, spaced evenly and hung at eye level, reads as intentional in a way that twelve small mixed frames does not.
Actionable takeaway: Pick one wall — specifically the wall your eye lands on when you reach the bottom of the stairs — for your most ambitious surface treatment. This is your focal wall, and it deserves the most design investment. The other walls can be painted uniformly; the focal wall is where you introduce texture, pattern, or material contrast. Trying to make every wall a feature results in visual chaos; giving one wall dominant design energy and letting the others recede is how intentionally raw spaces achieve their balance.
9. Plants and Organic Material: The Counterintuitive Solution for Hard Industrial Spaces
Basements are not natural environments for plants. They have no natural light, often low humidity in winter, and frequently inconsistent temperatures. This does not mean plants are impossible — it means plant selection is critical. And in an unfinished basement design context, plants do work that no other design element can replicate: they signal life, which is the single most powerful counterpoint to the inherent coldness of concrete, block, and exposed structural systems.
The plants that actually work in low-light basements:
- ZZ plant (Zamioculcas zamiifolia) tolerates near-total darkness, infrequent watering, and low humidity. It looks architectural — upright, glossy, sculptural. It’s genuinely hard to kill.
- Snake plant (Sansevieria trifasciata) is similarly indestructible in low-light conditions and grows vertically, making it useful for narrow spots between columns or next to furniture.
- Pothos (Epipremnum aureum) trails and climbs and can be trained to grow along open shelving or up exposed pipes, introducing an organic element that softens structural hardness dramatically.
- Cast iron plant (Aspidistra elatior) is named for its toughness and handles deep shade, infrequent watering, and cold temperatures — the trifecta of basement conditions.
Grow lights make a wider range of plants viable. A simple LED grow light on a timer, positioned above a plant grouping, extends your options considerably and costs $20–$50 for a unit adequate for a 2×2-foot plant arrangement. Grow lights in industrial-style fixtures — bare bulb, adjustable arm, matte black — read as design elements rather than horticultural equipment.
Large-scale plants create the most dramatic impact. A single fiddle-leaf fig or monstera in a large concrete or ceramic pot makes more of a design statement than six small plants on a shelf. The scale relationship between a large plant and an industrial-style basement is visually correct in a way that small plants are not — the boldness of the plant matches the boldness of the architecture.
Dried and preserved botanicals work where living plants don’t. Large dried grasses, preserved eucalyptus branches, or structural dried flowers in oversized vessels read as organic material without the maintenance requirements. In a basement where even the hardiest plants struggle, a large dried pampas grass arrangement in a tall concrete vessel provides the organic counterpoint that the space needs without requiring any grow lights or watering schedules.
Actionable takeaway: Start with one large plant rather than several small ones. Buy the biggest ZZ plant or snake plant you can find — which in most garden centers or nurseries means a 10–14 inch pot — place it in a large vessel that matches your material palette (concrete, black ceramic, raw clay), and put it in the most visible location in the space. The impact of one large, healthy plant in a thoughtfully chosen container is greater than a collection of small plants scattered across the space, and it’s easier to keep alive.
Putting It Together: How the Nine Approaches Work as a System
Individual interventions produce incremental results. The reason the examples in the introduction — the Chicago walk-up that felt like a boutique hotel — work is that they apply multiple approaches simultaneously, and the approaches reinforce each other.
A basement that has had its floor acid-stained, its ceiling painted matte black uniformly, one CMU wall treated with limewash, zone-defining area rugs placed correctly, three-layer lighting installed, and a single large architectural plant placed at the base of the stairs reads as entirely designed. None of those interventions individually is transformative. Together they create a space where every surface is accounted for, every material is intentional, and the eye has a coherent experience from entry to far wall.
The order of operations matters:
- Moisture remediation — nothing else works without this
- Floor treatment — the largest visual surface, sets the material direction
- Ceiling treatment — establishes the overhead plane and material palette
- Wall treatment on focal wall — creates the anchor point the eye needs
- Lighting plan — makes everything else visible and supports the zone logic
- Zone definition with rugs and furniture — creates the room logic
- Mechanical zone organization — removes the visual liabilities
- Acoustic treatment — makes the space comfortable for extended occupation
- Organic material — adds the life that counterbalances the structural hardness
Each step builds on the ones before it. Attempting step 6 before step 2 is how basements end up with moldy rugs. Attempting step 9 before step 5 is how basements end up with dead plants. The sequence exists because each layer creates the conditions the next layer requires.
Total material cost for all nine approaches applied to a 600-square-foot basement, DIY labor, runs roughly $2,000–$4,500 depending on material selections. The same transformation completed by a general contractor runs $8,000–$15,000. The professional-quality result is achievable at the DIY price point because these interventions are about design logic, not construction complexity.
FAQ: Unfinished Basement Designs
Q: Do I need permits for any of the approaches described here?
Generally, no. Painting, flooring treatments, furniture arrangement, lighting fixtures plugged into existing circuits, and decorative wall treatments don’t trigger permit requirements in most jurisdictions. The threshold for permit requirements is typically new electrical circuits, new plumbing, HVAC modifications, or structural changes. If you’re replacing a fixture on an existing circuit, adding track lighting to an existing junction box, or applying any surface treatment, you’re almost certainly in permit-free territory — but verify with your local building department, since requirements vary by municipality.
Q: How do I handle a basement that has moisture problems? Can these approaches still work?
Moisture has to be addressed before any of these approaches will hold up long-term. The question is the source of the moisture. Surface condensation — humidity in the air condensing on cold walls and floors — is managed with dehumidification and improved ventilation. Water intrusion — actual water migrating through the slab or walls — requires grading correction, gutter extension, or interior drainage systems depending on severity. The plastic sheet moisture test described in section 1 tells you which problem you have. Surface condensation is a $200–$400 fix (a quality dehumidifier). Water intrusion ranges from a $300 gutter correction to a $5,000–$15,000 interior drainage system. Know which one you’re dealing with before spending money on any surface treatment.
Q: What’s the most impactful single change I can make to an unfinished basement if I have a limited budget?
Lighting, without question. The difference between a basement with one pull-chain bulb and a basement with a properly designed three-layer lighting system is more dramatic than any surface treatment. A track lighting system on an existing junction box plus two floor lamps plus LED strip lighting behind a shelving unit represents roughly $300–$500 in materials and transforms the perceived quality of the space more than $3,000 in floor