The average homeowner spends $40,000 converting their attic into a bedroom — then discovers the room cannot legally be called a bedroom because no one checked the egress window dimensions before demo day. That’s not a horror story I made up. That’s a pattern I watched repeat itself across a decade of projects, and the clients who got burned weren’t careless people. They were people who hired contractors who never pulled permits, or who got excited about exposed beams and forgot to ask whether the floor joists could handle 40 pounds per square foot. This article exists because most attic bedroom remodel content treats the project like a mood board exercise. It isn’t. It’s a structural, mechanical, legal, and then finally aesthetic problem — in that order.
Quick Answer
The average homeowner spends $40,000 converting their attic into a bedroom — then discovers the room cannot legally be called a bedroom because no one checked the egress window dimensions before demo day.
What the 7 and 7 Rule Actually Means for Your Remodel Plans
In This Article
- What the 7 and 7 Rule Actually Means for Your Remodel Plans
- The Real Cost Breakdown — Not the Useless $5K–$300K Range
- Six Common Attic Bedroom Problems That Derail Projects Mid-Build
- How to Handle the Ceiling Height Problem Without Adding a Dormer
- Insulation and Ventilation: The Two Systems Designers Never Photograph
- Light and Airflow Strategies That Make the Space Feel Twice Its Size
- Permits, Timelines, and What Contractors Will Not Tell You Upfront
- Design Decisions That Affect Resale — Ranked by ROI
Before you start pricing out custom cabinetry or deciding between shiplap and plaster, measure your attic. Not with an app. With a tape measure, a pencil, and a notepad. IRC Section R305.1 specifies a minimum ceiling height of 7 feet over at least 50% of the finished floor area — and the remaining area must meet a 5-foot minimum. Not 4’11”. Five feet exactly, because anything below that threshold cannot be counted toward your minimum floor area calculations at all.
Here’s what that actually looks like in practice: you stand at the peak of your raw attic, measure down to the subfloor, and if that measurement is under 7’6″ — I say 7’6″ because the finished ceiling will eat 3–4 inches of that headroom — you have a problem before you’ve spent a dollar. The 50% rule means you then map out the full floor plate and calculate what percentage of it can realistically meet the height threshold once insulation, drywall, and framing are in place.
Most attics I’ve walked fail this test somewhere. The peak clears 8 feet, but the usable 7-foot zone is maybe 60% of the floor area, and a third of that is over the bathroom below or the stairwell — areas that won’t become sleeping space anyway.
How to self-assess before calling anyone:
- Measure ridge height from the raw subfloor
- Map the perimeter line where ceiling height drops to 5 feet
- Calculate square footage of the zone at or above 7 feet
- Subtract any area directly above mechanical penetrations or structural obstructions
- Compare usable area to the minimum habitable square footage required by your local jurisdiction (typically 70–120 sq ft)
The spaces below 5 feet aren’t dead weight — they become knee wall zones, which are actually some of the most useful real estate in a well-designed attic room. But they don’t count as floor area for code purposes, so don’t let anyone tell you they do.
Actionable takeaway: Spend 30 minutes measuring your attic with a tape measure and sketch a rough floor plan before talking to a single contractor. You will immediately know whether you’re dealing with a cosmetic finish project or a structural intervention.
The Real Cost Breakdown — Not the Useless $5K–$300K Range

Ranges that wide aren’t budgets. They’re disclaimers. The contractors and content sites that quote “$5,000 to $300,000” are technically not lying — those numbers exist somewhere — but they are completely useless to a homeowner trying to figure out whether this project makes financial sense. So here’s how I’d actually frame it.
Tier 1 — Cosmetic finish: Your framing is already there, the floor joists are adequate, the egress window exists or can be added without dormer work, and you’re essentially adding insulation, drywall, flooring, and lighting. Budget $15,000–$35,000. This is the project most people imagine when they start researching. It’s also the least common, because attics that already have adequate framing and egress are relatively rare.
Tier 2 — Structural conversion: You need subfloor reinforcement, a dormer or two for headroom and light, HVAC extension, and possibly stair reconfiguration. Budget $40,000–$85,000. Remodeling Magazine’s 2024 Cost vs. Value Report puts the national average for a finished attic bedroom conversion at roughly $40,000–$50,000 — which means the median project lands squarely in this tier, not Tier 1.
Tier 3 — Full gut with plumbing: Egress window installation, bathroom rough-in, stair reconfiguration from pull-down ladder to code-compliant permanent stairs, and full mechanical buildout. Budget $90,000–$160,000. This is the project that adds genuine bedroom classification with an en suite — and it’s also the project most likely to recoup meaningful value at resale.
A few line items that inflate budgets quietly:
- Dormers: $2,500–$20,000 per unit depending on style, structural complexity, and roofing material matching
- Spray foam insulation at the roofline: $2,000–$6,000 for a typical attic
- HVAC mini-split installation (often the smarter choice over duct extension): $3,000–$7,000
- Structural engineer fee: $500–$1,500 — and this is not optional
The 56% cost recoupment figure from the Cost vs. Value Report sounds underwhelming until you factor in what a legally classified additional bedroom does to your listing price. More on that in the resale section.
Actionable takeaway: Identify your tier before budgeting. Print that three-tier breakdown, walk your attic, and be honest about which category you’re actually in. Most people land in Tier 2. Few people want to believe that.
Six Common Attic Bedroom Problems That Derail Projects Mid-Build
Every attic bedroom remodel I’ve seen go wrong did so for one of six reasons. Not twenty. Six. The contractors who quote low often do so because they’re quoting against a project they haven’t yet fully assessed — and these are the discoveries that generate change orders at week four.
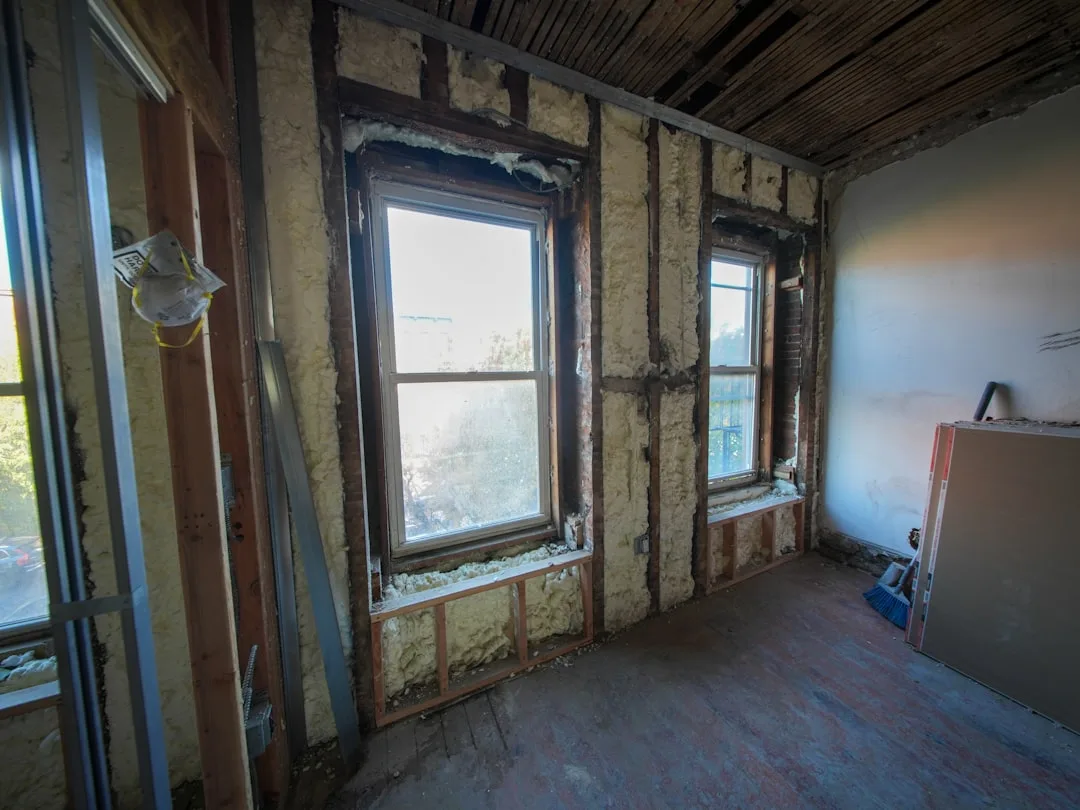
1. Insufficient floor joist load capacity. Attic joists are sized for storage — typically 10 to 20 pounds per square foot of live load. A habitable room requires 40 psf. That gap isn’t cosmetic. It requires sistering joists, which means pulling up the subfloor below or working from above, neither of which is cheap or fast.
2. Thermal bridging at the roofline. Most unfinished attics have zero continuous insulation along the rafter plane. Once you convert to conditioned space, you need a complete thermal envelope — and if you install batt insulation between rafters without addressing the thermal bridge at each rafter, you’ll have condensation problems within the first heating season.
3. No dedicated HVAC zone. Extending your existing ductwork to the attic seems logical until you realize that pushing conditioned air to the highest point in the house — where heat already wants to go — causes pressure imbalances on every floor below. I’ve seen this mistake make second-floor bedrooms stuffy and the new attic room simultaneously freezing.
4. Egress window non-compliance. IRC requires a minimum net clear opening of 5.7 square feet, with at least 24 inches of clear height and 20 inches of clear width. Many “attic windows” that existed before the remodel are fixed units that cannot open, or they open but don’t meet the net clear area requirement. That window looks fine. It is not fine. It means the room cannot be legally called a bedroom.
5. Stair code violations. Pull-down attic ladders cannot be grandfathered into a permitted bedroom conversion. Permanent stairs require a minimum 36-inch width, headroom of at least 6’8″, and a proper handrail. Cutting those stairs into the floor below often sacrifices a closet or landing that someone needs.
6. Electrical panel capacity. A new habitable room typically needs 15 to 20 amps of dedicated circuit capacity for lighting, outlets, and HVAC equipment. Panels in older homes — anything pre-1980 — frequently don’t have headroom for this without an upgrade.
NAHB data indicates structural and mechanical deficiencies are cited in over 60% of permit rejections for attic conversions in urban jurisdictions. That number makes sense to me. It matches what I saw.
Actionable takeaway: Before signing a contract, ask your contractor explicitly how they’re handling each of these six issues. Vague answers are red flags. “We’ll figure it out once we open it up” is not a plan.
How to Handle the Ceiling Height Problem Without Adding a Dormer

Dormers are the answer every contractor reaches for first, partly because they’re correct — dormers genuinely solve the headroom problem — and partly because they generate significant billable work. But they’re not the only answer. And for a project that’s already straining a budget, they may not be the right answer.
Collar tie relocation is one of the least-discussed structural interventions available. Collar ties are horizontal framing members that connect opposing rafters and resist the outward thrust of the roof. They’re often positioned lower than structurally necessary. A structural engineer can evaluate whether raising them 12 to 18 inches is safe — and in many older homes, it is. That seemingly small adjustment can move a ceiling from unusable to adequate without touching the exterior of the building. This is not a DIY move. It requires engineering sign-off and inspection. But the cost is a fraction of a dormer.
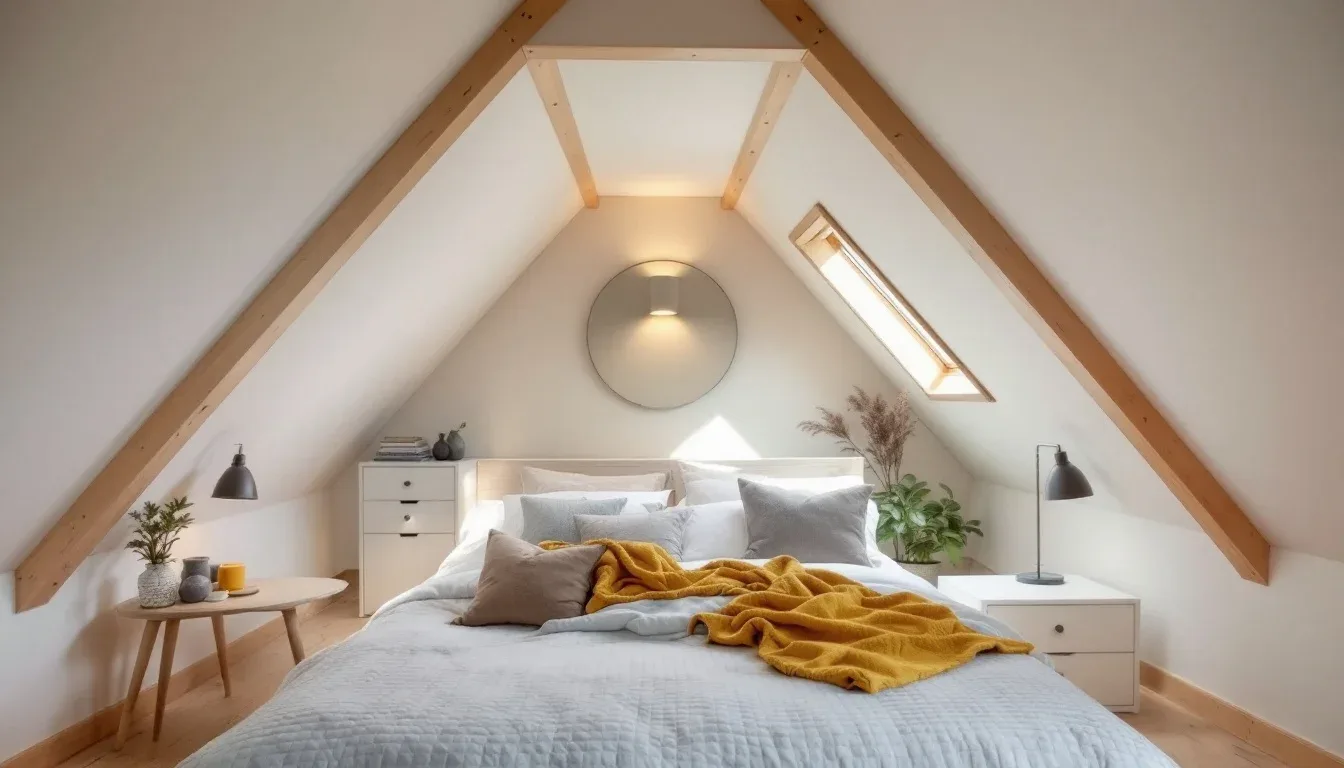
Strategic placement of the sleeping area matters more than most designers admit. Center the bed under the ridge peak — the highest point in the room — and suddenly the most-used area of the space feels airy even if the edges slope to 5 feet. I once worked with a client whose attic peaked at 8’2″ over roughly a 9-foot-wide zone. We placed a full platform bed centered under that peak, and the room photographed like a boutique hotel suite. The knee walls on either side were 4’6″. Nobody cared, because they weren’t standing there.
Those knee walls, incidentally, are prime real estate. Built-in storage, window seat nooks, bookshelves that run the full width of the wall — all of these convert dead space into something people actually pay more for at resale.
When you do need a dormer, the choice between a shed dormer and a doghouse dormer matters more than the aesthetic difference suggests. A shed dormer running the full width of a roof plane can add 300 to 500 square feet of code-compliant headroom on a typical 1,200-square-foot footprint, at a cost of $18,000–$45,000 depending on roofing complexity. A doghouse dormer adds maybe one window of usable headroom — better for light than for floor area.
Actionable takeaway: Before quoting a dormer, hire a structural engineer to evaluate collar tie relocation and assess your ridge height. A $500–$800 engineering consultation might save you $20,000.
Insulation and Ventilation: The Two Systems Designers Never Photograph
Nobody puts the vapor barrier on Instagram. I understand why — it’s not beautiful. But insulation and ventilation are the two systems that determine whether the room is livable in January and July, and getting them wrong is the kind of mistake that shows up 18 months after move-in, right around when you start seeing condensation on the knee wall framing.
Closed-cell spray foam at the roofline is the right answer for most attic bedroom conversions. It creates a conditioned attic assembly — meaning the attic is brought inside the thermal envelope of the house rather than being separated from it. This outperforms batt insulation between rafters in both thermal performance and moisture control, because it eliminates the air gaps where humid interior air can contact cold roof sheathing and condense.
Closed-cell spray foam runs $1.00–$1.50 per board foot installed. A typical attic conversion requires 2,000 to 4,000 board feet depending on rafter depth and total square footage — so budget $2,000 to $6,000 for this line item alone. That’s real money. It’s also the single most consequential material decision in the entire project, and it’s one contractors will sometimes try to value-engineer out of the budget.
The DOE recommends R-49 for attic insulation in most U.S. climate zones. Most renovated attics I’ve seen land at R-20 to R-30 because the rafter depth limits what you can fit between the framing members. Closed-cell spray foam gets you to higher R-values in less depth — another reason it outperforms batt in this specific application.
Vapor barrier placement is climate-zone dependent. In heating-dominated climates, the vapor retarder goes on the warm side — the interior. In mixed or cooling-dominated climates, the answer gets more complicated and genuinely requires an engineer or energy consultant to get right. Installing it backward causes mold. That’s not a maybe.
One thing that catches people off guard: when you convert an attic to conditioned space, you must completely change your ventilation strategy. Ridge vents and soffit vents are designed for unconditioned attics. Once you spray foam the roofline and bring the attic inside the envelope, you no longer want outside air flowing through that space. You need to seal those vents and implement a mechanical ventilation strategy instead.
Actionable takeaway: Specify closed-cell spray foam at the roofline in your contractor scope. If they push back with “batt is fine,” get a second opinion from an energy consultant before signing off.
Light and Airflow Strategies That Make the Space Feel Twice Its Size
Low ceilings are not a death sentence. I’ve been in converted attics that felt genuinely expansive and others that felt like a well-insulated panic room. The difference was almost never the actual square footage. It was light, airflow, and where the eye was drawn.
Skylights are the obvious move, but the choice between fixed and operable matters. Operable roof windows — the Velux-style units most people know — can satisfy IRC egress requirements if properly sized, which makes them one of the most efficient single purchases in an attic bedroom remodel. They provide light, they provide egress, and they provide ventilation. Three problems, one product, one penetration in the roof. Velux data suggests that roof windows and skylights can reduce artificial lighting dependency by up to 30% in converted attic spaces — which has a meaningful impact on energy cost over the room’s lifespan, though I’d verify that figure against your specific climate zone before treating it as gospel.
Tubular skylights are worth knowing about for spaces where a full skylight can’t be cut — maybe there’s a rafter configuration that makes the opening impractical, or you’re above a low-traffic zone where a full unit would be structurally complicated. Tubular units require no structural modification and can deliver genuine daylight through a remarkably small ceiling penetration.
Cross-ventilation matters more in an attic bedroom than in any other room in the house, because heat rises and the attic is where it accumulates. Dormer windows positioned on opposite roof faces — east and west, or north and south depending on your site — create a pressure differential that pulls air through the room. On a mild spring evening, that movement can make a mechanical cooling system feel unnecessary. In August in Chicago, nothing replaces actual HVAC. But in the shoulder seasons, it makes a real difference.
On the design side: matte white or warm off-white on sloped ceilings outperforms dark accent treatments in almost every low-headroom attic room I’ve designed. Dark colors absorb the borrowed light coming through dormers and skylights. Light colors reflect it back into the room, effectively multiplying what little you have. Recessed lighting works better along the knee wall line than at the ridge — positioning fixtures low draws the eye along the horizontal plane and prevents the glare that comes from ceiling fixtures directly overhead in a low space.
Actionable takeaway: Specify at least one operable roof window sized to meet egress requirements. It solves three separate code and comfort problems simultaneously, and it’s one of the few places in this project where a single line item genuinely does multiple jobs.
Permits, Timelines, and What Contractors Will Not Tell You Upfront
Here’s the thing about unpermitted attic conversions: they feel like savings until the moment you try to sell the house. The buyer’s inspector flags it. The lender gets nervous. The title company has questions. And you’re sitting across a table from someone who wants to renegotiate the price or walk, and you’re explaining why you saved $1,200 in permit fees four years ago. I’ve watched this happen. It is not a pleasant afternoon.
Pull the permit. Every time. For every jurisdiction. Without exception.
Permit approval timelines vary wildly — as little as two weeks in smaller municipalities with straightforward review processes, and as long as six months in dense urban markets where attic conversions require structural drawings, energy compliance documentation, and sometimes historic preservation review. The 2024 Joint Center for Housing Studies report noted that permit delays account for an average 11-week project extension on residential attic conversions in metro markets. Factor that into your timeline before you promise the room to a college student coming home in August.
Hire a structural engineer before you hire a general contractor. Not after. Not during. Before. The $500–$1,500 engineering fee is the single highest-ROI expenditure in the planning phase — it tells you what the floor joists can handle, whether collar tie relocation is viable, and what the actual scope of structural work looks like. That information either validates the contractor’s quote or reveals that it was underbuilt. Either way, you need to know.
Realistic timelines by tier:
- Tier 1 (cosmetic finish): 8–16 weeks
- Tier 2 (structural with dormers): 16–28 weeks
- Tier 3 (full gut, dormers, bathroom, stair reconfiguration): 6–12 months
When you get quotes, ask contractors explicitly whether these three things are included in the number: permit fees, dumpster removal, and temporary stair access during construction. These are the three most common exclusions in attic conversion contracts, and they add up — permit fees alone can run $500–$3,000 depending on municipality, and temporary stair rental for a 20-week project isn’t free.
Actionable takeaway: Before issuing any RFP to contractors, call your local building department and ask what’s required for an attic conversion permit in your municipality. That 20-minute phone call will tell you more about your project’s complexity than any contractor’s initial walkthrough.
Design Decisions That Affect Resale — Ranked by ROI
Most people making design decisions in an attic bedroom remodel are thinking about themselves, which is reasonable — they’re going to live there. But if there’s any chance this house sells in the next decade, every significant design decision is also a financial one.
Egress compliance is the non-negotiable baseline. A room without a code-compliant egress window cannot be listed as a bedroom on an MLS listing. It can be “bonus space,” “loft,” or “flex room” — none of which trigger the value premium that a bedroom does. NAR data shows that a legally classified additional bedroom adds an average of $30,000–$50,000 to home value in median U.S. markets, but only if the conversion is permitted and code-compliant. That range makes the cost of the egress window — typically $1,500–$4,500 installed — look like the easiest financial decision in the project.
Closet or built-in storage adds classification credibility. Many jurisdictions require a closet for a room to qualify as a bedroom, and even where they don’t, buyers associate the presence of closet space with bedrooms and the absence with secondary spaces. A built-in wardrobe along a knee wall accomplishes this without consuming floor area at the room’s center.
Flooring matters more than most sellers expect. Carpet in an attic bedroom signals deferred maintenance to buyers, particularly buyers who have dogs, kids, or allergies — which is most buyers. Hardwood or luxury vinyl plank holds up better, photographs better, and doesn’t retain the musty smell that old carpet develops in rooms that aren’t perfectly climate-controlled year-round.
Adding a half bath or en suite shifts the room’s value category entirely. A bedroom with attached bath commands a meaningfully higher premium than a bedroom-only conversion — estimates range from 10–15% additional resale improvement over the bedroom-only figure.
Avoid the design choices that feel bold but narrow the buyer pool. Extreme exposed beam configurations, mural ceilings, or highly specific roofline treatments are the ones I’d flag. A buyer imagines themselves living in the space — and if the space requires a very specific aesthetic tolerance to love, the pool of people who will bid competitively on it shrinks.
Actionable takeaway: Before finalizing any design decision, ask yourself whether it makes the room qualify more clearly as a legal bedroom or less. Every answer that goes in the “less” direction costs you money at resale.
Frequently Asked Questions
How much does it cost to renovate an attic into a bedroom?
The honest answer is: it depends on what you’re starting with, and that’s not a dodge — it’s the most important variable in the project. A Tier 1 cosmetic finish on an attic that already has adequate framing, egress, and floor joist capacity runs $15,000–$35,000. A Tier 2 structural conversion with dormers and HVAC work runs $40,000–$85,000, which is where most projects actually land — Remodeling Magazine’s 2024 Cost vs. Value data puts the national average at $40,000–$50,000. A full Tier 3 gut with bathroom rough-in, stair reconfiguration, and egress installation runs $90,000–$160,000. Know your tier before you budget.
What is the 7 and 7 rule for attics?
It’s shorthand for the ceiling height requirements under IRC Section R305.1. To qualify as habitable space, a room must have at least 7 feet of ceiling height over at least 50% of the finished floor area, and the remaining floor area must have a minimum ceiling height of 5 feet. Any area below 5 feet doesn’t count toward your minimum floor area calculation at all. This rule is why many attics that look “almost there” require dormer additions or collar tie relocation before they can be legally converted — the ridge height looks fine but the 50% threshold doesn’t pencil out once you account for insulation and drywall depth.
What are common attic bedroom problems?
Six specific problems derail the majority of attic conversions mid-build: inadequate floor joist capacity (attic joists are typically built for 10–20 psf storage loads, not the 40 psf required for occupancy), thermal bridging at the roofline, no dedicated HVAC zone, egress window non-compliance, stair code violations that require consuming square footage below, and insufficient electrical panel capacity. NAHB data links structural and mechanical deficiencies to over 60% of permit rejections for attic conversions in urban jurisdictions. Most of these are discoverable before construction starts — with a structural engineer review and a code pre-application meeting with your local building department.
How much does it cost to build an attic bedroom?
“Build” implies starting closer to raw framing, which tends to push projects toward the Tier 2 and Tier 3 range. Figure $40,000 as a realistic floor for a permitted, code-compliant attic bedroom conversion with adequate insulation, proper egress, and permanent stair access. The $15,000 projects you read about online are usually unpermitted, in rural areas with low labor costs, or are leaving out structural and mechanical work that will surface as problems later. Budget for the engineering fee ($500–$1,500), the permit ($500–$3,000 depending on your market), and at minimum a mini-split HVAC unit ($3,000–$7,000) that doesn’t compromise your existing system. Everything else is scope-dependent.
The one thing you can do today — before calling a contractor, before pulling up Pinterest, before measuring for curtains — is spend 30 minutes in your raw attic with a tape measure and a flashlight. Measure the ridge height. Find the line where the ceiling drops to 7 feet and walk its perimeter. Look at the floor joists and note their depth and spacing. Check whether there’s a window, and if so, whether it opens. That 30-minute assessment will tell you more about the real scope and cost of your project than any article, any estimate, or any contractor walkthrough. It also means you walk into every subsequent conversation with actual data instead of hope.