Category: HOME

  • 10 Awesome Ways to Design a Closet for Small Bedrooms

    10 Awesome Ways to Design a Closet for Small Bedrooms

    When you have a small bedroom, your closet is one place that gets cut down in area size. If you deem yourself a fashionista, it can be tricky to work with a small bedroom closet.

    Photo by Anastasia Shuraeva from Pexels

    However, there is no need to be dissatisfied. That’s because there are plenty of hacks that you can do to design a wardrobe that works best even with a small bedroom.

    Here are ten ideas that can get you started making the most out of your small bedroom closet.

    Declutter your space

    Any time you’re interested in designing a small space, it’s best to start by decluttering first, according to Planet Maids House Cleaning NYC.

    For smaller rooms, especially where every bit of space counts, decluttering is a critical step. This ensures that you have as much area to work with when coming up with design ideas.

    Get rid of any clothing pieces that you don’t even wear anymore. An excellent way to figure out which ones to get rid of is to ask yourself if they fit you or if you’ve worn them any time at all for the past year.

    Once you get rid of your unwanted clothing items, you’ll find that you have much more space to work with than you thought before.

    Organize by type

    Photo by Francesco Paggiaro from Pexels

    One way to make your closet design look more stylish and luxurious even with a limited space to work with is by organizing it well.

    Having a system of organization for your closet can help elevate it to the next level. You’ll love looking at it over and over again once you put that system into place.

    That said, a reliable way to organize your items in the closet is by organizing them based on what type of item they are.

    Grouping jackets with jackets or handbags with handbags is a simple system of organizing closet items. However, it will make it easier to find clothing items while also keeping your closet looking clean and nice.

    Store items seasonally

    It would be best to consider changing how your closet items are organized depending on their season. It ensures that you fix and organize your closet on a semi-regular schedule so that disorganization doesn’t slowly creep into the closet.

    Aside from that, it will be more convenient for you to find the clothing pieces that are most appropriate for the weather.

    Remember the floor space

    When you have long-hanging clothes all over the closet, it can make it harder for you to use the floor space in the closet. Instead of hanging these long-hanging clothing pieces all over the place, it might be better to leave them on the other end of the hanging rack.

    Organizing things this way ensures that the shorter hanging clothes will leave enough space on your closet floor for you to use. You can add storage solutions to the floor space of your closet so that you can store more items in it.

    Make use of the doors

    Photo by Castorly Stock from Pexels

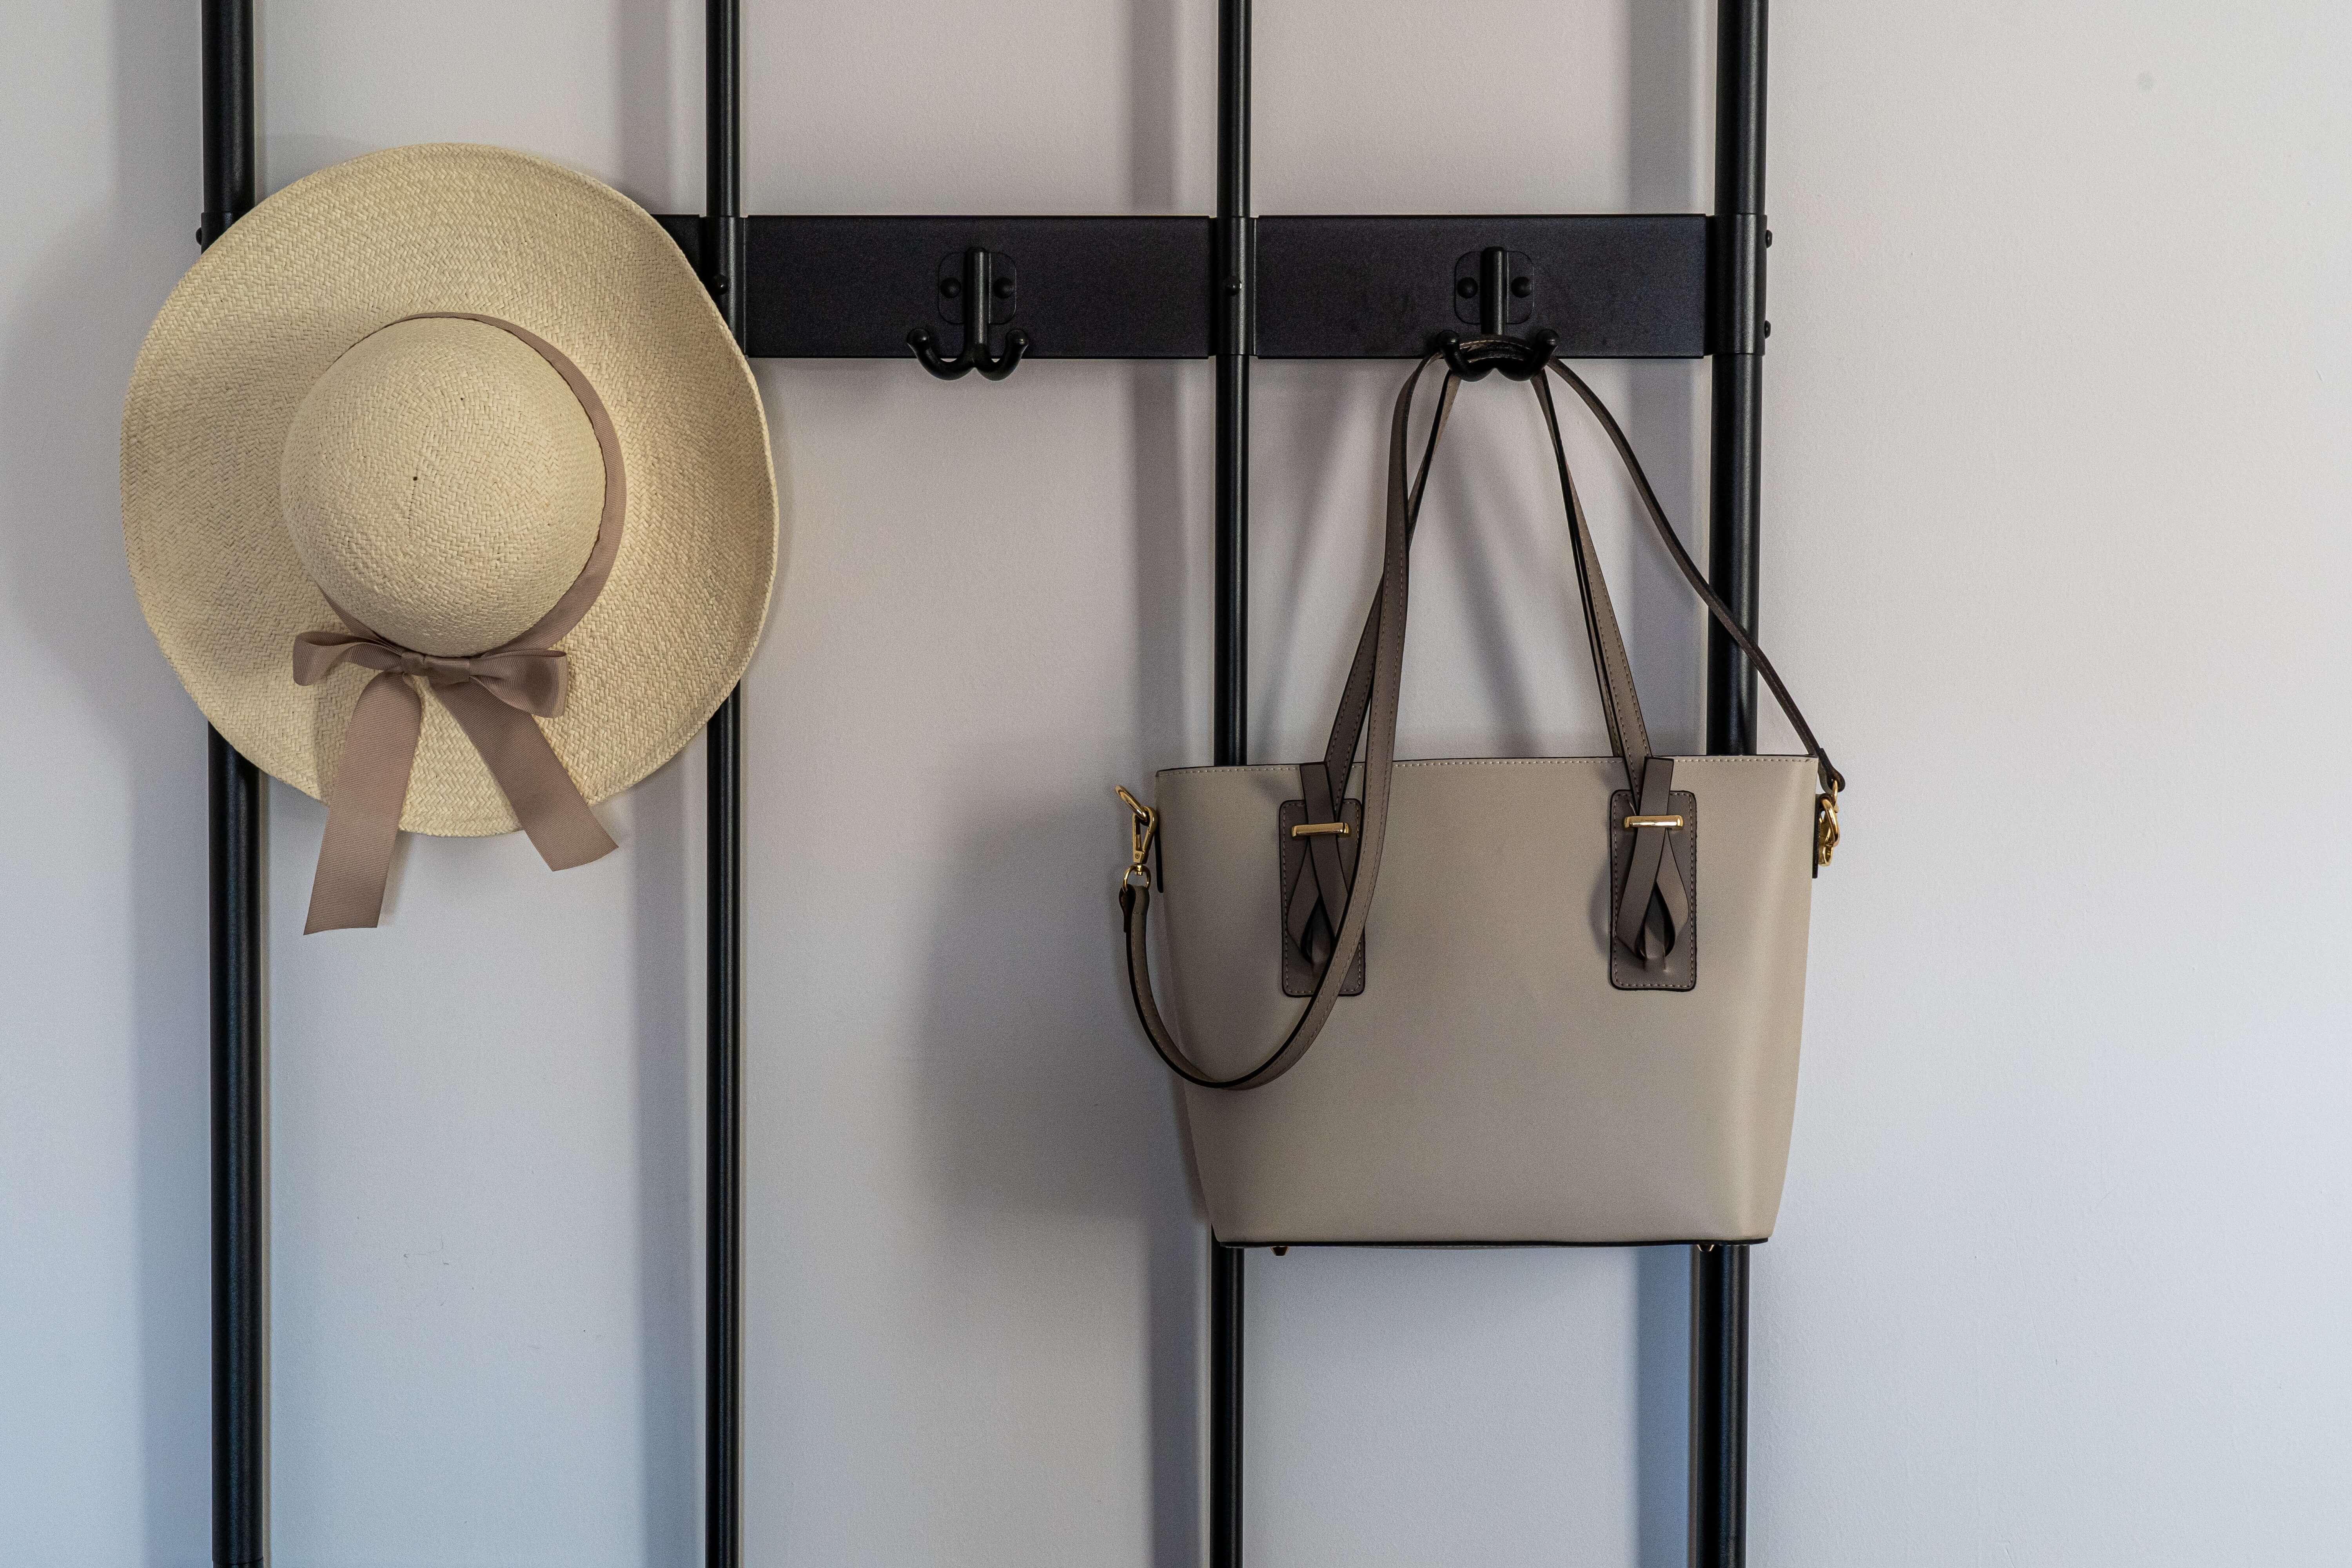
    Your closet doors’ design can contribute to aesthetics and the additional storage space for your closet. Make use of it if you still aren’t, as that is wasted space.

    Instead of opting to hang your clothes, you can instead use that space to install plenty of storage solutions. Preferable for clothing pieces like accessories.

    You can also add hooks or hook racks for hanging things other than clothes. For example, you can use that extra space to hang belts, hats, and scarves.

    When installing hooks or a hook rack, use an adhesive instead of screwing it on or nailing anything to your closet door. That way, you won’t have to damage the outside of your closet door to hang anything on it.

    Utilize modular shelving

    Modular shelving is a great way to ensure as much flexibility as possible in your closet.

    You can use a modular shelving system so that it can adapt to how you want to organize your closet. Plus, the inside of your closet looks more organized when it seems each section or category of items has a dedicated shelf that’s just the right size for it.

    With modular shelving, you ensure that each closet shelf is just right for whatever it holds, so you’re utilizing every area possible in your closet.

    Use matching baskets or bins

    Photo by Pixabay from Pexels

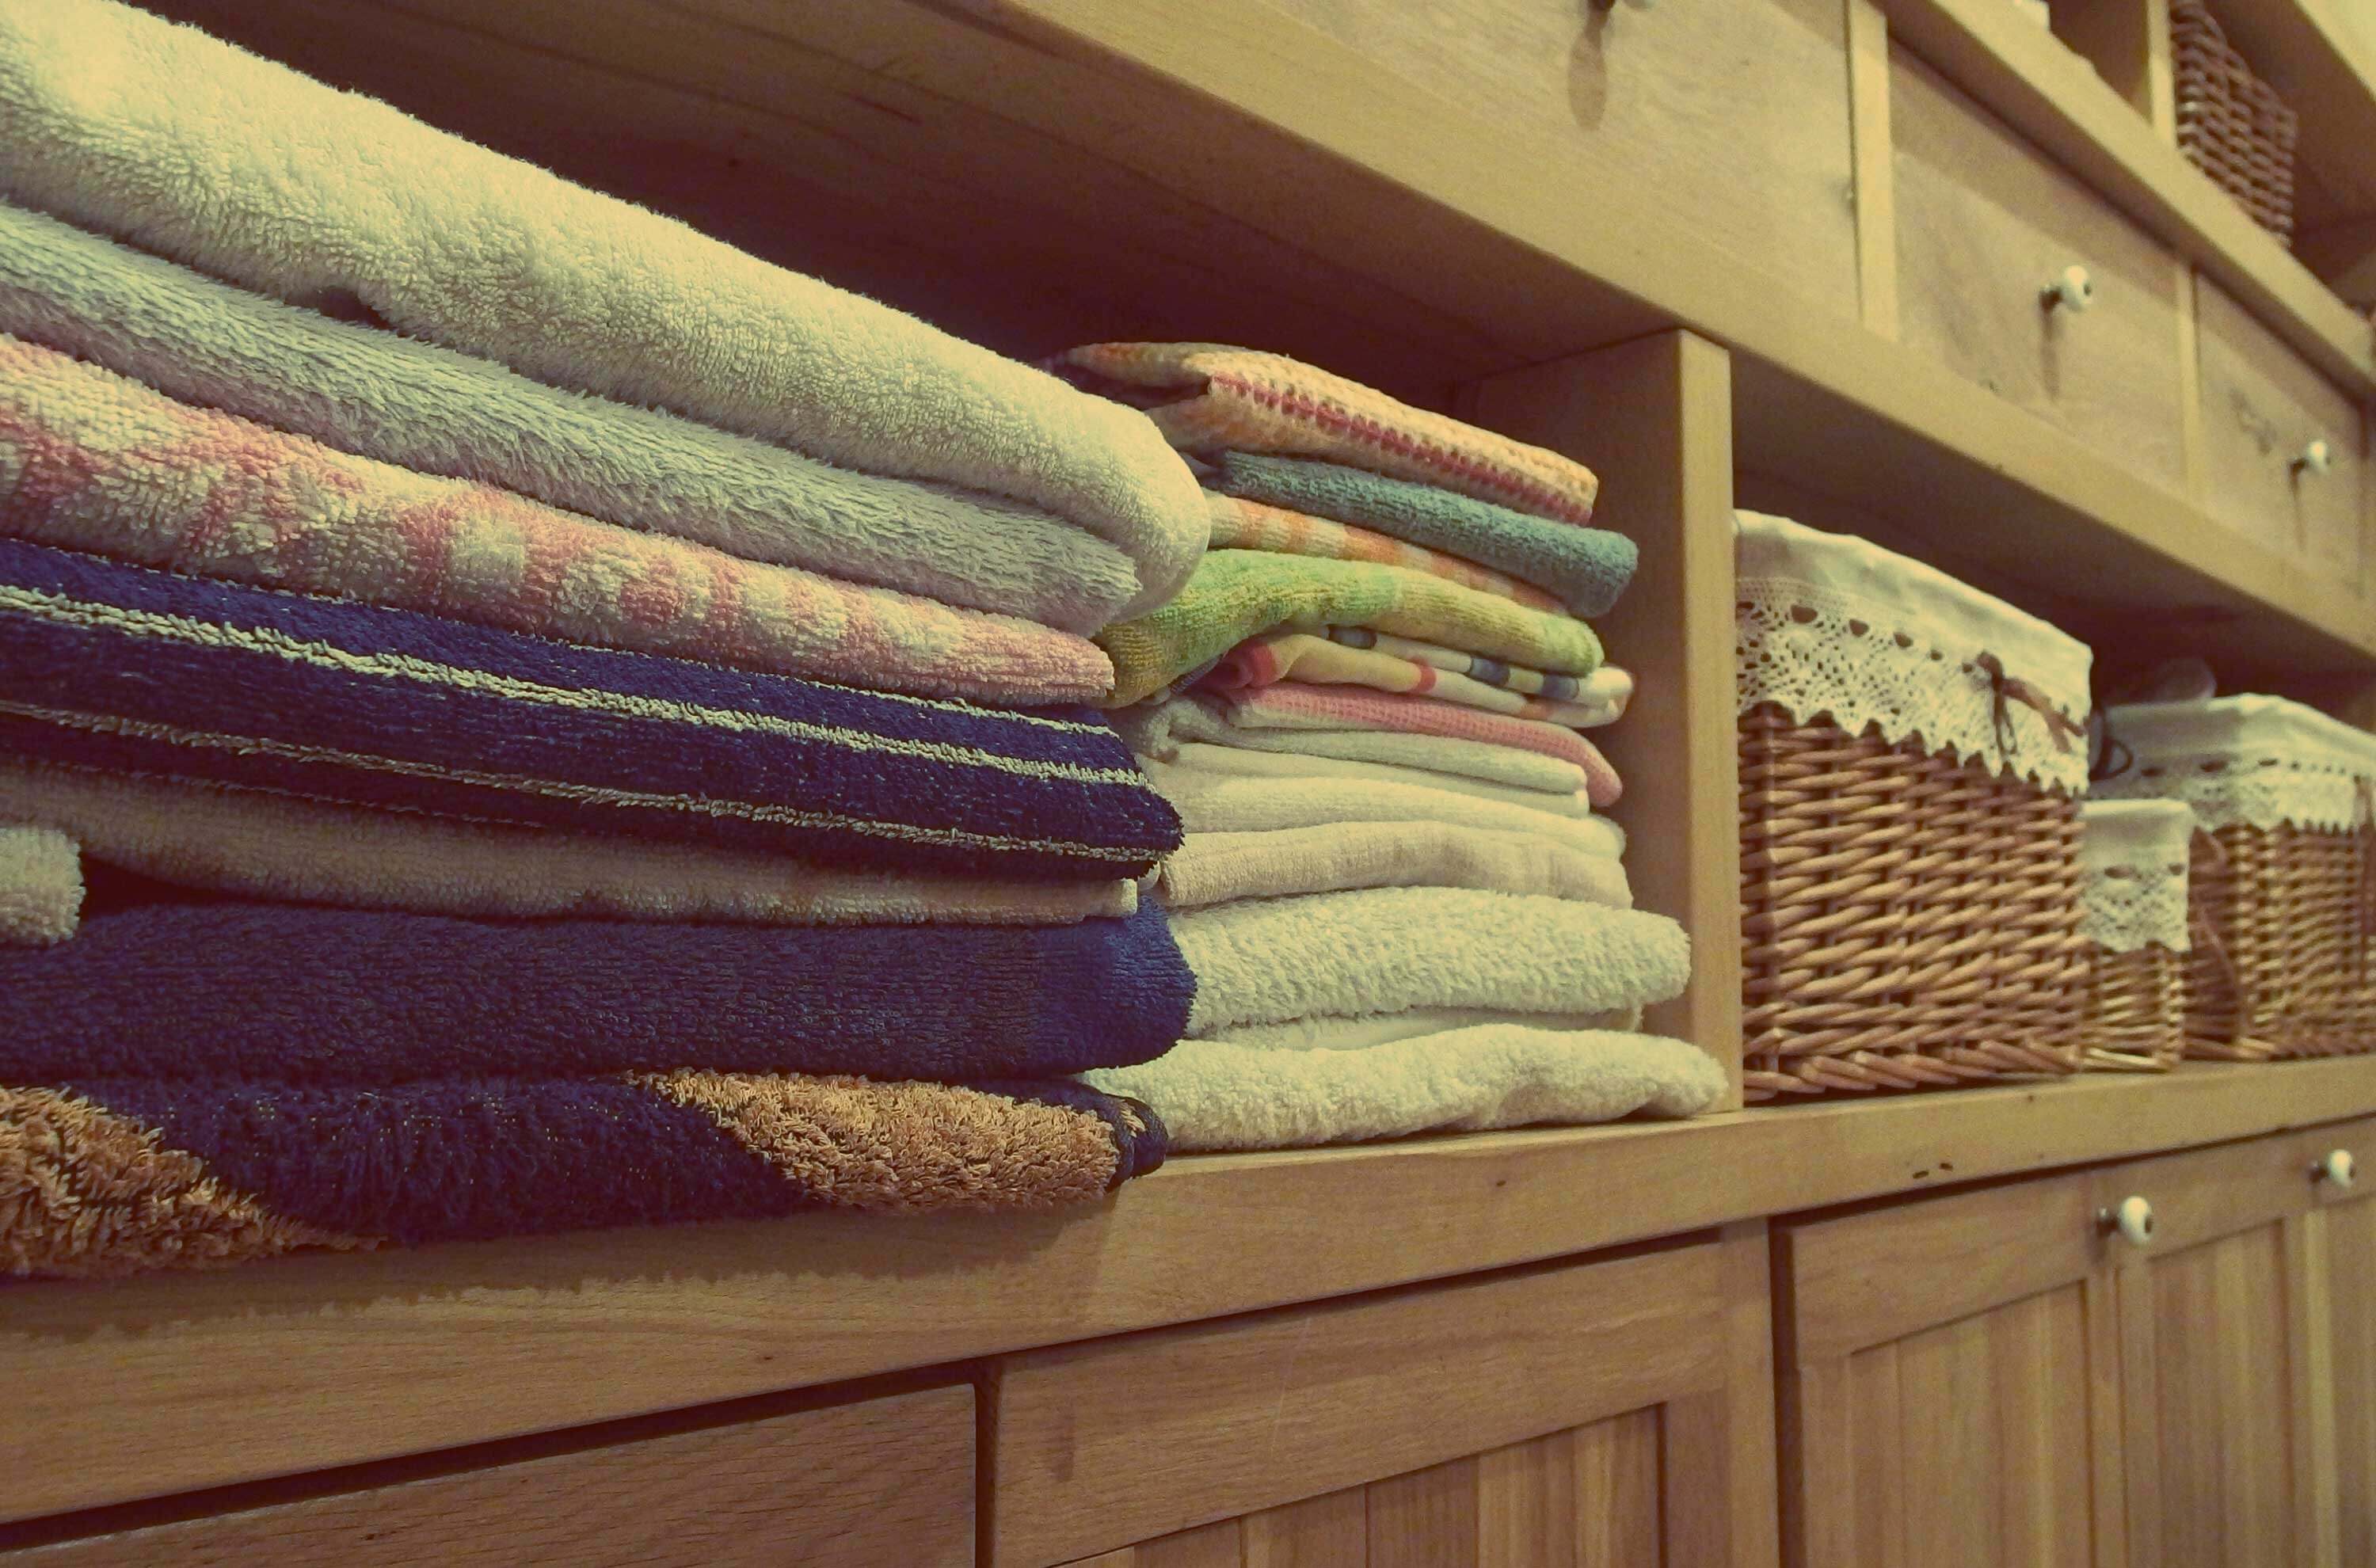
    Adding matching baskets and bins in the closet can help section of each item category in the closet. When your containers match, your clothes look a lot neater, and their consistency in style also makes your wardrobe look stylish and luxurious. It works even if your matching baskets or bins don’t cost that much.

    Add another hanging rod

    Most of the time, a closet space comes with a default single closet rod. Don’t feel like you have to abide by a single hanging rod when you have more clothes that need hanging. Install another hanging rod if you can. That simple addition can help you add more items to hang in your closet and free up shelving space as well.

    Use slim hangers

    Replacing your current hangers with slimmer hangers can make a huge difference in reducing space inside your closet. You may think that this does not have much of an effect, but you’ll see just how much hanging rod space frees up when you have slimmer hangers to use.

    Put your shoes in the corner

    Photo by Martin Adams on Unsplash

    If you have a small reach-in closet, the best place to put your shoes or shoe rack in would be at the corner of the closet. It would be even better if you get yourself a rotating shoe rack or organizer to get the pair of footwear you want quickly.

    These ten ways can help you get a great closet design even if you feel constrained by the size of your bedroom. All of these are adaptable, no matter what your current closet design may be.

    Author Bio

    Jean Deruiter is a brand consultant for Planet Maids House Cleaning NYC and an outdoor enthusiast from the US. She writes about high quality and innovative travel gears, as well as the dos and don’ts of outdoor travelling.

  • LET NATURE DECORATE YOUR WALLS

    LET NATURE DECORATE YOUR WALLS

    The glorious days of summer are coming to an end in the northern hemisphere and the cold wind of autumn is creeping in as the days are slowly getting shorter.

    Photo by form PxHere

    The time spent outside will inexorably decrease and for many of us that can be an effect on our mood. After two long winters spent locked in our homes in a series of lockdowns, the idea of heading back inside can feel a bit gloomy. It doesn’t need to be though; we can take steps to make sure that our home can be turned into a natural haven of serenity.

    Photo by form PxHere

    Using the time before it gets too cold and it gets difficult to keep the windows open to air the room, this is a great moment to get started on a small redecoration project and install beautiful nature patterns on your walls. A botanical wallpaper can do wonders for the mood, transporting you in a wood or summer field full of flowers. Combined with some actual plants and some warm, indirect light, it’s your best bet to fight the winter blues short of flying away to a tropical location.

    A designer, botanical wallpaper allows to completely change the vibe of a space at a fraction of the cost of a full furniture renovation. In this economic climate this can only be a good thing. After years of neglect, wallpapers have seen a resurgence in this last decade as a furnishing tool that is back in vogue for its practicality, its ability to completely change the atmosphere of an environment at a very low cost. 

    Photo by Dorothe form PxHere

    TRENDY BOTANICAL STYLES

    Just take a look at some trendy boutiques or browse some interior design magazines and you will soon notice how trendy and fashionable is the botanical style. This is mainly due to its versatility and the final effect it is able to create. The term ‘botanical’ obviously refers to the word ‘botany’, the scientific term for the study of plants. The world of botany also offers an interesting choice in terms of wallpaper design, with flowers, grasses, branches, vines and leaves creating patterns that are frequently found in high-quality wallpapers based on this theme.

    Botanical design refers to the use of plants and plant elements in interiors. As we mentioned wonderful botanical wallpapers, plant fabrics, green walls and accessories and exposed raw wood are just some of the elements that are part of this popular trend. But where do they come from and how did they become so popular?

    Although we are talking about a very current trend, its history is lost in the mists of time, as the quest to recreate the natural world in interiors has been visited many times in architecture and interiors over the centuries. 

    THE ORIGINS OF A TREND

    Our fascination with plants and flowers is not recent, and we can find testament of it back in ancient Egypt, their decorative style revealing that they too placed great value on everything to do with nature. Courtyards full of greenery or indoor gardens formed the core of wealthy families. Thousands of years later, the papyrus plant, the lotus flower and palm leaves are still popular designs in interior decoration.

    Photo by form PxHere

    Back in Europe gothic architecture placed great emphasis on the use of flowers and plants in decoration. Just think of the rose window, the central point of the Gothic church, which is one of the most memorable floral features in architecture. The decorative explosion brought by the Renaissance, with its creativity and new way of looking at society, provided magnificent frescoes that began by depicting plants and nature in a detail hitherto unknown.

    The opulence of the Baroque and Rococo periods, on the other hand, led to finely decorated and detailed dwellings with floral themes and figures in the foreground in furniture and decorative design. 

    This brief historical excursus serves to demonstrate the perhaps obvious fact, that nature and plants are of great importance to our wellbeing and a visual cue able to trigger associations with our other senses, be a specific scent like a rose or an aromatic herb such as rosemary or mint. The botanical trend appeals to all our senses and blends them together in a wonderful way.

  • Vaping Hacks: Every Vaper Must Know the Tricks

    Vaping Hacks: Every Vaper Must Know the Tricks

    No one wants to invest in a vape to enjoy a fantastic evening while vaping and end up with a dull experience. Come on; you want it to be fun and memorable every time you get your vape.

    Photo by Eduardo Lempo from Pexels

    But how can you have such an experience if you don’t know the tricks of the game? Don’t worry now; you have come to the right place as this article will be showing you some of the most amazing tricks every cool vaper should know. 

    Photo by Nicolas Soriano from Pexels

    As a vaper, you also have a personality trait common with many other vapers, which is why you are reading this article. You are curious and seeking ways to get the enormous clouds from your vape. Here are some hacks that will thrill you as you vape: 

    Blowing the Os

    A classic hack never goes out of style, and that is why Blowing Os has remained evergreen. You will need some practice time, but it is worth it, especially when you showcase it before your friends. 

    Take a long drag and keep it trapped in your throat, then place your tongue at the bottom part of your mouth while pushing the back of it into your throat. As long as your replacement vape coil is strong to handle this, you are good.

    THE “O” will appear, and you can position your lips to perfect the shape. Then push the vapor through your lips like a quick push (it will seem like you are coughing). Remember that the push needs to be quick to achieve the “O.” A truly remarkable and classic hack. 

    The French Inhale

    French Inhale is as simple as the typical French man. Take a drag and allow the smoke to remain in your mouth. Then open your mouth so the smoke freely flows out, but you wouldn’t be exhaling. As it flows, inhale with your nose and get that spicy and fun French Inhale. 

    The Waterfall style 

    This is a fancy hack, and you will need a water bottle containing frozen water at the bottom (yes, I know you wonder what’s with the props, but hold on and find out). Then take a drag and exhale the vapor into the water bottle. The water in the bottle will make it possible for the smoke to become thicker, and you can pour it out from the bottle, just like a waterfall. 

    Photo by ayoub oualmouche from Pexel

    A Vape Bubble

    For this fun hack, you will need some items: a tube (anyone will do), soap, water, and a homemade bubble wand. Get a long drag in and hold your bubble wand close, then blow. The vapor will get into the bubble, looking relaxed and making you feel like Harry Potter and his magic wand. 

    Bull Ring 

    The Bull ring is for the vaper who is curious about trying daring tricks. Are you ready? This trick will be like getting a septum piercing, but this time without any pain. To achieve the Bull ring, you must first perfect your O’s. 

    Blow a medium-sized ring and lean towards it while inhaling with your nostrils. By doing this, you will suck the ring towards your nose, making it appear like a bull ring. Again, you need to practice your timing and position your lips: trying in front of the mirror will be very helpful. 

    Photo by Alcini Widiasta from Pexels

    The Jellyfish hack

    Okay, this is a doozy hack you will love even though it is not easy. It may be hard at first, but when you get it right, you will love it! So, this trick enables you to create a vapor jellyfish that swims through the air. You will have to release O’s to achieve this and get a good hang of the clouds. 

    You can achieve this by getting a long drag and releasing the large and thick O ring. After getting the ring, immediately take another hit and breathe out the vapor within seconds through the center of the ring. At this stage, the smoke will be pushed out and can flow like a jellyfish. 

    The Rubber Band Tricks 

    Sometimes bits get stuck, and things can get stuck, especially if you are using a vape at varying times of the day. If the vape tank is wedged in the mod or the tank gets stuck together, don’t panic! If you are home, you can get a plier and gently bring your vape back. 

    But assuming you are not home and need to use your vape in such a situation, here is what you can do. Get some thick rubber bands, then wrap one of the bands (maybe two pieces). By doing this, you will get enough hold and pull to use your vape again.  

    Photo by Dede Avez from Pexels

    Conclusion

    When you vape as a beginner, it feels like you know it all, and it has a very incredible experience. But remember that the level of fun you can have with your cannabis and vape increases with every new trick you learn. Make it a habit of unraveling fun vape hacks so you don’t get used to the same boring routine. 

    Vaping is just too much of a fun substance for any user to stick to one routine. More so, the flavors and exhilarating feeling you get with each new hack take your vaping experience to another Dimension.

  • 5 Things to Look For When Buying a House

    5 Things to Look For When Buying a House

    If you’re looking to buy a house, you probably know that a home is more than just four walls, a floor, and a ceiling. There are multiple other factors such as the exterior siding, indoor plumbing, or electricity that could make or break your decision to buy.

    However, you might not be too sure exactly what you need to be on the lookout for when touring a house. Take a look through these top five considerations, so you’re prepared for your next showing. 

    Consider Location

    You probably already have a good idea as to what areas you could potentially see yourself living in. It could be based on your job, the familiarity of your hometown, or proximity to a downtown neighborhood near the city. When buying a house, the location also involves taking a look at a few other factors that could impact your long-term goals.

    Photo by form PxHere

    For instance, starting a family might be in the near future for you. This means you will want to find out about the quality of the school districts in the area. Perhaps you want to be more involved in the community or are uncertain about the safety of the neighborhoods you are investigating. 

    Since a house is something you will live in for multiple years, you’ll want to think about how your lifestyle and long-term goals will be impacted by the location, aside from just your immediate needs or desires. Make a list of what your goals are for the next five to ten years. Then ask yourself how the location could impact these goals so you’ll know the right questions to ask.

    Check the Exterior of the House

    When you’re looking at potentially buying a house, don’t just think about how the interior looks. Do a thorough look around the exterior of the house as well. This includes any damage or deterioration that might require hiring a professional for roof repair. While this is not necessarily a deterring thing, it’s important to factor in the extra cost of the roof repair into your home loan.

    If you aren’t certain of the exact things to look for on the exterior of the house, don’t worry. You will be able to do a home inspection if you decide to potentially purchase the house. That way, you will have a professional do a full overview of the house to find out what might be wrong with it in its current condition or if the previous homeowner needs to make any additional repairs before selling the house to you.

    Photo by form PxHere

    Heating and Cooling Systems

    There are different types of heating and cooling systems that certain homes might have. You’ll want to make sure that you ask the current homeowner what type of systems are set up. Most of the time, it could vary based upon the age of the house.

    Heating, for instance, could be through an electric or gas-powered furnace. If the house is older, it could potentially use a boiler or radiator. Cooling systems are a bit different. 

    Many older homes use air conditioning units that are either placed within the wall or are put in the window of an individual room. More modern homes have central air conditioning, which distributes the cool air evenly throughout the house.

    If the house doesn’t have specifically what you are looking for, you’ll want to note those extra expenses into your budget for any renovations. Remember, these types of upgrades aren’t usually something the previous homeowners are willing to make before the sale of the house.

    Look At Extra Space

    Whether you are downsizing or upgrading, it’s important to have enough space for all of your belongings, for any hobbies you might have, or for your business needs. See if there is a garage or a detached garage. This could be used to store your vehicles or to act as your shop for your woodworking business.

    Does the home offer a basement or attic for extra storage? Perhaps there is a shed or barn in the backyard on a large plot of land that could be for storing your kayaks or landscaping equipment. 

    Photo by form PxHere

    Think Long Term

    Of course, you’ll look through the standard interior rooms of the house such as the bedroom and bathroom. But what other non-negotiables do you have for the long-term?

    Do you plan on having family gatherings at your home? Maybe a larger kitchen with an island is necessary. Do you work from home or own your own business? Having an extra room that could act as a home office might be essential. Do you intend on having children in the future or multiple guests coming to visit? A spare bedroom for visitors or a future nursery might be exactly what you need.

    Whether it’s your first time or your fifth time buying, there is a lot on your plate when looking for a new house. If you start getting overwhelmed, take a breath and make a list that you can bring with you to every one of your showings. 

    That way, you can make sure you aren’t skipping any essentials during each of your visits. And lastly, don’t forget to have fun during the process.

  • How Can You Eliminate Fruit Stains From Your Rugs & Carpets?

    How Can You Eliminate Fruit Stains From Your Rugs & Carpets?

    Drinking fruit juices can prove to be delicious and healthy for your human body, but when it comes to your rugs & carpets, they can be hazardous.

    Photo by Inside Weather on Unsplash

    In case you’ve accidentally stained your carpet or rug with fruit juice, then you have to seriously treat the stains as fast as you can because the longer you decide to wait, the faster the fruit juice molecules will get ingrained into the fibres of your carpets & rugs. As a result, it will get more challenging to clean your rugs & carpets.

    Unless you want the aforementioned scenario to take place, it’s always a better choice to take the necessary steps beforehand, so that you can eliminate the stains as fast as you can. Therefore, in this comprehensive blog post, we’ll be taking a deeper look into the ways through which you can efficiently remove fruit stains from your carpets & rugs. 

    Photo by Spacejoy on Unsplash

    Procedure To Eliminate Fruit Juice Stains From Your Rugs & Carpets

    Eliminating The Excess Fruit Juice

    1. According to a professional service provider for carpet cleaning in Hamilton, the first step that you need to take is to use a paper towel for the blotting task. You need to start the blotting process as soon as you notice the fruit juice spill on your carpet or rug. All you need to do is simply press your paper towel over the affected area of your carpet or rug. 

    The paper towel will absorb the excess juice. Continue with the blotting process using a new paper towel until and unless you see no fruit juice on your paper towel. 

    You can also use a white cloth instead of a paper towel. Moreover, in case the amount of spilt juice is more, then we suggest using a wet vacuum before blotting. 

    1. Once you’re done with the blotting process, it’s time to spray the affected area with simple, cold water. Use small amounts of water to simply moisten the area. Make sure that you use distilled or packaged water to avoid further staining due to water impurities. 
    Photo by Julien Lanoy on Unsplash
    1. After moistening the area with distilled water, you have to use fresh paper towels to again blot the area. 

    Stain Treatment

    1. To start the treatment process, you have to first create a cleaning solution for the same. For the cleaning solution, you need to mix one tablespoon of dishwashing liquid along with two cups of warm water. The dishwashing liquid should have no bleach. 
    1. Once you’ve created the perfect cleaning solution, it’s time to apply the same to the stained area and start blotting with a paper towel. You can use a white sponge for the blotting process as well. Continue blotting until the excess cleaning solution has been eliminated. 
    1. Since you’ll not be able to remove the fruit stains with just a single application of the cleaning solution, continue with the process until the fruit juice stain has been removed. The number of applications will depend on the type of juice as well as the overall time for which the juice stain has been set into the carpet or rug fibres.
    Photo by Trend on Unsplash
    1. When you notice that the fruit juice stain has been removed, it’s time to eliminate any excess cleaning solution mixture still lingering inside the fibres of the rug or carpet. Thus, proceed to spray some water over the affected area and then blot the same using a clean paper towel. Repeat the process until you’re satisfied with the results.
    1. Finally, it’s time to cover the affected area with some new paper towels, so that any additional moisture gets absorbed into the same. Furthermore, it will also help the stained area to dry faster. 

    Pro Tip:For stubborn fruit juice stains, you can use a very small amount of hydrogen peroxide on the affected area.

  • Soapstone Countertops: Everything You Need To Know

    Soapstone Countertops: Everything You Need To Know

    Soapstone is a popular option for those looking to create a durable and stylish surface to match their home’s modern aesthetic. Soapstone slabs have a velvety, smooth texture, similar to a dry bar of soap, thanks to the talc component. This also makes it softer than other natural stone countertop selections. 

    This article will provide you with all the information you need about soapstone countertops to help make your decision easier. If you are looking for soapstone countertops for your kitchen, you can get more information at https://www.caesarstone.ca/blog/pros-and-cons-of-soapstone-countertops/.

    Photo by Joe Ciciarelli on Unsplash

    What Is Soapstone and How Does It Work?

    Soapstone, unlike much other natural stone, is often found in grey, green, or black, with little  visible veining or visible subtle shading. You can also find them in color variations such as light rose to deep charcoal.

    Soapstone’s basic and understated appearance performs well in classic country kitchens, where it has been used for generations. They go well even with a clean, contemporary diner with steel appliances.

    On the other hand, manufactured soapstone countertops have a hardness comparable to marble and can even be tougher due to the addition of quartz.

    What Are the Best Features of Soapstone Countertops?

    There are many benefits of buying soapstone countertops, and the best features include:

    Countertops Made of Soapstone Are Long-Lasting

    Soapstone is solid, waterproof, and heat-resistant, which are all desirable attributes in a countertop. However, soapstone is easier to carve and shape due to its high talc concentration.

    As a result, you’ll be able to carve your design features into your countertop. Integrated drainage channels adjacent to the sink for speedy dish drying, soap holders, and little depressions that can be used as pinch bowls, are just a few examples of customizations you can go for.

    Photo by Collov Home Design on Unsplash

    Simple To Form And Shape

    Soapstone can develop nicks and scratches due to its natural softness, which is part of its natural beauty. If you prefer a smooth surface, ensure to use kitchen utensils when preparing meals and sandpaper off any flaws using soft sandpaper.

    Countertops Made of Soapstone Are Low-Maintenance

    Soapstone does not require much sealing for stain protection since it is not as porous as marble. You can seal it every 3-4 years for color preservation. Being pH-neutral, you don’t have to worry about applying pH-neutral cleaners on soapstone.

    Acidic spills like wine and alcohol will also damage soapstone less than granite or marble. It only requires a simple wipe-down with food-safe mineral oil after installation rather than sealing.

    This darkens the rock and gives an attractive gloss (natural stone darkens gradually with time). If the countertop becomes dull, mineral oil will restore it to factory condition.

    Photo by Sidekix Media on Unsplash

    Heat Resistant 

    Soapstone is also heat resistant, allowing hot pans to be correctly placed on the surface without damaging the countertop. While you should still use trivets to protect the counter from nicks and damages, this might be beneficial if you need to take hot food off a crowded burner quickly.

    Some Things to Keep in Mind Before Purchasing

    There are few things to keep in mind before purchasing soapstone countertops.

    Mineral Oil Must Be Used to Seal

    Although soapstone is a dense natural stone, it is permeable and will discolor if not sealed every 3-4 years. To avoid stains and other sorts of damage, all natural-stone surfaces should be sealed accordingly.

    Soapstone, on the other hand, is one-of-a-kind, necessitating heavy coats of mineral oil once every 6 months.

    Evaluating Difficulty

    Examining soapstone samples from your local countertop store will help you obtain a better understanding of the material. Scratching soapstone samples can produce some fascinating outcomes. Some people scratch with their fingernails, while others scratch with a pocketknife.

    The hardness of a single stone will vary depending on its talc concentration, with even a single stone displaying varied hardness in different regions.

    Photo by Sidekix Media on Unsplash

    Resistant to Acid

    Soapstone is highly resistant to stains and acid damage. Its texture is very smooth with density which makes it resistant to acids and alkalis. It may also contain calcite veins and magnesite on some occasions, which keeps it resistant to acid.

    What Is the Best Way to Choose Soapstone?

    Soapstone colors vary from soft white to light grey to deep charcoal, depending on the area where it’s mined, with most forms having delicate veining. Some have touches of pearl, turquoise, or emerald, although whites and greys are the most common.

    Remember that soapstone tends to darken over time: a light grey countertop will eventually deepen to richer grey, and a dark grey countertop will darken to practically black. 

    And, because soapstone slabs are natural items, no two will be exactly alike, so expect some variation between linked slabs.

    Cleaning Soapstone Countertops 

    You can clean soapstone with mineral oil by applying it gently. After the mineral oil treatment, you can clean your soapstone with any home cleaning. Typically, simply wiping the soapstone with soap and water suffices. 

    Any basic cleanser will not harm a soapstone counter. When necessary, a small vegetable brush can be used to keep sink corners clean.

    Photo by Sidekix Media on Unsplash

    Soapstone Countertops Price

    Most soapstone countertops are priced differently based on the source, grade, depth, style, and size. Installation can add another $65 per square foot to the cost, bringing the total to between $95 and $150 for each square foot for properly installed soapstone countertops.

    Custom add-ons like grooved drainage boards and sophisticated edge profiles, as well as thicker slabs, will increase the final cost.

    Endnote

    Soapstone’s beauty has fascinated artists for centuries. Its endurance and convenience make it suitable for countertops in a wide range of applications, from household kitchens to science labs.

    If you’re buying soapstone for your home, make sure you get structural quality soapstone, which is ideal for kitchen and bathroom countertops. Its natural beauty makes it ideal for modern and unconventional homes. Thus, if you are pondering upon the decision, it is best to talk to an expert who can guide you.

  • Tips for Choosing Between Body Wave Hair and Deep Wave Hair.

    Tips for Choosing Between Body Wave Hair and Deep Wave Hair.

    Human hair bundles are coming in unending variances to meet the ever-growing hair extension needs among women. If you ask them, they will tell you that they only want to purchase fashionable hair bundles. No woman wants to buy a hair bundle that isn’t trendy. If you have to move with the current hair trends, you will need to consider human hair extensions. Though they could a bit expensive, they will ultimately give you a natural look and value to your beauty.

    Assume a case where someone is suffering from hair loss or a backing hairline. This is so frustrating and requires an immediate solution. Your confidence and self-esteem are paramount to your success and greatly affect your productivity. Purchasing a few bundles of human hair is a brilliant way of hiding your weakness.

    According to Fortune Business Insights™, The global hair care market is projected to grow from $77.15 billion in 2021 to $112.97 billion in 2028 at a CAGR of 5.6% in forecast period, 2021-2028

    Photo by Helena Ije from Pexels

    Buying a perfect hairpiece will see you attaining a natural look within minutes. Otherwise, this might take years if you decide to grow your natural hair. The worst is when your natural hair is scanty because it won’t grow voluminous however how long you grow it.

    That being said, we also recognize that some women find it challenging to decide on the hair to buy. This is due to the high supply of different types of wigs in the market. You are luckier if you only want to achieve a longer hairstyle. I mean when you are only considering a single factor when buying your wig. For example, you can pick any long wig that’s within your budget and take it home. But the selection process becomes more complex when you have to consider several aspects of the wig you want. This adds up to the existing stress you had due to baldness or poor hairline.

    Photo by Keenan Constance from Pexels

    Deep Wave Hair vs Body Wave Hair.

    For many years, millions of women have claimed that they don’t understand the difference between body wave hair and deep wave hair. If it’s your first time buying a wig, I’m sure it might be challenging to settle on one between the two. Though both hair types are made from 100% human hair they are still distinguishable.

    The first thing to note in these hairpieces is that their curl patterns are different. In addition to the curl pattern, each hair type comes with other variations to suit different users.

    In this article, we have detailed some facts about each hair type to make it easier for you to decide the one to buy. Categorically, the article will enlighten you on the similarities and differences between deep wave hair and body wave hair extensions. You’ll also have a few pros and cons as well as the distinguishing features of these curl patterns. However, I will advise that it’s good to decide whether you want to buy Brazilian, Malaysian, Peruvian, Indian, or any other human hair before moving to the curl pattern.

    Photo by Designecologist from Pexels
    1. Deep Wave Hair.

    This hair is nothing different from what the name suggests. The hair bundles are designed in a deep wave curl pattern. Deep wave hair is a bit distinct from most wavy or curly hair. It’s the curliest wavy human hair available in the market today. But don’t confuse it with kinky or jerry curly hair types. Those are undoubtedly curlier but we are only factoring in wavy hair bundles.

    Deep wave hair has a uniquely deep and pronounced curl pattern that requires a lot of maintenance to hold the sophisticated curls longer. With a very busy lifestyle, this hair isn’t right for you. You will need time to take it to a hairdresser for special treatment. This means that you must have the cash to buy the required products and pay the salon attendant. If you consider you feel this is too much for you, it’s better to pick another wig that will serve you longer. With proper care and maintenance, this hair holds the curls quite fine.

    It is the best hair type for women and girls who are less occupied and spend most of their time indoors. Don’t forget that maintenance isn’t negligible.

    Photo by Maksim Goncharenok from Pexels
    1. Body Wave Hair.

    Hoping you have a clear picture of the deep wave hair, we need to also look at the body wave hair. This one is more or less the opposite of our first hair. These bundles are the least curly hairpieces among the wavy hair bundles. It’s only curlier than straight hair. The stunning curl pattern on this hair is “S” shaped.

    With a body wave hair weave, you will forget the tens of maintenance products needed for deep wave hair. It is easy to maintain which makes it convenient for beginners. Body wave hair is naturally shiny and flows like your natural hair, especially for the long strands. Body wave hair wigs are the best hairpieces you can purchase if you want to have this hair on your head. Of course, it’s a little bit fuller and fluffier than straight hair or natural hair.

    Unfortunately, body wave hair has poor curl retention. At the same time, attaining such curls will only need your fingers and it’s done. This means that you can install and maintain the wig by yourself. It’s not the right hair for you if you want a wig that holds the curls for several weeks. Sadly, it will be similar to straight hair if you don’t plan on how to get back the curls.

    Photo by Kseniya Mazaeva from Pexels

    Conclusion.

    Identifying the right hair to buy is simple but turns tricky sometimes. We hope that this article will help you decide between deep wave hair and body wave hair. It’s upon you to decide what you believe will make you confident enough. If you want a luxurious hairpiece, go for deep wave hair wigs but you will spend a lot on their maintenance. Those who love simplicity should stick to body wave hair.

    It’s time to get out and become that women you’ve always dreamt of becoming. With the right hair, you will have all the reasons to walk with your ‘head high’ and be noted for the beauty and not for a hair extension. Either of these hair types will give you a natural look with proper installation.

  • Little Known Staging Tips That Help Homes Sell For Higher rates

    Little Known Staging Tips That Help Homes Sell For Higher rates

    Can you imagine that a clean doormat or furniture that is spaced properly can make a difference to the selling price of a home?  Well, they do! 

    Photo by Max Vakhtbovych from Pexels

    First impressions are important and make an immediate impact on the viewer, as many professionals in the field, like the estate agents in Blackheath will concur.  Staging is a form of visual marketing that attracts customers.  As Gordon Roberts, one of the brokers at Sotheby’s International Realty mentioned, “The object of staging is to flatter the property but not be too obvious about it, like being dressed without drawing particular attention to what you’re wearing.”

    Staging a home can be a lucrative way of raising the price of a home.  However, as experts like the estate agents in Beckenham will advise, it also entails disengaging emotionally from the home and looking at it through the critical eyes of a viewer, noticing the pros and cons, and then working on the negative points to make them positive. 

    Photo by RODNAE Productions from Pexels

    A few staging tips are given below, which can help increase the sale price of a home.

    Kerb appeal:  One of the most important, but less thought of, factors is making the first view of your home appealing.  Cleanliness makes the difference.  The windows should be thoroughly cleaned and the garden, too.  Nothing can put off a prospective buyer more than an unkempt garden or untidy outdoor space.  A sturdy, neat front door with matching door knobs can offer security and at the same time be alluring to the buyer.   If there is room for storage of the garbage bins, that will help too as wheelie bins can add to an untidy outlook.  Most folk enjoy having lush gardens, so if there is no place for soil plants, perhaps window boxes with bright, welcoming flowers could add to the ambience.

    Declutter:  The home should be as empty as possible for the viewers to have a futuristic idea of how they can see themselves living there.  All personal items and mementos (like photographs, fridge magnets and keepsakes) should be removed.  Clothes and toys should not be left lying around.  Bathroom counters should be kept bare except for hand soap.  

    Photo by Alexandr Podvalny from Pexels

    Repairs and maintenance:   Sellers should ensure that all repairs are carried out, so that every fixture is working in tip top condition.  Any damaged window panes need to be replaced.  Damp patches or small cracks in the plaster on walls or ceiling need to be fixed before a home is put on the market.  

    Painting:  If your home hasn’t been painted recently, a new coat of paint can work wonders.  The sight of shabby walls can be off putting.   Even though you may love bright colours, for prospective buyers a neutral colour would be best, as they can then add their own touch of favourites to the base, if required.  If painting is not possible, then a power wash could help attain almost the same benefit.

    Furniture and space:   What most prospective buyers will look for is the amount of space available, to help them assess how it can be maximised.  It is important for them to see that every nook and cranny is usable.  An attic could become an office or a finished basement and an entertainment room.  The idea is to make the home look as spacious as possible.  It is amazing how additional space can be created by either removing a few pieces of “additional” furniture or just by moving the furniture around.  Placing furniture away from walls can also make the room look bigger.

    Lighting:   One of the perks when selling a home is for it to have good lighting.  Natural light is the best, so curtains should be drawn and blinds raised.  However, if natural light is not readily available, then artificial lighting can be arranged to make your home look brighter and more inviting.  Just dusting the bulbs and keeping the lights on will allow more light.  If there is a dark corner, perhaps a lamp on a bookshelf or table in that area will make it less dim.  A mix of high, mid and low-level lighting can add to the atmosphere and homeliness of the place.  Brighter lights are required in the hallways and kitchen, while lower voltage bulbs will do for the living room and bedrooms, making them cosier.  

    Photo by Max Vakhtbovych from Pexels

    Prospective buyers:  However, before proceeding with the above staging tips, it is wise to assess who would be interested in buying your home. Having an idea of which age bracket they fall into would be helpful – whether the younger generation, families or retired people.  By having a rough idea, you can carry out the staging tips accordingly.  If your home is open to buyers from all categories, then a general staging can be carried out.

    Conclusion:  There is no doubt that staging a house for presentation to prospective buyers can add to the selling price of the property.   Depending on the budget, professional cleaners and advisors could be called in, to see to the cleaning and rearrangement of furniture and other fittings to provide the maximum benefit.  If it is unfeasible, then by just following the above tips, a seller can stage the home to bring in the best price!