The curtains cost $40 — but the room looks like it belongs in Architectural Digest, and the only thing that changed was where the rod was mounted. That’s the secret behind every DIY curtains to make home look expensive project worth following: the fabric isn’t the point. The installation is.
Quick Answer
The curtains cost $40 — but the room looks like it belongs in Architectural Digest, and the only thing that changed was where the rod was mounted.
That‘s not a fluke. It’s physics, proportion, and a handful of decisions most people get wrong because nobody explains the reasoning behind the rules. The fabric isn’t what makes curtains look expensive. The installation is. A $20 panel hung correctly will always outperform a $100 panel hung wrong — every time, in every room.
Three things control whether your curtains read as custom or clearance: proportion, fabric weight, and hardware. Get those three elements right and the budget becomes almost irrelevant. Get them wrong and even silk panels will look sad.
Research on visual perception confirms what designers have known for decades — vertical lines draw the eye upward, creating a measurable increase in perceived ceiling height without touching a single structural element. Your curtains are vertical lines. Where you start and end them determines whether your room feels like a loft or a basement storage unit.
This guide covers everything from the exact rod placement measurements designers use to hardware swaps that cost less than a pizza, to the specific DIY techniques that replicate what custom drapery workrooms charge hundreds of dollars for. You’ll walk away knowing not just what to do, but why it works — which means you can apply it to any window in any room rather than following rules you don’t understand.
How Do You Make Curtains Look Expensive Without Spending a Fortune?
In This Article
- How Do You Make Curtains Look Expensive Without Spending a Fortune?
- The Rod Placement Formula Every Interior Designer Uses (But Rarely Explains)
- How to Hang Curtains to Look Luxury: Fabric Weight and Panel Width Are Everything
- The Hardware Swap That Makes a $30 Panel Look Custom
- DIY Techniques That Replicate Custom Workroom Results
- The Biggest Mistakes That Make Windows Look Cheap (And How to Fix Each One)
The answer isn’t about fabric. It’s about confidence — specifically, the visual confidence that comes from correct proportion.
Most curtains look cheap because of installation error, not material quality. The rod is too low. The panels are too narrow. The hardware is too thin. Each of these mistakes quietly signals “afterthought” to anyone who walks into the room, even people who couldn’t articulate why the window looks off.
The good news is that these are mechanical problems with mechanical fixes. You don’t need a decorator’s budget. You need a drill, a tape measure, and the willingness to patch two extra holes in the drywall.
Here’s the core philosophy behind any successful DIY curtains to make home look expensive approach:
- Proportion — How the curtain relates to the window, the wall, and the ceiling
- Weight — How the fabric hangs, moves, and holds its shape
- Hardware — The rod, rings, and finials that frame the entire treatment
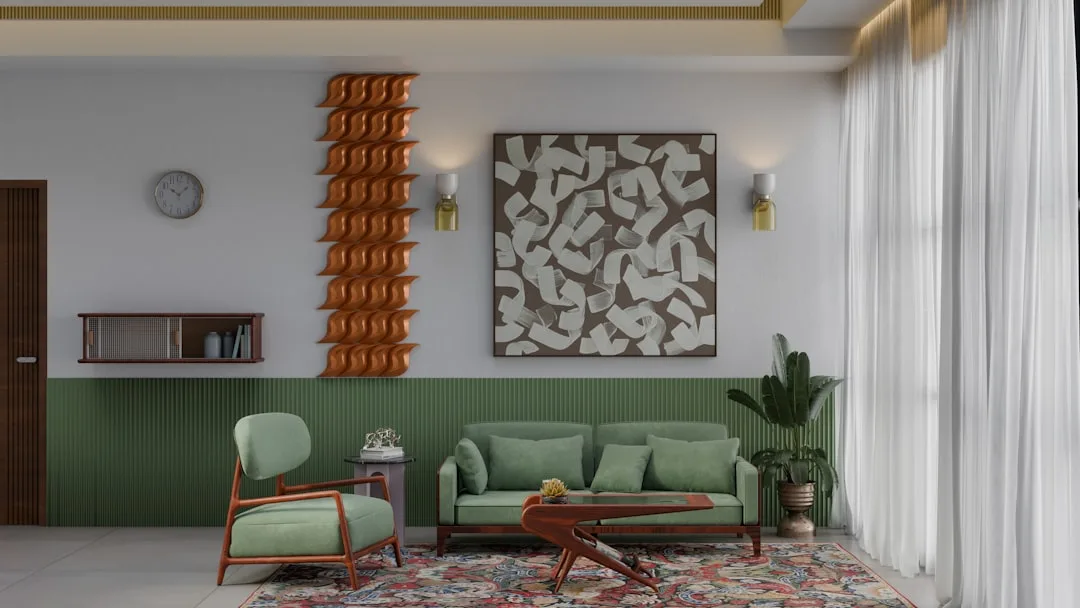
Visual perception studies show that vertical lines have a measurable effect on perceived ceiling height — people consistently judge rooms with strong vertical elements as taller than they actually are. Curtains that run from near-ceiling to floor create exactly that vertical line. It’s one of the top five most cost-effective ways to make a room feel larger, ranking above paint color changes and furniture upgrades in terms of perceived impact per dollar spent.
The mistake most people make is treating curtains as a functional afterthought — something to control light and provide privacy. Professional designers treat them as architecture. The window is a wall feature. The treatment is a frame. Once you shift that thinking, every decision that follows becomes obvious.
The single most important thing you can do today: Before buying anything new, measure from your floor to your ceiling and from your window frame to where a rod could be mounted 4–6 inches below the ceiling. That measurement will tell you whether your current panels are even the right length — and most of the time, they’re not.
The Rod Placement Formula Every Interior Designer Uses (But Rarely Explains)
You’ve heard “hang your rod high.” Everyone has. What you haven’t heard is the actual formula — because articles that repeat the tip almost never explain the geometry behind it.
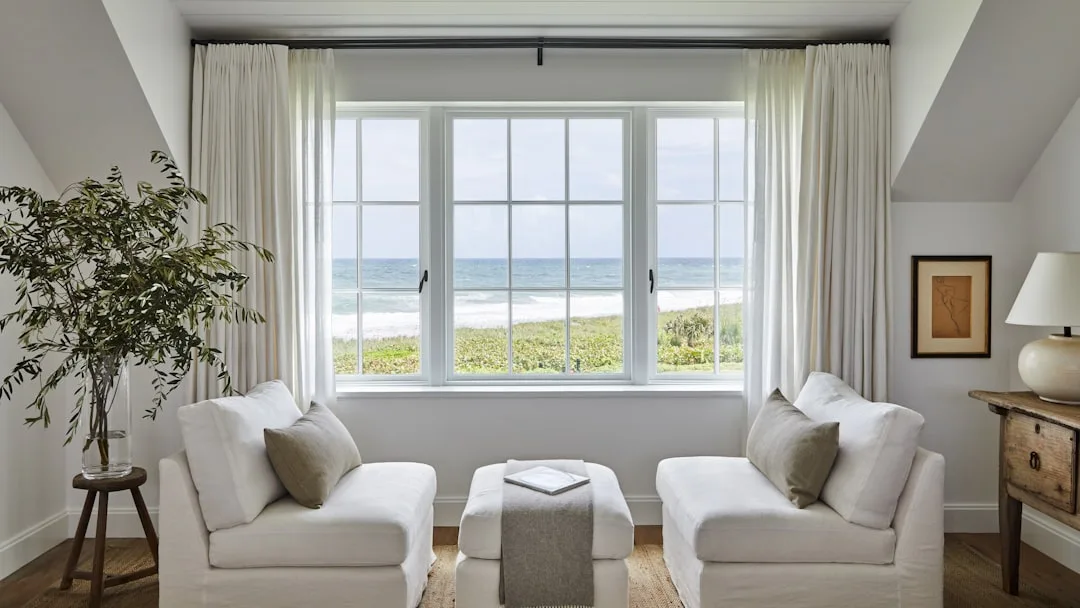
The rod should sit 4–6 inches below your ceiling or crown molding. Not “near the ceiling.” Not “higher than the window.” Four to six inches below the crown. In a standard 8-foot room, that puts your rod at roughly 90–92 inches from the floor. Most people hang their rods at 80–84 inches, directly above the window frame — and that 8-inch difference is the entire difference between a room that feels tall and one that feels average.
But here’s where the tip usually falls apart: people mount the rod high and keep it the same width as the window. That kills the effect entirely. The rod needs to extend 8–12 inches beyond each side of the window frame. This does two things simultaneously — it makes the window appear wider and grander, and it allows the panels to stack off the glass completely when open, so you’re not blocking any natural light.
For a standard 36-inch window, your rod should span roughly 52–60 inches total. For a 48-inch window, you’re looking at 64–72 inches. These aren’t decorating suggestions — they’re the actual numbers that replicate what you see in professionally styled rooms.
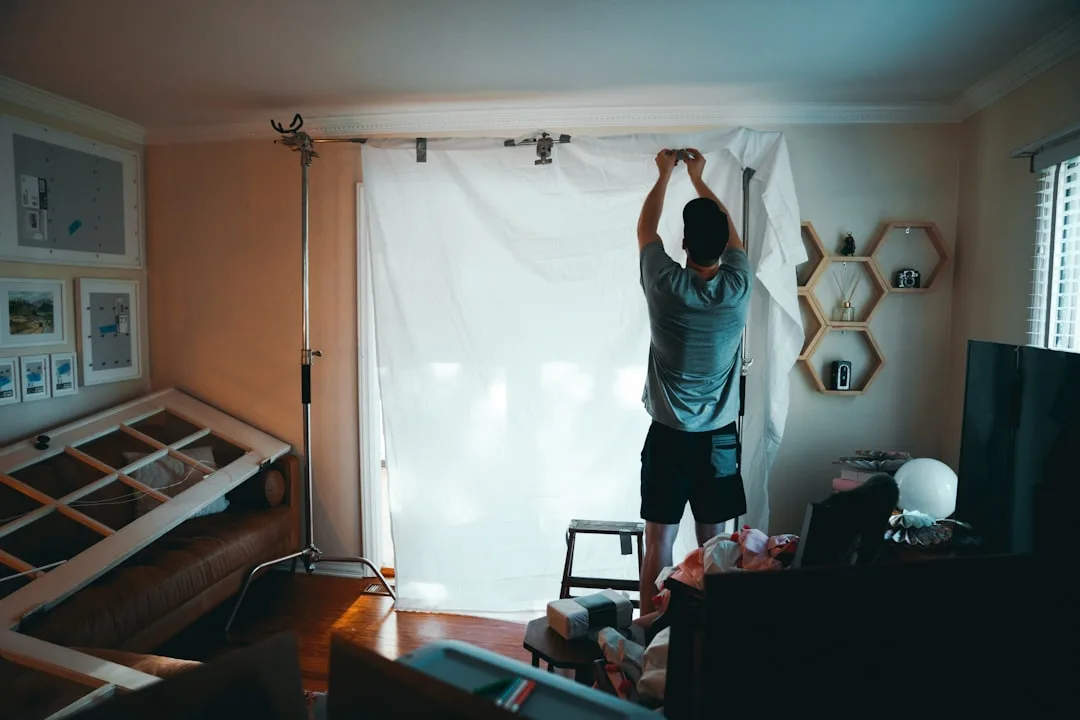
How to mark and install without guessing:
- Pick up a self-leveling laser level from any hardware store — they run $12–18 at Home Depot and project a perfectly horizontal line across the wall
- Set it on a shelf or step stool at your target rod height
- Mark both bracket positions with a pencil using the laser line as your guide
- Check your stud locations or use drywall anchors rated for at least 20 lbs per bracket
The common mistake that even people who’ve “done their research” make: hanging the rod high but buying panels that are too short. Rod height and panel length must be calculated together. If your rod is at 92 inches and you want a half-inch graze at the floor, you need 91.5-inch panels. Most store-bought panels come in 84-inch or 96-inch lengths. At 92 inches, you need the 96-inch panels — and if you’re buying 84-inch panels, either lower the rod or hem the extra fabric down.
Interior designers consistently rank the floor-to-ceiling visual illusion among the top five most cost-effective interventions in a room refresh — more impactful per dollar spent than repainting walls or replacing furniture. You’re not renovating. You’re repositioning two brackets.
Actionable takeaway: Remount your existing rod 4–6 inches below the ceiling and extend the rod width 8–10 inches past each side of the window frame. Do nothing else. The room will look different by end of day.
How to Hang Curtains to Look Luxury: Fabric Weight and Panel Width Are Everything
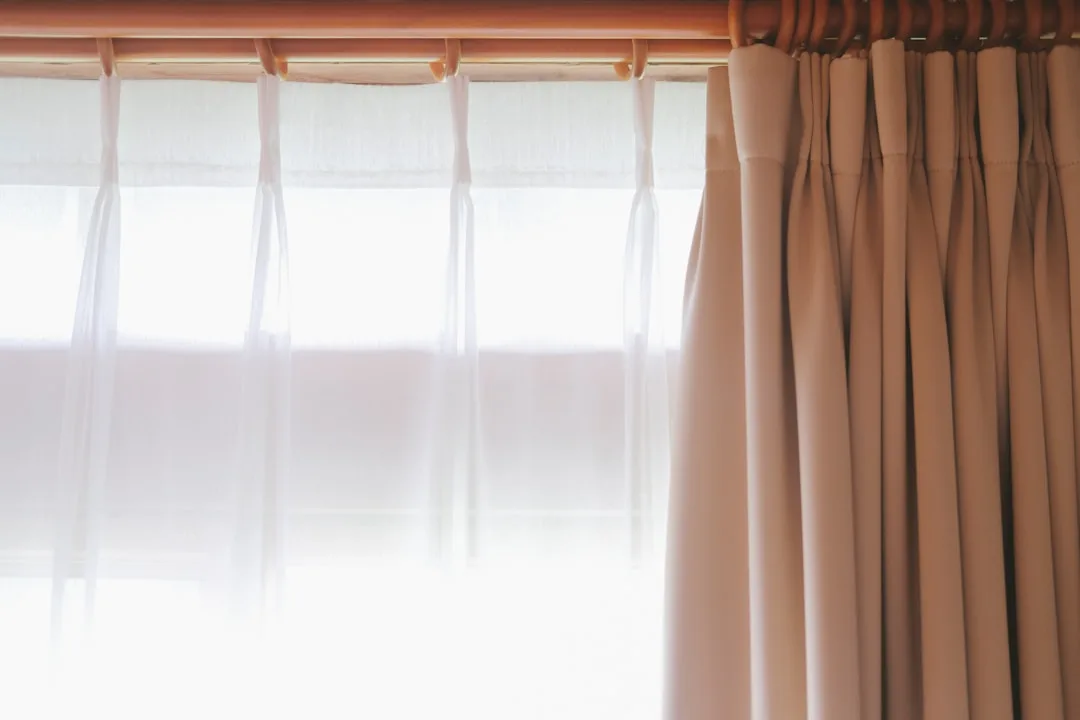
Custom drapery workrooms use fabric at 2.5 to 3 times the window width for full, structured panels that hold their shape and move with authority. Store-bought panels are almost universally cut at 1.5 times — which is why they look flat and thin even when the fabric quality is decent. The fullness ratio is the single biggest gap between what you buy at a big-box store and what a workroom produces.
You can close that gap without sewing a single seam. The fix is simple: buy more panels. Instead of one pair for a 48-inch window, buy two pairs and hang all four panels on the same rod. The fabric volume doubles. The stack depth at each side increases. The window suddenly reads as a feature rather than an afterthought — and the total cost difference is often under $40.
Fabric weight matters just as much as fabric volume. Lightweight polyester panels billow, crease at odd angles, and lose their shape the moment a door opens in the hallway. The panels that photograph well and hold their structure in real rooms share one characteristic: they have enough weight to hang in a straight, clean line from ring to floor.
What to look for when shopping:
- Linen blends — The best value in the medium weight category. They drape beautifully, wrinkle in a way that looks intentional rather than sloppy, and respond well to steaming
- Velvet — Heavy, light-blocking, and inherently luxurious. A $25 velvet panel from IKEA or Amazon will outperform a $60 sheer polyester panel on every visual metric
- Cotton canvas — Structured and crisp, works especially well in rooms that need a more tailored, less romantic feel
- Blackout-lined panels — The lining adds weight and body to panels that would otherwise hang limp, which is why designers often add blackout lining to decorative panels even in rooms that don’t need light control
The steamer is not optional. Every wrinkle in your curtain fabric reads as a visual interruption — a break in the clean vertical line that makes expensive curtains look expensive. A handheld garment steamer ($25–35) used on freshly hung panels will eliminate 90% of the creases and wrinkles that make budget fabric look budget. Steam the panels while they’re hanging, working from top to bottom in slow, steady passes. Let gravity do the rest.
Puddle, graze, or hover: These are the three floor-length options and each sends a different signal.
- Puddle — 3–6 inches of extra fabric pooling on the floor. Formal, romantic, high-maintenance. Works in dining rooms and primary bedrooms where the look justifies the dust-collecting.
- Graze — Half an inch to one inch of contact with the floor. The professional standard for most rooms. Clean, intentional, works in every style.
- Hover — Half an inch above the floor. Acceptable in high-traffic areas or rooms where the floor gets wet, but harder to pull off without looking like the panels are simply too short.
For most DIY curtains to make home look expensive projects, the graze is the right call. It’s forgiving of minor measurement errors, looks deliberate in every style of room, and photographs well in both wide shots and detail images.
The Hardware Swap That Makes a $30 Panel Look Custom
Hardware is where the visual weight of the entire treatment lives. A substantial rod with solid finials signals permanence and intention. A thin, bendy rod with plastic end caps signals temporary and cheap — regardless of what’s hanging from it.
The upgrade math is straightforward. A 1-inch diameter rod reads as decorative. A 3/4-inch rod reads as functional at best. The difference in cost at most home improvement stores is under $15, and the visual difference is immediate.
What to look for in budget hardware that reads as expensive:
- Matte black, unlacquered brass, or brushed nickel finishes — these age gracefully and photograph well
- Rods with a minimum 1-inch diameter — anything thinner will bow under the weight of heavier panels
- Solid or heavy finials — the finial is the punctuation mark at each end of the rod; a substantial finial anchors the treatment visually
- Rings with clips instead of grommets — clip rings allow you to adjust heading height and create a more tailored, custom look without sewing
The bracket gap problem: Most standard brackets position the rod 2–3 inches from the wall. For heavy, full panels, this creates an awkward gap where the fabric doesn’t fall cleanly. Look for brackets that extend 3–4 inches from the wall — this gives the fabric room to move and stack properly, especially important at the sides where panels need to clear the window frame.
One underused hardware trick: double rod brackets. Installing a double rod allows you to hang a sheer panel behind a heavier decorative panel on the same bracket system. This is how hotels and high-end residential projects achieve that layered look without custom tracks. The sheers stay closed for daytime privacy and light diffusion; the outer panels frame the window and add visual weight. Total hardware cost for this setup runs $35–55 for most standard windows.
DIY Techniques That Replicate Custom Workroom Results

The gap between store-bought and custom isn’t skill — it’s technique. These are the specific steps that workrooms use and most homeowners skip.
French pleat vs. pinch pleat vs. ripple fold: The heading style — how the fabric attaches to the rod — is the most visible differentiator between basic and custom. Grommet-top panels are the most common store-bought option and the least flexible visually. They create a rigid, uniform fold pattern that reads as catalog rather than custom.
Clip rings solve this immediately. By clipping the fabric at evenly spaced intervals (typically every 4–6 inches), you create a soft, consistent fold pattern that mimics the look of tailored pleats without any sewing. The trick is in the spacing — too far apart and the folds are sloppy; too close and the heading looks stiff.
For a more intentional look without investing in custom sewing, try this workroom technique: before hanging, fold the top 4 inches of each panel back onto itself and press with an iron. This creates a clean, weighted header that hangs straighter and adds a subtle layered look at the top of the panel.
Training your curtains: New panels, especially linen and cotton blends, need to be trained into their fold pattern. After hanging and steaming, physically fold each panel into its natural pleat lines and loosely tie a strip of fabric or ribbon around the middle section of the panel. Leave it tied for 24–48 hours. When you remove the tie, the fabric retains the fold memory. This is standard practice in residential staging and the reason freshly installed curtains in model homes look so structured.
Weighted hem tape: Available at any fabric store for under $5 per roll, hem weights are small lead or steel pellets sewn or pressed into the bottom hem of a panel. They add enough downward tension to keep the hem perfectly straight and prevent the panel from swaying or lifting in air-conditioned rooms. Workrooms use them on every panel, regardless of fabric weight. For DIY projects, iron-on hem tape with a thin strip of weighted chain threaded through the bottom hem achieves the same result without sewing.
The lining shortcut: If you’ve purchased unlined panels, iron-on blackout lining fabric can be bonded to the back of each panel using fusible webbing tape. This adds both visual body and actual light control. The result is a panel that hangs like a lined drapery, blocks light like a blackout shade, and cost roughly half of what a pre-lined panel would run at retail. The process takes about 20 minutes per panel and requires only an iron and a hard flat surface.
The Biggest Mistakes That Make Windows Look Cheap (And How to Fix Each One)
Even after following the right steps, a few specific errors consistently undermine otherwise well-executed window treatments. These are the ones that appear most often in before-and-after consultations.
Mistake 1: Matching curtain color exactly to the wall. When curtain fabric is the same shade as the wall behind it, the panels disappear visually. The window loses definition and the entire wall reads as flat. The fix is to go one or two shades darker or lighter than the wall color, or choose a texture that reads differently even in the same color family — a nubby linen against a smooth painted wall, for example.
Mistake 2: Two panels for a wide window. A single pair of panels on a 72-inch or wider window will never have enough fabric volume to look full. The standard fix is four panels minimum — two stacked per side — which creates the depth and weight the window needs.
Mistake 3: Skipping the return. The “return” is the small portion of fabric that wraps from the front of the panel around to the wall, closing the gap between the panel edge and the wall surface. Without a return, you can see daylight and wall space between the curtain and the wall when viewed from an angle, which makes the installation look unfinished. Returns are achieved either through specific hardware brackets that position the rod closer to the wall or by training the outer edge of each panel to fold back toward the wall naturally.
Mistake 4: Ignoring the ceiling line. In rooms with crown molding, the rod should sit just below the molding profile, not above it or flush with the top of the window. In rooms without crown molding, mounting within 4 inches of the ceiling is the standard. Either way, the rod height should reference the ceiling, not the window.
Mistake 5: Inconsistent hardware across rooms. Mixing brushed nickel in one room with matte black in the next and oil-rubbed bronze in a third fragments the visual language of the home. Choosing one finish for all window hardware throughout the main living areas creates a cohesive, intentional look that reads as designed rather than assembled.
FAQ
What is the correct height to hang curtain rods?
The rod should be mounted 4–6 inches below the ceiling or crown molding — not above the window frame. In a standard 8-foot room, that puts the rod between 90 and 92 inches from the floor. This placement creates the floor-to-ceiling vertical line that makes rooms feel taller and windows feel grander. Most people hang rods at 80–84 inches, which is why most rooms feel average rather than elevated.
How wide should the curtain rod extend past the window?
The rod should extend 8–12 inches beyond each side of the window frame. For a 36-inch window, that means a rod spanning 52–60 inches total. This width allows the panels to stack completely off the glass when open, which maximizes natural light and makes the window appear significantly wider than it actually is.
How many curtain panels do I need for one window?
Most windows need more panels than the standard one pair. For any window wider than 48 inches, use two pairs — four panels total. Custom workrooms use 2.5 to 3 times the window width in fabric; most store-bought panels are cut at 1.5 times, so doubling the panel count closes that gap and creates the full, structured look associated with expensive drapery.
What curtain length looks most expensive?
The graze — where the panel makes half an inch to one inch of contact with the floor — is the professional standard for most rooms. It reads as intentional and precise without the maintenance demands of a floor puddle. Panels that hover above the floor by more than an inch consistently read as too short, regardless of fabric quality or hardware.
Can I make cheap curtains look expensive without replacing them?
Yes — and the rod position is the first fix to make. Remounting your existing rod 4–6 inches below the ceiling and extending it 8–10 inches past each side of the window frame will change the room immediately, even with the same panels. After that: steam the fabric to remove wrinkles, add clip rings if the current attachment style is grommet-top, and consider adding a second pair of panels to increase fabric fullness. These three changes alone account for most of the visual difference between a budget window treatment and one that looks custom.
How do I make my curtains look expensive?
What is the correct height to hang curtain rods?
What does Martha Stewart use instead of curtains?
The rod should be mounted 4–6 inches below the ceiling or crown molding — not above the window frame. In a standard 8-foot room, that puts the rod between 90 and 92 inches from the floor. This placement creates the floor-to-ceiling vertical line that makes rooms feel taller and windows feel grander. Most people hang rods at 80–84 inches, which is why most rooms feel average rather than elevated.
How to hang curtains to look luxury?
How wide should the curtain rod extend past the window?
Can cheap curtains actually look expensive?
The rod should extend 8–12 inches beyond each side of the window frame. For a 36-inch window, that means a rod spanning 52–60 inches total. This width allows the panels to stack completely off the glass when open, which maximizes natural light and makes the window appear significantly wider than it actually is.