Most floating shelf projects don’t fail during the build — they fail six months later when the shelf sags, pulls from the wall, or looks nothing like the inspiration photo that started the whole project. The tutorials make it look simple. The finished photos make it look effortless. What they skip is everything that happens between drilling the first hole and stepping back to admire a shelf that actually holds weight and looks intentional.
Quick Answer
Most floating shelf projects don’t fail during the build — they fail six months later when the shelf sags, pulls from the wall, or looks nothing like the inspiration photo that started the whole project.
This is that missing information.
Can You DIY Floating Shelves in a Living Room Without Prior Experience?
In This Article
- Can You DIY Floating Shelves in a Living Room Without Prior Experience?
- Is It Cheaper to Buy or Build a Shelf? A Real Cost Breakdown
- The 6 Most Damaging Mistakes People Make With Living Room Shelf Placement
- Wall Type Changes Everything: How to Plan Your Build Around Your Specific Wall
- Are Floating Shelves Out of Style in 2026? What Interior Design Trends Actually Show
- The Hidden Cleat Method: Why It Produces Cleaner Results Than Bracket Builds
- How to Style DIY Shelves So They Look Designed, Not Decorated
Yes — but the honest answer comes with a condition: your skill level should determine which method you choose, not which photos you saved to Pinterest.
There are three distinct tiers of difficulty hiding under the umbrella term “DIY floating shelf,” and confusing them is how beginners end up with wobbly shelves and patched drywall.
Tier 1 — Bracket-and-board (beginner): You buy a decorative bracket, mount it to the wall, lay a finished board on top. The bracket is visible. The build takes an afternoon. If you can use a drill and read a level, you can do this.
Tier 2 — Hidden cleat system (intermediate): A wall-mounted cleat supports a hollow shelf box that slides over it, hiding all hardware. Clean result, more precise build. You’ll need to cut lumber at angles and build a simple box. This is the method that produces the results people are actually pinning.
Tier 3 — Fully hollow architectural box shelf (advanced): Custom dimensions, mitered corners, potentially routed edges. Looks like it was built into the room. Requires a table saw, clamps, and genuine patience with wood filler and finish work.
The minimum tool set for any of these is non-negotiable: a quality stud finder, a 4-foot level, a drill/driver, and appropriate bits. You don’t need a workshop. You do need those four things.
Here’s what actually matters more than carpentry skill: understanding your wall and how to anchor into it properly. A perfectly built shelf fails if it’s mounted wrong. According to the American Housing Survey, roughly 68% of U.S. homes have standard drywall interior walls — but homes built before 1950 frequently have plaster, which requires different anchoring hardware entirely, and rewards a stud finder that actually works on dense walls.
Before you buy a single board, spend 20 minutes mapping your studs and identifying your wall type. That knowledge determines everything else.
Is It Cheaper to Buy or Build a Shelf? A Real Cost Breakdown
The “DIY saves money” argument is true in specific circumstances and not at all true in others. Here are the actual numbers.
Pre-made floating shelf options span a wide range:
- IKEA LACK shelf (43 inches): around $20
- West Elm floating wood shelf (36 inches): $129–$179
- CB2 staggered wall shelf systems: $200–$400+
A standard 48-inch DIY shelf with a hidden cleat build runs $35–$65 in materials. That’s a pine or poplar board, the plywood for your cleat, and basic fasteners. Sounds like a clear win for DIY — until you account for what most tutorials quietly leave out.
The hidden cost stack competitors ignore:
- Sandpaper (multiple grits): $8–$12
- Wood filler and spackle: $6–$10
- Primer and paint or stain: $15–$25
- Cleat hardware and structural screws: $10–$15
- A second board when you measure wrong: $12–$20
Add those up and a $45 shelf becomes a $95 shelf. Still cheaper than West Elm, but the gap narrows.
Where DIY wins decisively: custom lengths. Retail floating shelves cap out around 48–60 inches, and options over 60 inches become scarce and expensive fast. If you want a shelf that runs wall-to-wall in a 9-foot living room, you’re building it or paying a carpenter to build it — there’s no IKEA shortcut. DIY also wins when you need to match existing trim color or wood species, which retail options simply can’t do.
Where buying wins: when your time has real dollar value attached to it. A mid-tier DIY build with finishing takes 6–10 hours across two days. If you bill $75/hour professionally, the math on a $100 savings doesn’t hold up.
The professional installation comparison is stark: a 2024 HomeAdvisor report found the average cost to have floating shelves professionally installed — materials and labor combined — runs $150–$350 per shelf. A DIY build done competently lands at $55–$100 per shelf. That’s a 60–80% cost reduction, which becomes meaningful fast when you’re installing three or four shelves on a single wall.
Run your real number: add up materials plus your hourly rate for estimated build time. That total tells you whether to build or buy.
The 6 Most Damaging Mistakes People Make With Living Room Shelf Placement
Most floating shelf projects fail in the planning phase, not at the drill. These are the six mistakes that show up repeatedly, and the last one is the one almost no tutorial mentions.
Mistake 1: Mounting shelves too high.
The visual sweet spot for living room floating shelves is 60 to 72 inches from the floor — roughly eye level when standing. Shelves pushed to ceiling height become inaccessible and visually disconnected from the furniture below them. Higher isn’t more dramatic; it’s just harder to use and harder to style.
Mistake 2: Going too shallow on depth.
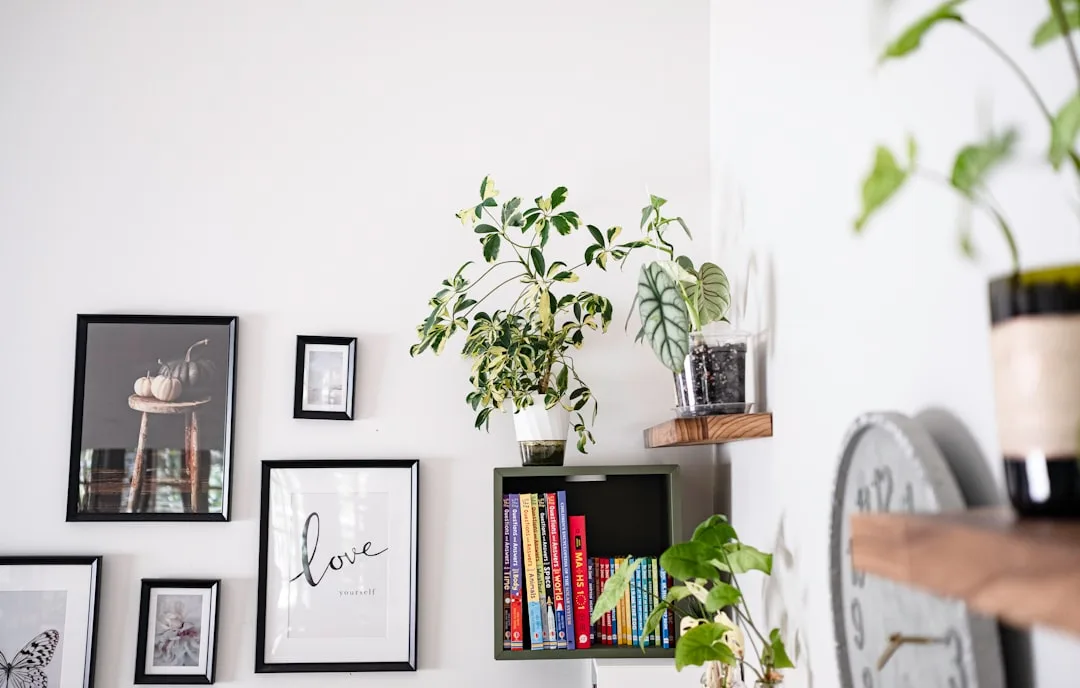
Shelves shallower than 10 inches can’t hold standard-size books upright without them tipping forward, and they can’t display objects with any visual weight. The sweet spot for living rooms is 10–12 inches of depth. That lets you layer items — a book in front of a plant in front of a small object — which is what makes a shelf look styled rather than stored.
Mistake 3: Skipping the stud map before buying lumber.
Wood studs are typically spaced 16 inches on center in residential construction. If you cut a 52-inch shelf without knowing where your studs fall, you may find yourself anchoring into drywall alone. Standard 3/4-inch pine or plywood can safely hold 20–25 lbs per linear foot when properly anchored into studs — drop that number significantly when you’re relying on drywall anchors between studs.
Mistake 4: Single-point anchoring on spans over 36 inches.
One cleat or bracket at each end works fine up to about 36 inches. Beyond that, mid-span deflection becomes a structural and aesthetic problem that develops slowly — you won’t notice it the week you install the shelf, but six to twelve months later the center will have dropped visibly.
Mistake 5: Finishing before final fitting.
Paint the shelf on the wall and you’ll get drips in corners, visible brush marks in awkward angles, and color mismatches where the painted shelf meets unpainted wall sections you missed. Always finish boards before installation, then touch up the seam after the shelf is mounted.
Mistake 6: Ignoring wall irregularities.
Most living room walls aren’t perfectly plumb. A quarter-inch variance across six feet is common and completely visible against a level shelf edge. Use a 4-foot level, shim where necessary, and check for baseboard projection if your shelf runs down to near the floor — the baseboard pushes the wall face forward by 1/2 to 3/4 inch, which throws off your shelf depth calculation.
Map your studs on paper before anything else. Mark them with painter’s tape on the wall and live with those marks for a day before committing to shelf positions.
Wall Type Changes Everything: How to Plan Your Build Around Your Specific Wall
This is the section most tutorials skip entirely, and it’s the one most likely to determine whether your shelf is still on the wall in three years.
Drywall over wood studs is the most forgiving scenario and covers roughly 68% of U.S. homes. Screw 2.5-inch structural screws directly into studs for any load-bearing installation. Between studs, use toggle bolts rated for your expected load — not the plastic “butterfly” anchors from the hardware bin, which work fine for picture frames and nothing heavier.
Plaster walls (common in homes built before 1960) require a different approach. Magnetic stud finders often fail here because the dense plaster layer interferes with the signal. An electronic stud finder set to “deep scan” mode works better, or use the knock-and-nail method: tap across the wall and listen for the denser sound where a stud sits, then confirm with a finish nail before committing your cleat. Pre-drill everything in plaster — skipping this cracks the wall surface, which is expensive and frustrating to repair.
Concrete and masonry walls (basement living spaces, some ground-floor condos) require a hammer drill and concrete sleeve anchors or wedge anchors. A standard cordless drill won’t penetrate masonry effectively, and standard drywall screws will strip immediately. This isn’t a harder build — it just needs the right tool. A hammer drill rents for around $35/day at most home improvement stores.
Metal stud construction is where people get into real trouble. The Steel Framing Industry Association estimates metal stud framing is used in roughly 40% of new commercial and residential construction — if you’re in a post-2000 condo or apartment, there’s a meaningful chance your walls are metal-framed. Standard wood screws don’t grip metal studs. You need toggle bolts or snap toggles (the Toggler brand SnapSkru is a reliable option) specifically rated for metal stud applications.
How to identify your wall type in under five minutes:
- Remove an outlet cover plate — the gap between the box and the wall surface reveals material thickness and type
- Use a strong magnet: it’ll stick to metal studs right through drywall
- Knock on the wall — plaster sounds denser and duller than drywall
- Check your home’s build date: pre-1950 strongly suggests plaster, post-2000 condo strongly suggests metal framing
Buy your hardware after you identify your wall type, not before — returning toggle bolts because you needed concrete anchors costs you a trip and a week of delay.
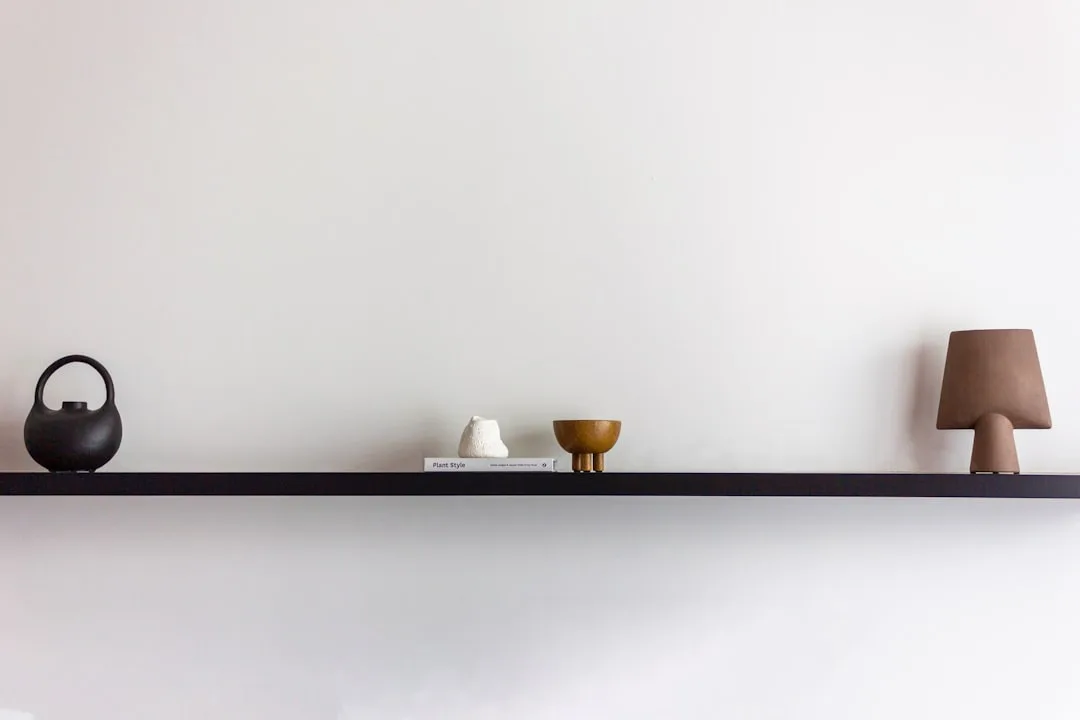
Are Floating Shelves Out of Style in 2026? What Interior Design Trends Actually Show
The honest answer is this: the shelf itself isn’t dated. The way most people style them absolutely is.
What’s genuinely falling out of favor is the aesthetic that dominated Pinterest from roughly 2018 to 2022 — the all-white shelf with a succulent, a single candle, and a stack of three books with the spines turned inward. That look has been recreated so many millions of times that it now reads as a visual cliché rather than a design choice.
What’s current in 2025–2026 is noticeably different in material, proportion, and attitude:
- Thicker shelf profiles — 2-inch-plus face depth instead of the thin floating slab look
- Mixed materials — walnut paired with black powder-coated steel, concrete shelves with brass hardware, live-edge wood with minimal industrial brackets
- Asymmetrical arrangements — shelves at different heights and lengths on the same wall rather than uniform horizontal rows
- Intentional negative space — designers are actively limiting displayed items to under seven per shelf, letting the wall breathe rather than filling every inch
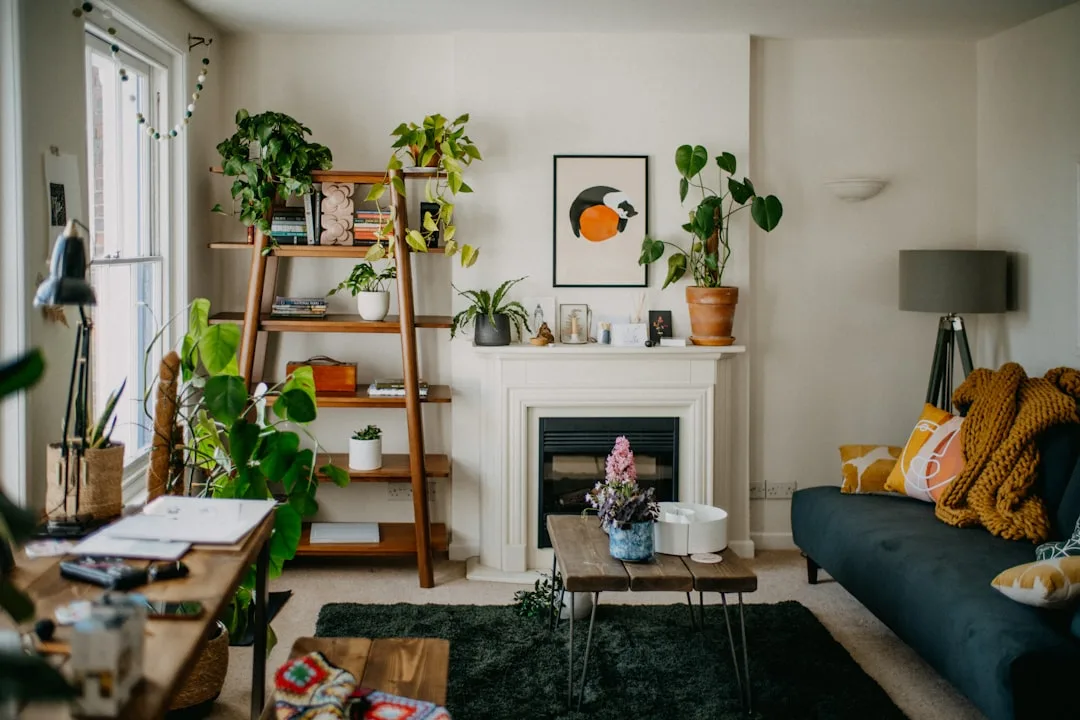
The “shelfie” aesthetic is saturated. The direction worth building toward is what experienced interior designers call architectural integration — shelves that feel like they belong to the room’s structure rather than something you added afterward. This means matching shelf material or stain to existing woodwork: your door frames, window trim, hardwood floor color. When a shelf shares a finish with the room’s fixed elements, it reads as part of the architecture rather than décor.
According to Pinterest’s 2025 Predicts report, searches for “warm minimalism” and “organic modern shelving” increased over 60% year-over-year — a clear signal that the cold, sparse floating shelf look is actively being replaced by warmer, more textured approaches that prioritize material quality over arrangement quantity.
The most future-proof floating shelf in 2026 isn’t a trendy shape. It’s a well-proportioned, properly finished shelf in a material that connects visually to the rest of the room.
If you’re choosing a finish right now, pull a sample from your door frames or floor and match to that — not to the shelves in someone else’s living room.
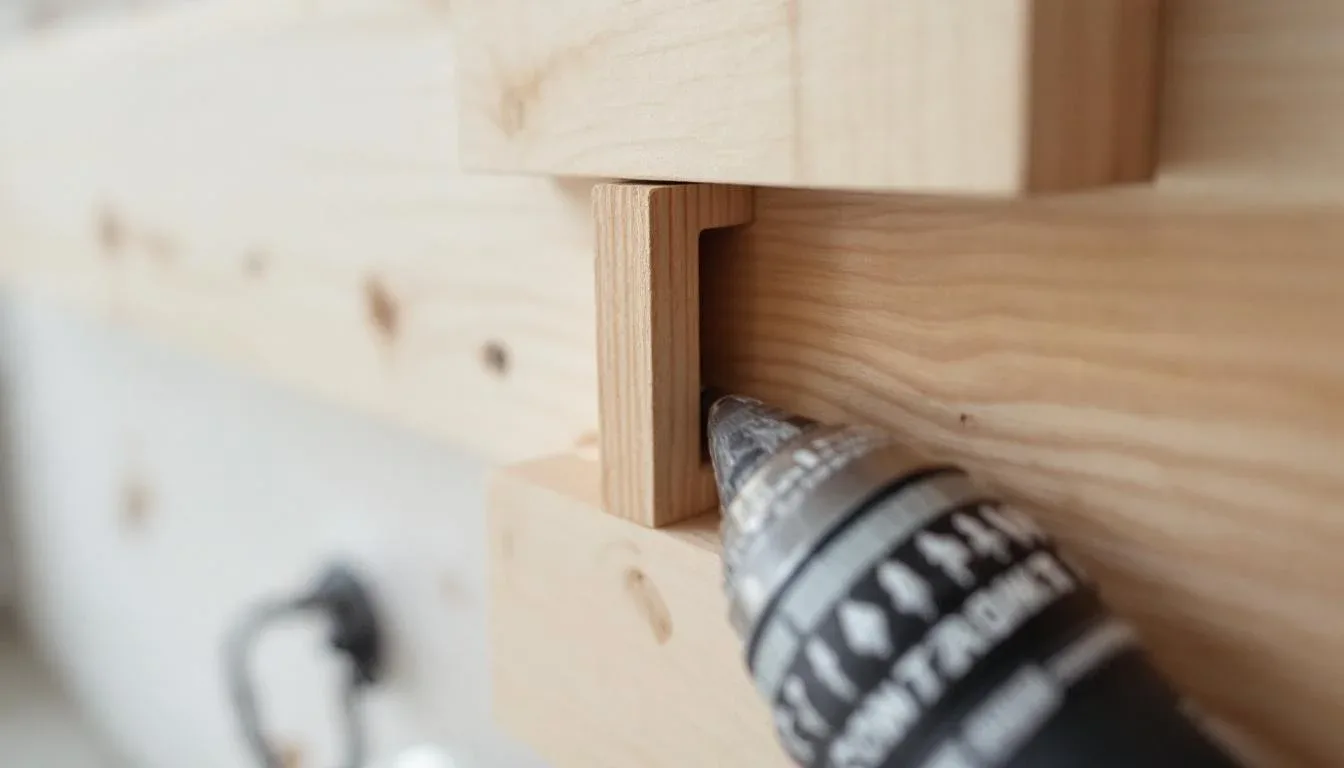
The Hidden Cleat Method: Why It Produces Cleaner Results Than Bracket Builds
The French cleat is the technique that separates shelf builds that look DIY from shelf builds that look like they were done by someone who really knew what they were doing. Zero visible hardware from the front. Zero visible hardware from the sides. Just a shelf that appears to float.
Here’s how it works: you cut a length of 3/4-inch plywood or solid lumber at a 45-degree bevel along one edge. Half of that beveled board mounts to your wall with the angled edge pointing upward and outward. The matching bevel on the shelf box hooks over it. Gravity does the rest — the more weight you put on the shelf, the more securely it locks to the wall cleat.
Materials for a cleat build:
- 3/4-inch plywood for the wall cleat (same stock can work for the shelf box)
- Matching solid lumber for the shelf face if you want a furniture-grade appearance
- Wood glue and clamps
- A circular saw or table saw set to 45 degrees
- 2.5-inch structural screws for wall mounting
- 1.25-inch screws for assembling the box
The installation sequence matters:
- Locate and mark all studs in the shelf zone
- Cut the wall cleat to length — it should span at least two studs
- Mount the wall cleat, checking level as you go
- Build the hollow shelf box separately on a workbench — top, bottom, and two end caps glued and pinned
- Test the fit before any finishing — slide the box over the cleat and check for gaps
- Remove, sand, finish, and reinstall
The precision requirement here is real. The interior cavity of the shelf box needs to clear the cleat by about 1/8 inch on each side — too tight and it won’t slide on cleanly, too loose and the shelf will wobble. Measure twice, cut once isn’t a cliché here; it’s the difference between a shelf that seats firmly and one that shifts when you set a book down.
Load capacity is the other major advantage. According to structural fastener load tables from manufacturers like Simpson Strong-Tie, a 2.5-inch structural screw driven into a wood stud has a shear strength of approximately 100 lbs per fastener. A cleat spanning two studs with four screws total creates a mounting system rated at 400+ lbs of shear capacity — well above anything a living room shelf will ever experience.
Build the box first, bring it to the wall to test fit against the cleat, then take it back to the bench to finish. Never finish in place if you can avoid it.
How to Style DIY Shelves So They Look Designed, Not Decorated
Building a solid shelf and styling it well are two completely different skills, and most tutorials abandon you at the drill. Here’s what actually makes the difference between a shelf that looks intentional and one that looks like you ran out of places to put things.
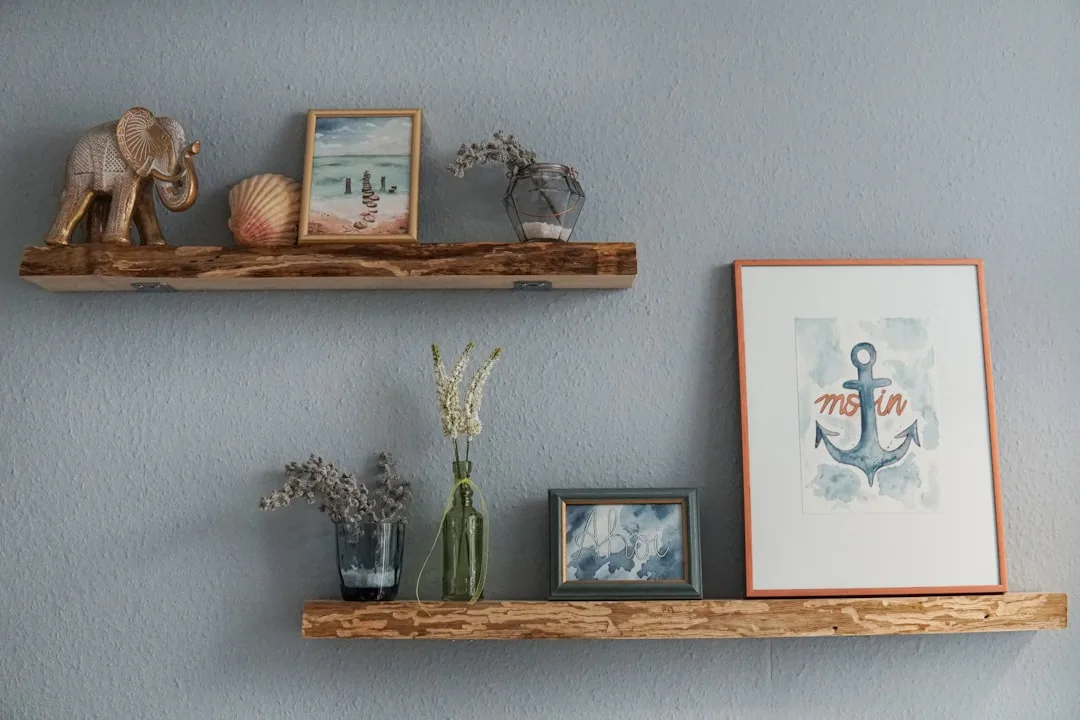
The rule of odd numbers is foundational. Group items in threes or fives, never pairs. Two identical objects sitting side by side reads as symmetrical decoration — the kind you see in hotels and staged homes. Three objects of varying heights and scale read as curation. This single rule will change how your shelves look immediately.
Vary height within each shelf by at least 3 inches. A row of same-height objects — a line of books all the same size, a row of matching vases — makes a shelf read as storage. The moment you introduce height variation, the shelf starts to read as a design decision. Stack two books horizontally under a plant. Lean a taller ceramic against a shorter one. The eye needs levels to travel across.
The 60/30/10 content ratio prevents the “junk shelf” problem:
- 60% solid objects — books, larger ceramics, meaningful objects with visual weight
- 30% decorative items — smaller plants, interesting vessels, one framed piece maximum per grouping
- 10% negative space — genuinely empty area that lets the shelf breathe and makes the displayed items feel chosen rather than crammed
Color cohesion across multiple shelves is what makes a whole wall feel like a design decision rather than a collection of individual shelves. Pick two or three colors that appear in your room and let those dominate the objects you display. Everything else gets stored somewhere else.
Lighting changes everything and costs almost nothing. A small LED puck light or a thin LED strip mounted to the underside of an upper shelf creates a warm glow that makes the shelf below it look intentional and elevated. Battery-operated options from brands like Govee or IKEA’s MITTLED system require no wiring and run for months on a charge. This single addition has more visual impact than any arrangement change you’ll make.
Interior designers consistently reference the triangle rule for shelf styling: place three anchor objects of varying heights to form an implied visual triangle on each shelf. This creates movement and prevents the eye from reading the shelf as a flat, static line. One tall object at one end, a medium-height object in the center-offset position, and a low object near the other end — the eye bounces between them rather than sliding off.
And the one styling mistake that dates a shelf fastest: too many picture frames. A shelf filled with frames looks like a wall of obligation rather than a display. Limit frames to one per shelf grouping, maximum.
Pull everything off your shelves today, set it on the floor, and rebuild from scratch using the 60/30/10 ratio. Most people discover they need to display about 40% less than they currently are.
Frequently Asked Questions
Can you DIY floating shelves in a living room without carpentry experience?
Yes, with the right method. The bracket-and-board approach — a decorative bracket mounted to the wall with a finished board on top — requires only the ability to use a drill and read a level. The hardware does the structural work; you’re providing placement and finishing. Where people without experience run into trouble is choosing a more advanced method (like a hidden cleat build) without accounting for the precision it requires, or choosing the wrong anchoring hardware for their wall type. Start with brackets if you’re new to this. The result is less minimal-looking, but it’s structurally sound and genuinely achievable in a few hours.
Is it cheaper to buy or build a floating shelf?
It depends on what you’re comparing. A standard DIY hidden cleat shelf in a 48-inch length costs $55–$100 in materials when you include finishing supplies — compared to $129–$179 for a comparable retail option from West Elm or similar. The gap grows significantly for longer spans: a 72-inch or longer shelf is difficult to source at retail and expensive when you find it, while the DIY material cost scales modestly. Where buying wins is on time: a mid-level DIY build takes 6–10 hours across two days. If professional installation is on the table, a 2024 HomeAdvisor report puts that cost at $150–$350 per shelf installed, making even a careful DIY build roughly 60–80% cheaper.
Are floating shelves out of style in 2026?
The shelf as a concept isn’t dated — the specific aesthetic that dominated the last five years is. All-white shelves styled with succulents and turned-spine books have been replicated so widely that they’ve lost any sense of individuality. What’s gaining traction in 2025–2026 is thicker shelf profiles, warm mixed materials (walnut with steel, natural wood with brass), and arrangements that prioritize negative space over maximum display. Pinterest’s 2025 trend data showed searches for “organic modern shelving” and “warm minimalism” up over 60% year-over-year. The most durable approach: build in a material that connects to your room’s existing woodwork, and style with restraint.
What are the most common mistakes with floating shelves?
The six that cause the most problems: mounting too high (above 72 inches from the floor disconnects shelves visually from the room), going too shallow in depth (under 10 inches limits what you can actually display), not mapping studs before cutting lumber (which forces you to rely on drywall anchors for heavy loads), single-point anchoring on spans over 36 inches (mid-span sag develops slowly but is eventually visible), finishing shelves after installation rather than before (drips, uneven coverage, and color mismatch are much harder to correct in place), and ignoring wall irregularities (a quarter-inch variance across six feet is visible against a level shelf edge). The mistake most people don’t anticipate is the stud-mapping step — skipping it forces structural compromises that show up months later.
Here’s the action you can take today: get your stud finder, a pencil, and two strips of painter’s tape, and map every stud across the wall where you want shelves. Mark the center of each stud with a vertical tape line. Then stand back and look at what you’re working with — stud spacing, any obstacles, the actual wall space available — before you buy a single piece of wood. That 15-minute exercise will tell you more about what you can realistically build than any tutorial you’ll find online.
Can you DIY floating shelves in a living room without carpentry experience?
The “DIY saves money” argument is true in specific circumstances and not at all true in others. Here are the actual numbers.
Is it cheaper to buy or build a floating shelf?
Pre-made floating shelf options span a wide range:
Are floating shelves out of style in 2026?
A standard 48-inch DIY shelf with a hidden cleat build runs $35–$65 in materials. That’s a pine or poplar board, the plywood for your cleat, and basic fasteners. Sounds like a clear win for DIY — until you account for what most tutorials quietly leave out.
What are the most common mistakes with floating shelves?
The hidden cost stack competitors ignore: